


Your vehicle deserves only genuine OEM Nissan parts and accessories. To ensure reliability, purchase Nissan part # 39100-58G60 Shaft Assembly-Front Drive R. It is sometimes referred to as Nissan Axle Shaft. Our Nissan parts and accessories are expedited directly from authorized Nissan dealers strategically located all across the U.S. and are backed by the manufacturer's 12 month, 12,000 mile warranty. OEM Nissan parts are the best for restoring your vehicle to factory condition performance. This part fits 1993-1994 Nissan Hardbody Pickup (D21), 1995-1997 Nissan Hardbody Pickup (D21U), 1996-2004 Nissan Pathfinder.
Affordable, reliable and built to last, Nissan part # 3910058G60 Shaft Assembly-Front Drive R stands out as the smart option. NissanPartsDeal.com is your prime online source with the biggest and best selection of genuine Nissan parts and accessories at giant discounted prices. We have the OEM Nissan parts and accessories you need at the wholesale prices. NissanPartsDeal.com has you covered no matter what type of Nissan vehicle you drive.
×
My Garage
My Account
My Cart
Make sure this part fits your vehicle
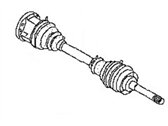
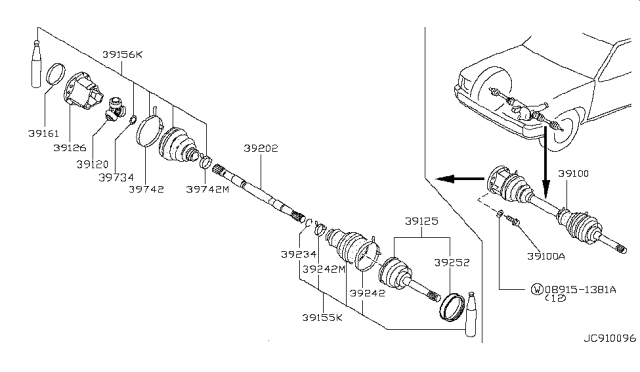
Nissan 39100-58G60 Shaft Assembly-Front Drive R
1993-2004 Nissan 3910058G60

- Part DescriptionShaft Assy-Front Drive
- Lookup Code39100
- PositionFront Passenger Side
- Replaces39100-58G00
- ManufacturerNissan
$605.90 MSRP: $814.38 1
You Save: $208.48 (26%)
Ships in 1-3 Business Days
Nissan Value Advantage Replacement Part

Part No. C9100-58G6JNW
Shaft Front Drive
Value Advantage Replacement Parts are designed as a high quality alternative to Original Equipment Parts for maintenance and/or vehicle repairs by Nissan.
$193.79 MSRP: $266.93 1
You Save: $73.14 (28%)
39100-58G60 Shaft Assembly-Front Drive R is Lookup Code 39100 in the diagram below
Product Specifications
Brand Genuine Nissan Lookup Code 39100 Manufacturer Part Number 39100-58G60 Part Description Shaft Assy-Front Drive Other Names Axle Assembly Manufacturer Note PLASTIC BOOT TYPE Item Dimensions 22.4 x 6.2 x 5.4 inches Item Weight 16.30 Pounds Position Front Passenger Side Condition New Fitment Type Direct Replacement Replaces 39100-58G00 Require Quantity 2 Manufacturer Nissan SKU 39100-58G60 Warranty This genuine Nissan part is guaranteed by Nissan's factory warranty. Shipping & Return Shipping Policy Return Policy Warning: California’s Proposition 65Vehicle Fitment
Year Make Model Trim & Engine Important vehicle option details 1993-1994 Nissan Hardbody Pickup (D21) DX|4 Cyl 2.4L KA24E 1995-1997 Nissan Hardbody Pickup (D21U) Long Body XE, SE, Short Body XE, XE|4 Cyl 2.4L KA24E 1996-2004 Nissan Pathfinder LE, SE, XE|6 Cyl 3.3L, 6 Cyl 3.5L VG33E, VQ35DE
Customer Questions & Answers
- Q:I want to make sure this part fits my car Posted by NissanPartsDeal Specialist
- A:You can Select Your Vehicle to check if 39100-58G60 fits your vehicle.Posted by NissanPartsDeal Specialist
- Q:How should the boots on the drive axles be maintained for the 2003 Nissan Pathfinder? Posted by Customer
- A:It's important to inspect the boots on the drive axles periodically for any damage or signs of leaking lubricant. If either boot on a drive axle is damaged, that drive axle needs to be removed in order to replace the boot.Posted by NissanPartsDeal Specialist
- See expert answers on similar Axle Shaft
- Q:What's the initial step before beginning work on the rear axle for the 2003 Nissan Pathfinder? Posted by Customer
- A:Start by loosening the rear wheel lug nuts. Then, raise the rear of the vehicle and make sure it's securely supported on jack stands placed under the frame rails. Additionally, block the front wheels to prevent any rolling off the stands.Posted by NissanPartsDeal Specialist
- See expert answers on similar Axle Shaft
- Q:How to remove and reinstall the front drive axle in a 4WD Nissan Pathfinder's front suspension system? Posted by Customer
- A:Loosen the wheel lug nuts, raise the front of the vehicle, and support it on jackstands. Remove the wheel. Remove the free-running hub, then remove the snap-ring from the axle shaft splines. The manufacturer recommends replacing the snap-ring with a new one whenever it is removed, but save the old one; it will be used for end play measurement purposes. Remove the skid plate, if equipped. Remove the axle shaft-to-axle shaft flange bolts. Have an assistant apply the brake as you loosen the bolts to prevent the axle shaft from turning. Separate the axle shaft from the axleshaft flange. Place a floor jack under the outer end of the lower control arm and raise it slightly. Separate the tie-rod end from the steering knuckle. Remove the cotter pin and loosen, but don't remove, the nut from the upper control arm ball joint. Break the steering knuckle loose from the ball joint by striking the steering knuckle boss where the ball stud passes through. Remove the nut and separate the upper control arm from the steering knuckle. Pull out on the knuckle and push the axle shaft through it, then maneuver the axle shaft out. Be careful not to stretch the brake hose and don't lose the thrust washer on the outer end of the axle shaft. For installation, inspect the needle bearing in the knuckle. If it shows signs of wear, replace it. If you install a new bearing, ensure it faces in the proper direction. Install the thrust washer on the axle shaft, if removed. The chamfer on the washer must face the center of the axle shaft. Lubricate the needle bearing in the steering knuckle with multi-purpose grease and also the axle shaft splines. Guide the axle shaft into position, pass the outer end through the knuckle, then reconnect the upper axle shaft through the ball joint to the steering knuckle. Tighten the nut and install a new cotter pin. Connect the inner end of the axle shaft to the axleshaft flange, install the bolts and tighten them. Connect the tie-rod end to the steering knuckle, tighten the nut, and install a new cotter pin. Install the snap-ring in the inner groove on the axle shaft. Using a dial indicator, measure the end play of the axle shaft in the hub. If the end play is satisfactory, remove the snap-ring, measure its thickness with a micrometer, and install a new one of the same thickness. If the end play isn't within the specified range, install a snap-ring of the proper thickness. Snap-rings are available in various thicknesses. Install the free-running hub assembly. Install the wheel and lug nuts. Lower the vehicle and tighten the lug nuts.For Pathfinder models, follow similar steps with some variations: After removing the wheel, pull off the hub cap. Before using pliers, move the cap off by driving a chisel between the cap and the drive flange, a little at a time. Remove the snap-ring from the end of the Axle Shaft, then unscrew the nuts and remove the drive flange from the hub. Remove the skid plate if present. Remove the Axle Shaft-to-axle shaft flange bolts with an assistant applying the brake. Separate the Axle Shaft from the axle shaft flange. Remove the three nuts and detach the ball joint from the control arm. Pull out on the knuckle, push the Axle Shaft through it, and maneuver it out. Be careful with the brake hose and the thrust washer on the Axle Shaft's outer end. For installation in Pathfinder models, inspect the needle bearing in the knuckle for wear, ensure the bearing's correct orientation, install the thrust washer on the Axle Shaft ensuring the chamfer faces the axle's center, lubricate the necessary parts, guide the Axle Shaft into position, and reconnect it. Ensure you connect the ball joint to the control arm, check the O-rings on the drive flange, and install the drive flange. Install the snap-ring in the groove on the Axle Shaft and measure its end play. Adjust the snap-ring if necessary, install the hub cap, and finalize with the wheel and lug nuts. Ensure the vehicle is lowered safely, and the lug nuts are tightened adequately.Posted by NissanPartsDeal Specialist
- Q:How should you handle the driveshaft during this process for the 2000 Nissan Pathfinder? Posted by Customer
- A:Before removing the driveshaft, mark the relationship of the driveshaft to the differential companion flange. Then, unbolt the driveshaft from the flange and support it with a piece of wire from the underbody.Posted by NissanPartsDeal Specialist
- See expert answers on similar Axle Shaft
- Q:What are the final steps after installing the axleshaft and related components for the 1999 Nissan Pathfinder? Posted by Customer
- A:Complete the remainder of the installation process by following the reverse of the removal steps. Check the differential lubricant level and add some if necessary. Afterward, bleed the brakes, install the wheel and lug nuts, lower the vehicle, and tighten the lug nuts to the specified torque.Posted by NissanPartsDeal Specialist
- See expert answers on similar Axle Shaft
- Q:What's a common misconception when diagnosing issues related to the axle for the 2004 Nissan Pathfinder? Posted by Customer
- A:Often, problems suspected to be related to the axle may actually stem from other causes. Therefore, it's crucial to perform a comprehensive examination of potential contributing factors before assuming that the axle is the root of the issue.Posted by NissanPartsDeal Specialist
- See expert answers on similar Axle Shaft
- Q:it fits in both sides? left and right? Posted by Customer: 2004 Nissan Pathfinder
- A:YES IT DOESPosted by NissanPartsDeal Specialist 11/1/2022
If you have any questions about this product, please don't hesitate to ask us. We will be happy to help you!
Genuine Nissan Part 39100-58G60, the Right Choice
Why choose Nissan Parts Deal
- Dedicated Service
Your complete satisfaction is our #1 goal
- Lowest Prices
Best deals on genuine OE parts from dealerships
- Fast Delivery
Orders are processed and delivered promptly