×
- Hello
- Login or Register
- Quick Links
- Live Chat
- Track Order
- Parts Availability
- RMA
- Help Center
- Contact Us
- Shop for
- Nissan Parts
- Nissan Accessories
My Garage
My Account
Cart
Genuine Nissan 240SX Steering Wheel
Navigation Steering Wheel- Select Vehicle by Model
- Select Vehicle by VIN
Select Vehicle by Model
orMake
Model
Year
Select Vehicle by VIN
For the most accurate results, select vehicle by your VIN (Vehicle Identification Number).
15 Steering Wheels found

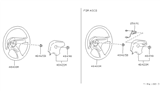
Nissan 240SX Steering Wheel Assembly W/O Pad
Part Number: 48430-51F00$527.86 MSRP: $813.35Limited AvailabilityYou Save: $285.49 (36%)
Nissan 240SX Steering Wheel
The Nissan 240SX Steering Wheel allows the operator to turn the hands to permit the precise movement of the front tires, allowing the sporty coupe to have confidence in taking turns. This device functions by rotating the Steering Wheel, and the rotary force travels through rack and pinion gears. In various model years, rack and pinions have been fitted with either hydraulic power steering or electric power steering systems. Thus, a slight twist aligns the front wheels together. The early 240SX versions applied an unadorned three-spoke Steering Wheel covered with a durable material. On later 240SX trim, the rim was a bit thicker and included cruise buttons while both are tough and hold up well to hard driving. Whatever variant you grab, the Steering Wheel translates driver input via solid mechanical contact, with no vibrations or stiffness so long as it is well maintained. If the wheel starts to shake, feels tight, or squeaks, owners of Nissan models can swap in a factory replacement for a reasonable price. Many Nissan enthusiasts, equipped with some basic tools, do the job at home, which saves on labor charges that vary by vehicle. Regular inspections ensure responsiveness of the Steering Wheel and stable handling.
If you need any OEM Nissan 240SX Steering Wheel, feel free to choose them out of our huge selection of genuine Nissan 240SX Steering Wheel. All our parts are offered at unbeatable prices and are supported by the manufacturer's warranty. In addition, we offer quick shipping to have your parts delivered to your door step in a matter of days.
Nissan 240SX Steering Wheel Parts Questions & Experts Answers
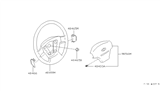
- Q: How to remove and install the steering wheel on Nissan 240sx?A:Before you take off or replace the steering wheel on your 1989-1992 Nissan 240SX, turn your wheels to face straight ahead and tilt the steering wheel sideways to be equal on both sides. Disconnect the battery ground cable. Step back and remove screws from the rear of the wheel. Unbolt the horn pad while moving the wire beyond reach, if needed. The method for removing and putting back on each horn button varies. Some you pop off, others you press up then remove, while others have a push in, turn clockwise way to remove them. When you have trouble taking off the horn pad, adjust the fixing screw behind the steering wheel before continuing. It's better to remove the horn switching block when necessary, but only if it gets in the way while you're taking out the wheels. Make sure to note where you put each piece. Use the pliers to connect two marks on the steering shaft right above the nylon nut and the wheel connecter. Take off the nut, then remove the steering wheel with a puller tool that won't chip the column shaft. Put the steering wheel back in place, following the same steps, and line up the punch marks. Also grease the turn signal cancel and horn ring. Be careful not to drive or hammer the wheel when putting it in place to keep the supporting column safe. Last, tighten the steering wheel nut to its prescribed torque and put on the horn button parts, before making sure everything works correctly, with the recommended steering wheel nut torque of 22-29 foot-pounds.

Related Nissan 240SX Parts
 Nissan 240SX Clock Spring
 Nissan 240SX Cruise Control Switch
 Nissan 240SX Steering Column Cover
 Nissan 240SX Cruise Control Servo
 Nissan 240SX Sway Bar Link
 Nissan 240SX Cruise Control Module
 Nissan 240SX Steering Column
 Nissan 240SX Air Bag
 Nissan 240SX Air Bag Control Module
 Nissan 240SX Intermediate Shaft