×
- Hello
- Login or Register
- Quick Links
- Live Chat
- Track Order
- Parts Availability
- RMA
- Help Center
- Contact Us
- Shop for
- Nissan Parts
- Nissan Accessories
My Garage
My Account
Cart
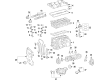
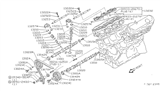
Genuine Nissan Altima Lash Adjuster
Lash Adjuster Lifter- Select Vehicle by Model
- Select Vehicle by VIN
Select Vehicle by Model
orMake
Model
Year
Select Vehicle by VIN
For the most accurate results, select vehicle by your VIN (Vehicle Identification Number).
218 Lash Adjusters found

Nissan Altima Lifter-Valve
Part Number: 13231-1KC6E$45.40 MSRP: $62.59You Save: $17.19 (28%)Ships in 1-2 Business Days
Nissan Altima Lifter-Valve
Part Number: 13231-1KC4A$33.02 MSRP: $45.52You Save: $12.50 (28%)Ships in 1-3 Business Days
Nissan Altima Lifter-Valve
Part Number: 13231-8J060$33.33 MSRP: $45.95You Save: $12.62 (28%)Ships in 1-3 Business Days
Nissan Altima Lifter-Valve
Part Number: 13231-JA10A$30.84 MSRP: $42.51You Save: $11.67 (28%)Ships in 1-3 Business DaysNissan Altima Lifter-Valve
Part Number: 13231-1KC3B$33.33 MSRP: $45.95You Save: $12.62 (28%)Ships in 1-3 Business Days
Nissan Altima Lifter-Valve
Part Number: 13231-6RC0A$35.81 MSRP: $49.37You Save: $13.56 (28%)Ships in 1-3 Business Days
Nissan Altima Lifter-Valve
Part Number: 13231-2Y818$55.11 MSRP: $75.97You Save: $20.86 (28%)Ships in 1-3 Business DaysNissan Altima Lifter-Valve
Part Number: 13231-2Y873$55.95 MSRP: $77.13You Save: $21.18 (28%)Ships in 1-3 Business Days
Nissan Altima Lifter-Valve
Part Number: 13233-1KC4E$18.73 MSRP: $25.82You Save: $7.09 (28%)Ships in 1-3 Business DaysNissan Altima Lifter-Valve
Part Number: 13233-1KC1E$18.73 MSRP: $25.82You Save: $7.09 (28%)Ships in 1-3 Business DaysNissan Altima Lifter-Valve
Part Number: 13233-1KC2E$20.40 MSRP: $28.12You Save: $7.72 (28%)Ships in 1-3 Business DaysNissan Altima Lifter-Valve
Part Number: 13233-1KC3E$20.90 MSRP: $28.82You Save: $7.92 (28%)Ships in 1-3 Business DaysNissan Altima Lifter-Valve
Part Number: 13233-1KC0E$20.90 MSRP: $28.82You Save: $7.92 (28%)Ships in 1-3 Business DaysNissan Altima Lifter-Valve
Part Number: 13231-1KC1E$30.08 MSRP: $41.47You Save: $11.39 (28%)Ships in 1-3 Business DaysNissan Altima Lifter-Valve
Part Number: 13233-1KC4C$31.06 MSRP: $42.82You Save: $11.76 (28%)Ships in 1-3 Business DaysNissan Altima Lifter-Valve
Part Number: 13233-1KC0D$31.06 MSRP: $42.82You Save: $11.76 (28%)Ships in 1-3 Business DaysNissan Altima Lifter-Valve
Part Number: 13233-1KC0C$31.06 MSRP: $42.82You Save: $11.76 (28%)Ships in 1-3 Business Days

| Page 1 of 11 |Next >
1-20 of 218 Results
Nissan Altima Lash Adjuster
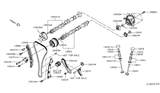
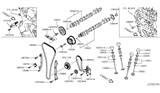
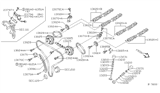
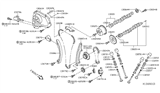
The Nissan Altima Lash Adjuster serves as the self-setting link between the camshaft motion and the intake or exhaust valve, keeping valve clearance correct so the engine stays quiet and efficient. It is a self-setting device. Similar to hydraulic tappets in classic engine layouts, every Lash Adjuster expands or contracts an internal plunger using pressurized engine oil. This mechanism takes up the slack that would require shimming otherwise. Solid styles were the norm for earlier generations, all of which required a scheduled adjustment. However, the later model years switched to the hydraulic Lash Adjuster because it maintained zero lash while the unit was running. As a result, premature wear was avoided and service life extended. The basic function never changed, but depending on the specific Altima engine family, Nissan offered either a bucket-type or roller-style Lash Adjuster setup. The roller version reduced friction at the cam-to-follower contact point for smoother revs and better fuel economy. Whatever the application, the small oil-fed Lash Adjuster has a quiet, yet powerful effect on maintaining valvetrain timing in every dependable Nissan Altima.
If you need any OEM Nissan Altima Lash Adjuster, feel free to choose them out of our huge selection of genuine Nissan Altima Lash Adjuster. All our parts are offered at unbeatable prices and are supported by the manufacturer's warranty. In addition, we offer quick shipping to have your parts delivered to your door step in a matter of days.
Nissan Altima Lash Adjuster Parts Questions & Experts Answers
- Q: Should the camshaft and lash adjuster be thoroughly inspected before installation, and what steps should be followed for their removal and reinstallation on V6 Nissan Altima?A:Camshafts and Lash Adjusters should always be closely examined before they are mounted and endplay of camshafts should be measured before camshafts are removed. Starting with the timing cover, take out the Timing Chains and the camshaft sprockets, also untwist the camshaft position sensors' brackets located at the driver ends of the cylinder heads. Remake the camshaft in order to its correct installation and label the camshaft bearing caps numbered 1 through 4 with indication of Intake or Exhaust with an 'I' or 'E' respectively and mark arrows to show the front end of the engine. Make certain all parts will have mark that will show that it has been originally taken from a particular cylinder head. Turn the camshaft bearing caps in a counter clockwise direction in two or three increments and in a sequence different from the tightening one, as the caps must not be mixed during replacement. Huntington beach 3 Remove the bearing caps and camshafts, marking the position of the camshafts for installation intent and the intake camshaft has a drilled spot on the side of the sprocket mounting flange. Pull out the Lash Adjusters from the cylinder head and while doing so, make sure that the Lash Adjusters are organized in a manner that they can be put back in place later on and check the camshaft and Lash Adjusters. First you should ensure the removal of all old RTV sealant for the bolts and the front bearing caps, and number one piston, if disturbed should be returned to TDC prior to its reassembly, and the Lash Adjusters should be liberally coated with clean engine oil before they are put back. Using the moly-based engine assembly lubricant, apply it to the camshaft lobes and journals, then fit the exhaust camshafts back in as they were with the dowel pins up and inline with the cylinder bank, the small dowel hole in each intake camshaft should be pointing up. Using the RTV sealant, apply a bead on the sealing surfaces of the No. 1 bearing cap(s) and cylinder head, place new O-rings on the LT2 secondary timing chain tensioner(s) and the IVT oil control drilling on the bearing cap(s). Fit the bearing caps and the bolts hand tight paying attention to the stamp marks, then tighten the bearing cap bolts in thirds to the required torque in the correct order. After that ensure that the front bearing caps are only about 0.0055 inches behind the front face of the cylinder head, if no ensure that the camshaft is reinstalled right again with the caps and then check again. Spread the camshaft sprockets on the engine block and fit the timing chain simultaneously and hold the camshafts with the help of a suitable wrench while tightening the sprocket bolts with the recommended torque. The rest of the installation is a mirror image of this removal and if any of the valve train elements were replaced; check and set the valve clearance. Last but not least, connect the battery, then, it is the time to complete certain relearn procedures.

Related Nissan Altima Parts

Browse by Year
2025 Lash Adjuster 2024 Lash Adjuster 2023 Lash Adjuster 2022 Lash Adjuster 2021 Lash Adjuster 2020 Lash Adjuster 2019 Lash Adjuster 2018 Lash Adjuster 2017 Lash Adjuster 2016 Lash Adjuster 2015 Lash Adjuster 2014 Lash Adjuster 2013 Lash Adjuster 2012 Lash Adjuster 2011 Lash Adjuster 2010 Lash Adjuster 2009 Lash Adjuster 2008 Lash Adjuster 2007 Lash Adjuster 2006 Lash Adjuster 2005 Lash Adjuster 2004 Lash Adjuster 2003 Lash Adjuster 2002 Lash Adjuster 2001 Lash Adjuster 2000 Lash Adjuster 1999 Lash Adjuster 1998 Lash Adjuster 1997 Lash Adjuster 1996 Lash Adjuster 1995 Lash Adjuster 1994 Lash Adjuster 1993 Lash Adjuster