×
- Hello
- Login or Register
- Quick Links
- Live Chat
- Track Order
- Parts Availability
- RMA
- Help Center
- Contact Us
- Shop for
- Nissan Parts
- Nissan Accessories
My Garage
My Account
Cart
How to use OE catalog
Genuine Nissan Camshaft
Cam
Currently shopping for
2001 Nissan Pathfinder
Change VehicleCategories Close X
Axle & Suspension
Body (Back Door & Rear Body)
Body (Front, Roof & Floor)
Body (Side & Rear)
Body Electrical
Brake
Engine Electrical
Engine Mechanical
Exhaust & Cooling
Fuel & Engine Control
Miscellaneous
Power Train
Seat & Seat Belt
Steering
6 Camshafts found


 Product Specifications
- Other Name: Camshaft Assy; Camshaft
- Replaces: 13061-1W600
- Lookup Code: 13020
- Item Weight: 8.30 Pounds
- Item Dimensions: 2.6 x 2.9 x 18.2 inches
- Condition: New
- Fitment Type: Direct Replacement
- SKU: 13061-1W696
- Warranty: This genuine part is guaranteed by Nissan's factory warranty.
 Product Specifications
- Other Name: Camshaft Assy; Camshaft
- Lookup Code: 13020
- Item Weight: 3.00 Pounds
- Item Dimensions: 16.6 x 2.0 x 2.0 inches
- Condition: New
- Fitment Type: Direct Replacement
- SKU: 13020-4W002
- Warranty: This genuine part is guaranteed by Nissan's factory warranty.


 Product Specifications
- Other Name: Camshaft Assy; Camshaft
- Replaces: 13001-1W600
- Lookup Code: 13001
- Item Weight: 5.30 Pounds
- Item Dimensions: 17.5 x 3.1 x 3.0 inches
- Condition: New
- Fitment Type: Direct Replacement
- SKU: 13001-1W696
- Warranty: This genuine part is guaranteed by Nissan's factory warranty.
 Product Specifications
- Other Name: Camshaft Assy; Camshaft
- Lookup Code: 13020+A
- Item Weight: 3.30 Pounds
- Item Dimensions: 16.5 x 2.1 x 2.1 inches
- Condition: New
- Fitment Type: Direct Replacement
- SKU: 13020-4W003
- Warranty: This genuine part is guaranteed by Nissan's factory warranty.
 Product Specifications
- Other Name: Camshaft Assy; Camshaft
- Lookup Code: 13020+C
- Item Weight: 3.30 Pounds
- Item Dimensions: 16.5 x 2.1 x 2.0 inches
- Condition: New
- Fitment Type: Direct Replacement
- SKU: 13020-4W011
- Warranty: This genuine part is guaranteed by Nissan's factory warranty.
 Product Specifications
- Other Name: Camshaft Assy; Camshaft
- Lookup Code: 13020+B
- Item Weight: 3.40 Pounds
- Item Dimensions: 16.5 x 2.1 x 2.1 inches
- Condition: New
- Fitment Type: Direct Replacement
- SKU: 13020-4W010
- Warranty: This genuine part is guaranteed by Nissan's factory warranty.
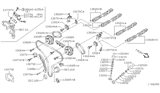
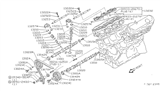
2001 Nissan Pathfinder Camshaft
Committed to delivering top-notch quality at affordable prices, our website is your go-to source for OEM 2001 Nissan Pathfinder Camshaft worldwide. Each of our genuine 2001 Nissan Pathfinder Camshaft come with a manufacturer's warranty, so rest assured, quality and cost are covered. With us, you're making a smart choice that stands the test of time.
Nissan Pathfinder Camshaft Parts Questions & Experts Answers
- Q: How to inspect the camshaft and Lash Adjuster on Nissan Pathfinder?A: During the inspection process, carefully examine the camshaft bearing surfaces for any signs of damage like pitting, score marks, galling, or abnormal wear. If any such issues are detected, the Cylinder Head will require replacement. Measure the outside diameter of each camshaft bearing journal and record these measurements, then measure the inside diameter of the corresponding camshaft bearings. Calculate the oil clearance for each bearing by subtracting the journal's outside diameter from the bearing's inside diameter, and compare these results to specified clearance values. If any measurements fall outside standard wear limits, either the camshaft, cylinder head, or both must be replaced. Check camshaft runout by setting it up with a dial indicator and turning it slowly to observe readings. Compare these readings to specified runout values, and if they exceed the specified limit, replace the camshaft. Measure the camshaft lobe height with a micrometer, comparing it to the specified cam lobe height and calculating wear. If wear exceeds specified limits, replace the camshaft. Inspect Lash Adjuster contact and sliding surfaces for wear and scratches, including valve Lash Adjusters and valve adjusting shims for 2.4L and 3.5L engines. If Lash Adjuster pads are worn, check corresponding camshaft lobes or adjusting shims, as they may also be worn. Measure the outside diameter of each Lash Adjuster with a micrometer and compare it to specifications; replace any Lash Adjuster worn beyond specified limits. Examine Lash Adjuster bore diameters and Lash Adjuster-to-guide clearances, comparing the results to specifications; replace Lash Adjuster guide assemblies (3.3L engines) or cylinder heads (2.4L and 3.5L engines) if bore wear exceeds specified limits. Subtract the Lash Adjuster's outside diameter from the Lash Adjuster bore's inside diameter and compare the difference to the specified clearance. Ensure that all parts, whether new or old, undergo thorough inspection before reassembly, and for 3.3L engines, inspect rocker arms and shafts, replacing rocker arms if the pads are worn, and avoid attempting to restore them by grinding the pad surfaces.
- Q: How to remove camshafts and Lash Adjuster on 2.4L four cylinder Nissan Pathfinder?A: Before proceeding with camshaft removal, always inspect the camshafts and lash adjusters thoroughly, and check the camshaft endplay. To begin removal, disconnect the battery cable, then remove the valve cover and air intake duct. Position the engine at TDC for cylinder one, marking the Timing Chain links and sprockets for reference, with additional markings for "I" (intake) and "E" (exhaust) on the sprockets. Loosen the camshaft sprocket bolts while holding the sprockets in place with a wrench, ensuring they remain aligned with the "TDC" marks on the Crankshaft Pulley. Remove the sprocket retaining bolts, disengage the timing chain, and remove the camshaft sprockets. Next, loosen and remove the camshaft bearing caps, keeping them in order. Lift the camshafts and mark them "I" or "E." To reuse them, they must return to their original location. Lift the lash adjusters and store them with their respective shims in labeled bags or a marked box. To install new camshafts, apply moly-based engine assembly lubricant, and place them in the cylinder head. Install the bearing caps and bolts, tightening them in a specific sequence. Engage the camshaft sprocket teeth with the timing chain links, align the match marks, position the sprockets over the dowels on the camshaft hubs, and install the camshaft sprocket bolts. Ensure the sprockets are correctly matched to the camshafts, and then tighten the sprocket bolts to the specified torque. Complete the installation by reversing the removal process.
- Q: How to remove and install the camshaft and lash adjuster on the 3.5L V6 Nissan Pathfinder?A: The camshafts and Lash Adjusters should always be thoroughly inspected before installation and camshaft endplay should always be checked prior to camshaft removal. Detach the cable from the negative terminal of the battery. Remove the upper and lower intake plenums and the valve covers. Remove the Timing Chains and the camshaft sprockets. Remove the variable valve timing valve(s) from the top of the number one camshaft journal(s). Mark the camshaft bearing caps from 1 to 4, and with an "I" or an "E", to indicate intake or exhaust. Also mark arrows indicating the front of the engine. Loosen the camshaft bearing caps in two or three steps, in the reverse order of the tightening sequence. Remove the bearing caps and the camshafts. Make a note of the camshaft markings to ensure correct installation. Remove the Lash Adjusters and shims from the Cylinder Head, keeping the proper shim with each Lash Adjuster. Inspect the camshaft and Lash Adjusters. Lubricate the Lash Adjusters with clean engine oil, then install the Lash Adjusters and shims into their original locations. Apply moly-based engine assembly lubricant to the camshaft lobes and journals. Install the camshafts in their original positions with the dowel pins facing up and inline with the cylinder bank. Apply a bead of RTV sealant to the sealing surfaces of the No. 1 bearing cap(s) and the cylinder head. Install new O-rings on the secondary timing chain tensioner(s) and the VVT oil control orifice on the No. 1 bearing cap(s). Install the bearing caps and bolts and tighten them hand tight. Tighten the bearing cap bolts in several steps, to the specific torque, using the proper tightening sequence. Install the camshaft sprockets and timing chain. Hold the camshafts with a suitable wrench as you tighten the sprocket bolts to the specified torque. The remainder of installation is the reverse of removal. If any part of the valve train was replaced, check and adjust the valve clearance.
- Q: How to remove the camshaft, camshaft seal, and lash adjuster on the 3.3L V6 Nissan Pathfinder?A: To remove the Lash Adjusters, start by removing the valve cover and rocker arm shaft assemblies. Secure the Lash Adjusters with rubber bands to prevent them from falling out of the guides. Remove the Lash Adjuster guide assembly and then remove the Lash Adjusters from the bores one at a time, keeping them in order. Avoid laying the Lash Adjusters on their side or upside down to prevent air from becoming trapped inside. If air is trapped, reinstall the rocker arm shaft assemblies and valve cover, and bleed the air from the Lash Adjusters by running the engine at 1,000 rpm for about 10 minutes. Inspect the Lash Adjusters for wear while they are out of the engine. To remove the camshafts, remove the Cylinder Heads and gently pry off the camshaft cover plate. Use holding lugs to secure the camshaft while loosening the retaining bolt, and remove the bolt and thrust plate. Carefully pry out the camshaft oil seal without scratching or nicking the camshaft. Pull the camshaft out of the cylinder head using a twisting motion. To install the camshafts, lubricate the bearing journals and lobes with moly-based engine assembly lube and carefully install them in the cylinder head. Install the camshaft thrust plate and retaining bolt, and check the camshaft endplay. If the endplay is outside the specified range, replace the thrust plate. Install the camshaft oil seal and complete the cylinder head assembly.
Categories Close X
Axle & Suspension
Body (Back Door & Rear Body)
Body (Front, Roof & Floor)
Body (Side & Rear)
Body Electrical
Brake
Engine Electrical
Engine Mechanical
Exhaust & Cooling
Fuel & Engine Control
Miscellaneous
Power Train
Seat & Seat Belt
Steering