×
- Hello
- Login or Register
- Quick Links
- Live Chat
- Track Order
- Parts Availability
- RMA
- Help Center
- Contact Us
- Shop for
- Nissan Parts
- Nissan Accessories
My Garage
My Account
Cart
How to use OE catalog
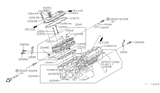
Genuine Nissan Cylinder Head
Head
Currently shopping for
2001 Nissan Pathfinder
Change VehicleCategories Close X
Axle & Suspension
Body (Back Door & Rear Body)
Body (Front, Roof & Floor)
Body (Side & Rear)
Body Electrical
Brake
Engine Electrical
Engine Mechanical
Exhaust & Cooling
Fuel & Engine Control
Miscellaneous
Power Train
Seat & Seat Belt
Steering
8 Cylinder Heads found

 Product Specifications
- Other Name: Head Assy-Cylinder; Cylinder Head
- Replaces: 11040-0W000
- Lookup Code: 11041
- Item Weight: 18.80 Pounds
- Item Dimensions: 21.2 x 8.8 x 5.2 inches
- Condition: New
- Fitment Type: Direct Replacement
- SKU: 11040-1W200
- Warranty: This genuine part is guaranteed by Nissan's factory warranty.
 Product Specifications
- Other Name: Head Assy-Cylinder,LH; Cylinder Head
- Position: Driver side
- Lookup Code: 11041M
- Item Weight: 27.50 Pounds
- Item Dimensions: 21.4 x 10.3 x 9.6 inches
- Condition: New
- Fitment Type: Direct Replacement
- SKU: 11090-4W005
- Warranty: This genuine part is guaranteed by Nissan's factory warranty.
- Product Specifications
- Other Name: Head Assy-Cylinder,LH
- Position: Driver side
- Lookup Code: 11041M
- Item Weight: 28.30 Pounds
- Item Dimensions: 22.6 x 11.1 x 9.4 inches
- Condition: New
- Fitment Type: Direct Replacement
- SKU: 11090-4W000
- Warranty: This genuine part is guaranteed by Nissan's factory warranty.
- Product Specifications
- Other Name: Cylinder Head
- Position: Driver side
- Lookup Code: 11041M
- Item Weight: 26.70 Pounds
- Item Dimensions: 22.1 x 10.1 x 9.5 inches
- Condition: New
- Fitment Type: Direct Replacement
- SKU: 11090-4W015
- Warranty: This genuine part is guaranteed by Nissan's factory warranty.
- Product Specifications
- Other Name: Head Assy-Cylinder; Cylinder Head
- Lookup Code: 11041
- Item Weight: 25.80 Pounds
- Item Dimensions: 17.9 x 10.2 x 10.1 inches
- Condition: New
- Fitment Type: Direct Replacement
- SKU: 11040-4W015
- Warranty: This genuine part is guaranteed by Nissan's factory warranty.
- Product Specifications
- Other Name: Head Assy-Cylinder; Cylinder Head
- Lookup Code: 11041
- Item Weight: 25.30 Pounds
- Item Dimensions: 17.0 x 10.4 x 9.4 inches
- Condition: New
- Fitment Type: Direct Replacement
- SKU: 11040-4W005
- Warranty: This genuine part is guaranteed by Nissan's factory warranty.
- Product Specifications
- Other Name: Head Assy-Cylinder
- Lookup Code: 11041
- Item Weight: 24.60 Pounds
- Item Dimensions: 17.2 x 10.3 x 9.2 inches
- Condition: New
- Fitment Type: Direct Replacement
- SKU: 11040-4W000
- Warranty: This genuine part is guaranteed by Nissan's factory warranty.
- Product Specifications
- Other Name: Head Assy-Cylinder,LH; Cylinder Head
- Position: Driver side
- Replaces: 11090-0W000
- Lookup Code: 11041M
- Item Weight: 10.20 Pounds
- Item Dimensions: 18.5 x 8.9 x 7.2 inches
- Condition: New
- Fitment Type: Direct Replacement
- SKU: 11090-1W200
- Warranty: This genuine part is guaranteed by Nissan's factory warranty.
2001 Nissan Pathfinder Cylinder Head
Committed to delivering top-notch quality at affordable prices, our website is your go-to source for OEM 2001 Nissan Pathfinder Cylinder Head worldwide. Each of our genuine 2001 Nissan Pathfinder Cylinder Head come with a manufacturer's warranty, so rest assured, quality and cost are covered. With us, you're making a smart choice that stands the test of time.
Nissan Pathfinder Cylinder Head Parts Questions & Experts Answers
- Q: How to remove and reinstall a cylinder head on 2.4L four cylinder Nissan Pathfinder?A: Before proceeding, ensure the engine is completely cool. Note that the cylinder head can be removed with the Intake Manifold still attached, and the manifold can be removed later on the workbench. To initiate removal, disconnect the negative battery cable, remove the upper Timing Chain, and insert a timing chain tensioner wedge through the lower timing chain cover's opening, ensuring it's wedged between the narrowest section of the lower timing chain. Carefully make reference marks on the lower timing chain and the idler sprocket, then remove the idler sprocket bolt while ensuring the idler gear and lower timing chain remain engaged and rest on the timing chain wedge. Proceed to remove the Camshafts and lifters, followed by the Exhaust Manifold, and label and remove any remaining components attached to the cylinder head. Loosen the cylinder head bolts in 1/4-turn increments, ensuring they can be removed by hand, and follow the specific loosening sequence. Lift the cylinder head off the engine block, prying it up at a casting protrusion if needed. Remove all external components from the cylinder head for cleaning and inspection. Cleaning the mating surfaces between the cylinder head and block is crucial, and any damage should be addressed. Chase the threads in the cylinder head bolt holes and clean them thoroughly. Check for warpage in the cylinder head, intake, and exhaust manifolds. Install the removed components, position the new cylinder head gasket, and apply clean engine oil to the cylinder head bolt threads and hardened washers before tightening the bolts in the recommended sequence. Reinstall the lifters, shims, and camshafts, adjusting valve clearances if necessary due to prior machine work on the cylinder head. Install the idler gear/idler shaft bolt, ensuring alignment with reference marks, and remove the timing chain wedge. Install the upper timing chain and cover, and complete the remaining installation steps in reverse. Finish by changing the engine oil and filter, refilling the cooling system, and checking for leaks during engine operation.
- Q: How to remove the cylinder head on 3.3L V6 Nissan Pathfinder?A: To remove the cylinder head, start by relieving the fuel system pressure and disconnecting the battery. Drain the cooling system and remove the spark plug wires, distributor cap, and spark plug wires as an assembly. Take off the Intake Manifold, Timing Belt, camshaft sprocket, and rear timing belt cover. Remove the rocker arm components, lifters, and Exhaust Manifold. Disconnect hoses and electrical harness connectors, as well as the coolant pipes. Remove the air conditioning compressor, power steering pump, and alternator. Take off the compressor bracket, power steering pump bracket, and alternator bracket. Remove the distributor and then loosen the cylinder head bolts. Lift the cylinder head off the engine block, being careful not to damage it. To install the new cylinder head, remove the old gaskets and clean the mating surfaces thoroughly. Use a gasket scraper and lacquer thinner or acetone to clean the surfaces. Check for any damage and use a file or machining if necessary. Chase the threads in the cylinder head bolt holes and ensure they are clean and dry. Position the new gaskets over the dowel pins and carefully place the heads on the engine block. Install the intake manifold gaskets, manifold, and fasteners. Lightly oil the threads of the cylinder head bolts and install them, making sure the washers are in place correctly. Follow the recommended sequence to tighten the bolts to the specified torque. Tighten the small bolt on the outside of the cylinder head. Complete the remaining installation steps in reverse order. Add coolant, change the engine oil and filter, and check for any leaks.
- Q: How to disassemble and inspect cylinder heads on Nissan Pathfinder?A: New and rebuilt cylinder heads are commonly available for most engines at dealerships and auto parts stores. Some specialized tools are necessary for the disassembly and Inspection procedures, and replacement parts may not be readily available, making it more practical and economical for the home mechanic to purchase replacement heads rather than disassemble, inspect and recondition the originals. Cylinder head disassembly involves removal of the intake and Exhaust Valves and related components. If they're still in place, remove the rocker arms (3.3L only) and the lifters and Camshafts from the cylinder head. Label the parts or store them separately so they can be reinstalled in their original locations. Do not lay the lifters on 3.3L engines on their side or upside down, or air can become trapped inside and the lifter will have to be bled. The lifters can be laid on their side only if they are submerged in a pan of clean engine oil until reassembly. Before the valves are removed, arrange to label and store them, along with their related components, so they can be kept separate and reinstalled in the same valve guides they are removed from. Compress the springs on the first valve with a spring compressor and remove the valve stem keepers. Carefully release the valve spring compressor and remove the retainer, the spring and the spring seat (if used). Pull the valve out of the cylinder head, then remove the oil seal from the guide. If the valve binds in the guide (won't pull through), push it back into the cylinder head and deburr the area around the valve stem keeper groove with a fine file or whetstone. Repeat the procedure for the remaining valves. Remember to keep all the parts for each valve together so they can be reinstalled in the same locations. Once the valves and related components have been removed and stored in an organized manner, the cylinder head should be thoroughly cleaned and inspected. If a complete engine overhaul is being done, finish the engine disassembly procedures before beginning the cylinder head cleaning and inspection process.
- Q: How to ensure the cylinder head is thoroughly clean before commencing reassembly on Nissan Pathfinder?A: Ensure the cylinder head is thoroughly clean before commencing reassembly, regardless of whether it underwent valve servicing at an automotive repair shop. If valve servicing was performed externally, the valves and associated components will already be in place, and the reassembly process can begin. Install the valves, applying light oiling to the stems, and then position the valve spring seat(s) correctly on the cylinder head. Note that older 3.3L engines feature an inner and outer valve spring seat, while 2.4L, 3.5L, and newer 3.3L engines have a single valve spring seat. Ensure the outer valve spring seat is installed first, followed by the inner valve spring seat for older 3.3L engines. Once the valve spring seat(s) are properly placed, manually install the valve seals over the valve tips, using the valve stems as guides, and gently tap each seal into its designated position to the specified depth. Exercise caution during installation to avoid damaging the seals or twisting them, as this may lead to improper sealing on the valve stems. For 3.3L engines, a seal installation tool is only necessary for the intake valve guide, while exhaust valve seals should be slid into place by hand. Slip the valve spring(s) onto the cylinder head, then utilize a spring compressor to install the springs, retainers, and valve stem keepers. Note that 3.3L engines have an inner and outer valve spring, whereas 2.4L and 3.5L engines employ a single valve spring. Ensure that the inner valve spring is installed within the outer valve spring and place the springs as a set on 3.3L engines, always positioning the end of the outer valve spring with the more closely wound coils or paint marks towards the cylinder head. Always reinstate old cylinder head components in their original locations.
- Q: How to remove and install a cylinder head on 3.5L V6 Nissan Pathfinder?A: The engine must be completely cool before beginning this procedure. The coolant pipe which attaches to the rear of both cylinder heads must be removed by removing the engine from the vehicle. REMOVAL: Remove the Timing Chain(s) and sprockets. Remove the rear timing chain cover bolts in reverse order. Detach the rear timing cover from the engine. Remove the lower Intake Manifold and the Exhaust Manifolds. Remove the Camshafts and lifters from the cylinder head. Label and remove any remaining items attached to the cylinder head. Loosen the cylinder head bolts in 1/4-turn increments until they can be removed by hand. Lift the cylinder head off the engine block. Remove all external components from the head. INSTALLATION: Ensure the mating surfaces of the cylinder head and block are clean. Use a gasket scraper to remove all traces of carbon and old gasket material. Check the block and head mating surfaces for damage. Use a tap to chase the threads in the head bolt holes. Measure each cylinder head bolt for stretching. Check the cylinder head for warpage. Install the components that were removed from the head. Position the new cylinder head gasket over the dowel pins on the block. Carefully set the head on the block without disturbing the gasket. Apply a small amount of clean engine oil to the threads and hardened washers of the head bolts. Install the bolts in their original locations and tighten them finger tight. Then tighten all the bolts in several steps, following the proper sequence, to the specific torque. Remove all traces of old sealant from the rear timing chain cover and apply a bead of ATV sealant to the sealing surfaces. Install new O-rings in the front of the engine block and in the variable valve timing oil control orifices in the cylinder head. Place the rear timing chain cover in position over the dowels on the engine and tighten the bolts to the specific torque. Install the camshafts and timing chains and sprockets. Check and adjust the valve clearance if necessary. Install the engine in the vehicle. Refill the cooling system, and change the engine oil and filter. Start the engine and check for oil and coolant leaks.
- Q: What are the proper cleaning and inspection procedures for assessing the engine's valve train components and cylinder heads during an overhaul on Nissan Pathfinder?A: For a comprehensive assessment of the engine's valve train components and cylinder heads during an overhaul, proper cleaning and inspection procedures are crucial. Cleaning should commence by meticulously removing old gasket material and sealing compounds from the cylinder head gasket, intake manifold, and exhaust manifold sealing surfaces, taking care to avoid any damage to the cylinder head. Scale buildup within the coolant passages should be completely removed, and stiff wire brushes can be utilized to clear deposits from various holes. It is essential to run an appropriately sized tap through threaded holes to eliminate corrosion and sealant, with compressed air aiding in the removal of debris. The combustion chambers should be cleaned using a brass wire brush and solvent if carbon buildup is present. Thoroughly clean the cylinder head with solvent, ensuring complete drying with compressed air for effective cleaning of holes and recesses. Decarbonizing chemicals can be cautiously employed when cleaning, following the manufacturer's guidelines. In the case of 3.3L engines, rocker arms and shafts should be cleaned with solvent and carefully dried, without mixing up their orientation. Valve springs, spring seats, valve stem keepers, and retainers should all undergo solvent cleaning and thorough drying, with attention to preventing part mix-up during the process. Removing heavy deposits from valves and utilizing a motorized wire brush to clean valve heads and stems is advised, with care taken to avoid valve mix-up during this step. The subsequent inspection phase should be completed thoroughly before considering machine shop work. A meticulous inspection of the cylinder head is required to detect cracks, coolant leakage signs, and other forms of damage. Should cracks be identified, consultation with an automotive machine shop is recommended for possible repair options, and if unfeasible, obtaining a new cylinder head is advised. Using a straightedge and feeler gauge, check the cylinder head gasket mating surface for warpage, adhering to specified limits, and consult with an automotive machine shop if resurfacing is necessary. Keep in mind that the cylinder head has a minimum height requirement, and if machining would cause it to fall below this minimum, a new cylinder head is essential. Thoroughly examine valve seats within the combustion chambers for pitting, cracks, or burning, with extensive damage potentially requiring valve service beyond home mechanic capabilities. Measure valve stem-to-guide clearance with the appropriate tools, and if it surpasses specific limits, consider replacing valve guides. When in doubt, consult an automotive machine shop for further evaluation. For valve inspection, assess each valve face for even wear, deformities, cracks, pits, and burn marks. Scrutinize the valve stem for scuffs, galling, cracks, and ensure it is not bent. Measure the margin width on each valve, and valves with narrower margins than specified should be replaced. Inspection should extend to valve components, where valve springs should be checked for wear on their ends and pits, with measurements compared to specified free lengths. Tension checks should be carried out by an automotive machine shop before determining their suitability for use in an engine rebuild. Confirm the squareness of each valve spring, replacing any distorted or sagged springs. Examine spring retainers and valve stem keepers for wear and cracks, with any questionable parts necessitating replacement to prevent potential damage during engine operation. For components such as the Camshaft, lifters, rocker arms, and shafts, ensuring a thorough examination of camshaft bearing journals. If severe gouging or scoring is detected, the cylinder head should be replaced, irrespective of the valve and related component conditions. Any damaged or excessively worn parts should be replaced with new ones, and if the inspection reveals general wear and component conditions beyond specified limits, the valves should be reassembled in the cylinder head.
Categories Close X
Axle & Suspension
Body (Back Door & Rear Body)
Body (Front, Roof & Floor)
Body (Side & Rear)
Body Electrical
Brake
Engine Electrical
Engine Mechanical
Exhaust & Cooling
Fuel & Engine Control
Miscellaneous
Power Train
Seat & Seat Belt
Steering