×
- Hello
- Login or Register
- Quick Links
- Live Chat
- Track Order
- Parts Availability
- RMA
- Help Center
- Contact Us
- Shop for
- Nissan Parts
- Nissan Accessories
My Garage
My Account
Cart
Genuine Nissan Frontier Steering Knuckle
Front Steering Knuckle- Select Vehicle by Model
- Select Vehicle by VIN
Select Vehicle by Model
orMake
Model
Year
Select Vehicle by VIN
For the most accurate results, select vehicle by your VIN (Vehicle Identification Number).
16 Steering Knuckles found


Nissan Frontier Spindle-KNUCKLE,RH
Part Number: 40014-EA000$382.79 MSRP: $540.67You Save: $157.88 (30%)Ships in 1-2 Business Days


Nissan Frontier Spindle-KNUCKLE,LH
Part Number: 40015-EA000$382.79 MSRP: $540.66You Save: $157.87 (30%)Ships in 1-2 Business Days


Nissan Frontier Spindle LH
Part Number: 40015-9Z400$419.31 MSRP: $592.25You Save: $172.94 (30%)Ships in 1-3 Business Days


Nissan Frontier Spindle LH
Part Number: 40015-01G50$419.31 MSRP: $592.25You Save: $172.94 (30%)Ships in 1-3 Business Days
Nissan Frontier Spindle-KNUCKLE,RH
Part Number: 40014-7Z200$371.45 MSRP: $524.65You Save: $153.20 (30%)Ships in 1-3 Business Days


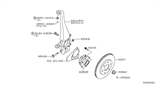
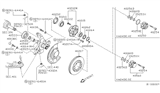
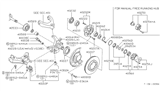
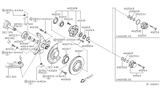
Nissan Frontier Steering Knuckle
The Nissan Frontier Steering Knuckle is the pivotal link that connects the steering components, front suspension, and wheel hub. This allows the vehicle's wheels to steer and travel with the road surface. The attachment points for the upper and lower control arms or strut and lower arm, the tie-rod end, and the hub or spindle that carries the wheel are all provided by a Steering Knuckle. The Steering Knuckle anchors these components to allow the wheel to vertically track as the suspension reacts to bumps while pivoting horizontally as a result of steering input, keeping the tire rotating in a stable plane. The Nissan Frontier part works as a hub assembly or a spindle depending on whether the front wheel is driven. In essence, it offers the same function. Steering Knuckle typically is replaced only when they become impact damaged or when critical attachment bores become deformed. Frequent inspection helps keep the Nissan Frontier's front end truly aligned and handling safely. Furthermore, every Nissan Frontier suspension system places importance on a sound Steering Knuckle.
If you need any OEM Nissan Frontier Steering Knuckle, feel free to choose them out of our huge selection of genuine Nissan Frontier Steering Knuckle. All our parts are offered at unbeatable prices and are supported by the manufacturer's warranty. In addition, we offer quick shipping to have your parts delivered to your door step in a matter of days.
Nissan Frontier Steering Knuckle Parts Questions & Experts Answers
- Q: How to remove and install a steering knuckle on Nissan Frontier?A:Before you take off the wheel, loosen the lug nuts, lift up the vehicle, and make sure it's held firmly in place by jackstands put right under the frame or subframe rails. For 4WD models, remove the driveaxle. To keep the lower Control Arm stable, lift your vehicle with a floor jack and raise the jack just a little. Hang the brake caliper out of the way without disconnecting the brake hose using wire, and take off both the brake caliper and brake disc. Carefully take off the splash shield that covers the disc from the steering knuckle and disconnect the steering knuckle from the tie-rod end. First, disconnect the balljoints from the steering knuckle for Frontier and Xterra models, then take off the steering knuckle. To put everything back together, you must first tighten each balljoint, strut, and tie-rod end to its right torque number. To match the ballstud slots with the nut hole, you can turn the nut slightly tighter - just enough for the cotter pin to go in. Then insert a fresh cotter pin. Last, hand-tighten these four essential bolts: caliper mounting and hub locking bolts, as well as wheel mounting nuts. Install them to the numbers shown on the maintenance instructions.

Related Nissan Frontier Parts


Browse by Year
2025 Steering Knuckle 2024 Steering Knuckle 2023 Steering Knuckle 2022 Steering Knuckle 2021 Steering Knuckle 2020 Steering Knuckle 2019 Steering Knuckle 2018 Steering Knuckle 2017 Steering Knuckle 2016 Steering Knuckle 2015 Steering Knuckle 2014 Steering Knuckle 2013 Steering Knuckle 2012 Steering Knuckle 2011 Steering Knuckle 2010 Steering Knuckle 2009 Steering Knuckle 2008 Steering Knuckle 2007 Steering Knuckle 2006 Steering Knuckle 2005 Steering Knuckle 2004 Steering Knuckle 2003 Steering Knuckle 2002 Steering Knuckle 2001 Steering Knuckle 2000 Steering Knuckle 1999 Steering Knuckle 1998 Steering Knuckle