×
- Hello
- Login or Register
- Quick Links
- Live Chat
- Track Order
- Parts Availability
- RMA
- Help Center
- Contact Us
- Shop for
- Nissan Parts
- Nissan Accessories
My Garage
My Account
Cart
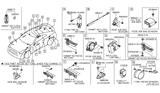
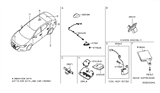
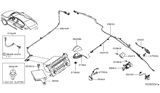
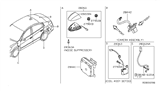
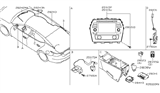
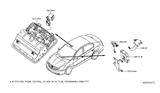
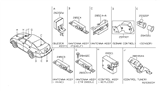
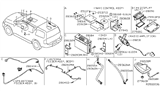
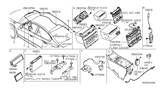
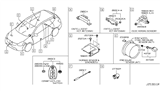
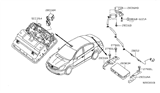
Genuine Nissan Maxima Antenna
Radio Antenna- Select Vehicle by Model
- Select Vehicle by VIN
Select Vehicle by Model
orMake
Model
Year
Select Vehicle by VIN
For the most accurate results, select vehicle by your VIN (Vehicle Identification Number).
45 Antennas found


Nissan Maxima Antenna Assembly-Door,Smart KEYLESS
Part Number: 285E7-JK60A$82.36 MSRP: $116.33You Save: $33.97 (30%)Ships in 1-3 Business Days

Nissan Maxima Ant Assembly-Sat
Part Number: 28208-9N11A$379.29 MSRP: $535.72You Save: $156.43 (30%)Ships in 1-3 Business Days

Nissan Maxima Ant Assembly-Sat
Part Number: 28208-ZX60A$127.29 MSRP: $179.78You Save: $52.49 (30%)Ships in 1-3 Business Days


Nissan Maxima Antenna
Part Number: 28208-ZX50A$139.74 MSRP: $192.48You Save: $52.74 (28%)Ships in 1-2 Business Days
Nissan Maxima Gps Antenna Assembly
Part Number: 25975-4RA0A$126.41 MSRP: $178.55You Save: $52.14 (30%)Ships in 1-3 Business Days
Nissan Maxima Antenna Assembly-TCU
Part Number: 28212-4RA1A$85.54 MSRP: $120.82You Save: $35.28 (30%)Ships in 1-3 Business DaysNissan Maxima Satellite Antenna Assembly
Part Number: 28208-4RA0A$142.12 MSRP: $200.73You Save: $58.61 (30%)Ships in 1-3 Business Days
Nissan Maxima Antenna Assy-Room,Smart Keyless
Part Number: 285E4-ZK30D$40.97 MSRP: $56.48You Save: $15.51 (28%)Ships in 1-3 Business Days
Nissan Maxima Antenna Assy-Room,Smart Keyless
Part Number: 285E4-ZK30C$56.18 MSRP: $77.38You Save: $21.20 (28%)Ships in 1-2 Business Days
Nissan Maxima Antenna Assembly
Part Number: 28208-CF40A$185.42 MSRP: $255.40You Save: $69.98 (28%)Ships in 1-2 Business Days
Nissan Maxima Gps Antenna Assembly
Part Number: 25975-ZX70A$144.32 MSRP: $198.78You Save: $54.46 (28%)Ships in 1-2 Business Days
Nissan Maxima Ant-Smart KEYLESS,Room
Part Number: 285E5-89905$214.82 MSRP: $303.42You Save: $88.60 (30%)Ships in 1-3 Business DaysNissan Maxima Ant-Smart KEYLESS,Room
Part Number: 285E5-89915$52.94 MSRP: $72.98You Save: $20.04 (28%)Ships in 1-3 Business Days
Nissan Maxima Gps Antenna Assembly
Part Number: 25975-9DJ0A$70.95 MSRP: $100.22You Save: $29.27 (30%)Ships in 1-3 Business Days
Nissan Maxima Time Control Unit Antenna Assembly
Part Number: 28212-4RA0A$109.52 MSRP: $154.68You Save: $45.16 (30%)Ships in 1-2 Business Days
Nissan Maxima Antenna Assy-Telephone
Part Number: 28212-9DE0A$119.18 MSRP: $168.33You Save: $49.15 (30%)Ships in 1-3 Business Days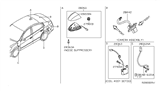
Nissan Maxima Switch - AMBIENCE
Part Number: 28208-9DA0A$291.80 MSRP: $412.15You Save: $120.35 (30%)Ships in 1-3 Business DaysNissan Maxima Ant Assembly-Sat
Part Number: 28208-9N30A$339.60 MSRP: $479.47You Save: $139.87 (30%)Ships in 1-2 Business Days
Nissan Maxima Antenna Assy-Telephone
Part Number: 28212-9N00B$86.11 MSRP: $118.60You Save: $32.49 (28%)Ships in 1-2 Business Days
Nissan Maxima Antenna Assembly
Part Number: 28208-CF41A$191.70 MSRP: $264.05You Save: $72.35 (28%)Ships in 1-2 Business Days
| Page 1 of 3 |Next >
1-20 of 45 Results
Nissan Maxima Antenna
The Nissan Maxima Antenna converts roaming radio waves into electric impulses usable by the speakers so that the car's audio system can receive broadcast signals. Nissan's earlier models employed a metal whip that could gather waves from all directions as the vehicle moved on the road. Over time, the Antenna was concealed inside the rear window by various generations, minimizing wind noise and exterior clutter but not modifying how the conductive elements feed the receiver. Whether it be in the fender or the glass, the Antenna creates its own way. The Antenna intercepts the alternating fields to create a matching current which is then passed to the amplifying circuits. Subsequently, you'll receive pleasant music and up-to-the-minute news and traffic reports. Although its length is far shorter than half a broadcast wavelength, it is matched and grounded for efficient energy transfer. This was first proven by Hertz and is still vital on today's roads. There are directional arrays, such as parabolic dishes, but Maxima drivers need a broad listening range so the car has the easier and simpler omnidirectional style. Throughout the different types of Maxima Antenna, both visible and hidden, a link is consistently established by Nissan.
If you need any OEM Nissan Maxima Antenna, feel free to choose them out of our huge selection of genuine Nissan Maxima Antenna. All our parts are offered at unbeatable prices and are supported by the manufacturer's warranty. In addition, we offer quick shipping to have your parts delivered to your door step in a matter of days.
Nissan Maxima Antenna Parts Questions & Experts Answers
- Q: How to remove and install the antenna motor, antenna mast, and antenna grid on Nissan Maxima?A:To remove the antenna motor, first take off the antenna mast-retaining nut using snap-ring pliers or an antenna tool, and apply masking tape around the antenna mount to prevent paint scratches. Next, in the trunk, pry out the plastic clips that hold the passenger side trunk finishing panels to access the antenna motor. Detach the motor retaining screws, pull the antenna motor out, disconnect the electrical connector, and remove the motor from the vehicle. For installation, follow the reverse order of removal. To remove the antenna mast, at least two people are needed; one should control the ignition switch while the other holds the antenna mast. Remove the antenna mast-retaining nut, then with the ignition key and radio in the ON position, guide the antenna mast and toothed drive cable out of the motor assembly. When installing the new antenna mast, insert the antenna cable with the teeth facing the rear of the vehicle, and have your assistant turn the ignition key and radio to the ON position to wind the mast back into the motor assembly. The rest of the installation follows the reverse of removal. Most models feature a wire-grid antenna in the rear window alongside the mast antenna, while later models may only have the antenna grid. The antenna grid is located in the upper portion of the rear window, with the rear window defogger grid below it. Continuity testing of the antenna grid can be performed similarly to the rear defogger grid, and any breaks in the grid can be repaired in the same way.

Related Nissan Maxima Parts
 Nissan Maxima Antenna Mast
 Nissan Maxima Antenna Base
 Nissan Maxima Antenna Cable
 Nissan Maxima Antenna Switch
Browse by Year
2023 Antenna 2022 Antenna 2021 Antenna 2020 Antenna 2019 Antenna 2018 Antenna 2017 Antenna 2016 Antenna 2014 Antenna 2013 Antenna 2012 Antenna 2011 Antenna 2010 Antenna 2009 Antenna 2008 Antenna 2007 Antenna 2006 Antenna 2005 Antenna 2004 Antenna 2003 Antenna 2002 Antenna 2001 Antenna 2000 Antenna 1999 Antenna 1998 Antenna 1997 Antenna 1996 Antenna 1995 Antenna 1994 Antenna 1993 Antenna 1992 Antenna 1991 Antenna 1990 Antenna 1989 Antenna 1988 Antenna 1987 Antenna 1986 Antenna 1985 Antenna