×
- Hello
- Login or Register
- Quick Links
- Live Chat
- Track Order
- Parts Availability
- RMA
- Help Center
- Contact Us
- Shop for
- Nissan Parts
- Nissan Accessories
My Garage
My Account
Cart
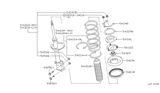
Genuine Nissan Maxima Coil Springs
Strut Spring- Select Vehicle by Model
- Select Vehicle by VIN
Select Vehicle by Model
orMake
Model
Year
Select Vehicle by VIN
For the most accurate results, select vehicle by your VIN (Vehicle Identification Number).
78 Coil Springs found


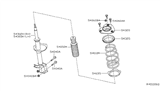
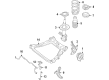
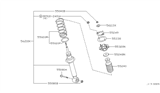
Nissan Maxima Front Spring
Part Number: 54010-4RA1A$227.83 MSRP: $321.80You Save: $93.97 (30%)Ships in 1-3 Business Days

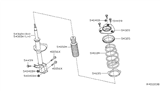
Nissan Maxima Front Spring
Part Number: 54010-ZX70A$130.13 MSRP: $183.80You Save: $53.67 (30%)Ships in 1-3 Business Days

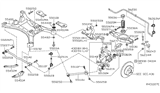
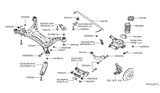
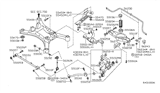
Nissan Maxima Rear Suspension Spring
Part Number: 55020-9N10B$119.36 MSRP: $168.58You Save: $49.22 (30%)Ships in 1-3 Business Days
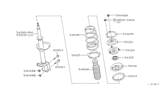
Nissan Maxima Front Spring
Part Number: 54010-ZY80A$212.00 MSRP: $299.43You Save: $87.43 (30%)Ships in 1-3 Business Days

Nissan Maxima Front Spring
Part Number: 54010-9J410$125.47 MSRP: $172.82You Save: $47.35 (28%)Ships in 1-2 Business DaysNissan Maxima Rear Suspension Spring
Part Number: 55020-9N60B$73.55 MSRP: $103.88You Save: $30.33 (30%)Ships in 1-3 Business Days
Nissan Maxima Rear Suspension Spring
Part Number: 55020-4RA2A$110.00 MSRP: $155.37You Save: $45.37 (30%)Ships in 1-3 Business Days
Nissan Maxima Front Spring
Part Number: 54010-4RA0B$230.65 MSRP: $325.78You Save: $95.13 (30%)Ships in 1-3 Business DaysNissan Maxima Rear Suspension Spring
Part Number: 55020-4RC2A$125.98 MSRP: $177.93You Save: $51.95 (30%)Ships in 1-3 Business DaysNissan Maxima Spring Front RH
Part Number: 54010-7Y011$103.62 MSRP: $159.65You Save: $56.03 (36%)Ships in 1-2 Business DaysNissan Maxima Front Spring
Part Number: 54010-7Y310$144.95 MSRP: $204.73You Save: $59.78 (30%)Ships in 1-3 Business Days
Nissan Maxima Spring Rear Suspension
Part Number: 55020-2Y423$144.02 MSRP: $221.91Limited AvailabilityYou Save: $77.89 (36%)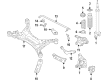
Nissan Maxima Rear Suspension Spring
Part Number: 55020-4RC2B$125.98 MSRP: $177.93You Save: $51.95 (30%)Ships in 1-3 Business DaysNissan Maxima Front Spring
Part Number: 54010-4RA0A$230.65 MSRP: $325.78You Save: $95.13 (30%)Ships in 1-3 Business DaysNissan Maxima Spring Rear Suspension
Part Number: 55020-2Y421$144.02 MSRP: $221.91Limited AvailabilityYou Save: $77.89 (36%)Nissan Maxima Rear Suspension Spring
Part Number: 55020-3Y000$158.79 MSRP: $224.28Limited AvailabilityYou Save: $65.49 (30%)
Nissan Maxima Front Spring
Part Number: 54010-2Y108$103.70 MSRP: $159.78Limited AvailabilityYou Save: $56.08 (36%)

Nissan Maxima Rear Suspension Spring
Part Number: 55020-7Y001$169.44 MSRP: $239.32You Save: $69.88 (30%)
Nissan Maxima Rear Suspension Spring
Part Number: 55020-4RA3A$92.17 MSRP: $130.18You Save: $38.01 (30%)
Nissan Maxima Rear Suspension Spring
Part Number: 55020-4RA3B$92.17 MSRP: $130.18You Save: $38.01 (30%)
| Page 1 of 4 |Next >
1-20 of 78 Results
Nissan Maxima Coil Springs
The Nissan Maxima Coil Springs is one of the essential car suspension parts known to offer the prime reliability and performance. These common coil springs are used to help reduce the impact of some ride irregularities; they are made of metals and alloys, and are made using hot-winding or cold-winding. Some of the components of the Maxima suspension system include coil springs that are of variable and constant rate, shot peening, and thermal hardening of the suspension parts make them stronger and perform better due to these treatments. These coil springs are very essential in the provision of vehicle stability, comfort, and safety due to the force exerted while driving. These coil springs are compatible with the different generations of the Nissan Maxima especially the eighth generation where they will provide unique solutions to the different models enhancing on the efficiency of the car. Together with the car's distinctiveness, its three and a half-liter V6 power plant gives capability a boost as do its coil springs which are tuned to their ideal rates of stiffness and travel. This integration does not only improve the aspects of using the car for driving but also adds to the belief of the car as a sports luxury. Newer models offer specific features like lightweight yet strong construction that enhances the vehicle's ability to be controlled and maneuvered; in this context, Nissan Maxima Coil Springs set the bar for superior components in auto parts industry. In summary, these coil springs are crucial to the car's performance and durability that a Nissan Maxima driver would want.
If you need any OEM Nissan Maxima Coil Springs, feel free to choose them out of our huge selection of genuine Nissan Maxima Coil Springs. All our parts are offered at unbeatable prices and are supported by the manufacturer's warranty. In addition, we offer quick shipping to have your parts delivered to your door step in a matter of days.
Nissan Maxima Coil Springs Parts Questions & Experts Answers
- Q: How to remove and install the rear coil springs on the suspension arm of a Nissan Maxima?A:Loosen the rear wheel lug nuts, raise the rear of the vehicle, support it securely on jackstands, and remove the wheels. Position a floor jack under the lower rear suspension arm and raise it slightly. Mark the relationship of the adjusting cam to the center member, then remove the bolt for the rear lower suspension arm at the center member. Loosen the bolt and nut for the lower rear suspension arm at the knuckle. Carefully lower the suspension arm using the floor jack, angling it away from the center member for additional clearance. Remove the coil spring, the rubber mount, and the rubber seal. For installation, raise the lower suspension arm with a floor jack until it reaches normal ride height, then tighten the suspension arm bolt and nuts to the specified torque, ensuring the marks on the adjusting cam and the center member are aligned before tightening. Finally, tighten the wheel lug nuts to the specified torque.

Related Nissan Maxima Parts
 Nissan Maxima Shock Absorber
 Nissan Maxima Coil Spring Insulator
 Nissan Maxima Shock And Strut Mount
 Nissan Maxima Bump Stop
 Nissan Maxima Strut Bearing
 Nissan Maxima Leaf Spring Bushing
 Nissan Maxima Front Cross-Member
 Nissan Maxima Rear Crossmember
Browse by Year
2023 Coil Springs 2022 Coil Springs 2021 Coil Springs 2020 Coil Springs 2019 Coil Springs 2018 Coil Springs 2017 Coil Springs 2016 Coil Springs 2014 Coil Springs 2013 Coil Springs 2012 Coil Springs 2011 Coil Springs 2010 Coil Springs 2009 Coil Springs 2008 Coil Springs 2007 Coil Springs 2006 Coil Springs 2005 Coil Springs 2004 Coil Springs 2003 Coil Springs 2002 Coil Springs 2001 Coil Springs 2000 Coil Springs 1999 Coil Springs 1998 Coil Springs 1997 Coil Springs 1996 Coil Springs 1995 Coil Springs 1994 Coil Springs 1993 Coil Springs 1992 Coil Springs 1991 Coil Springs 1990 Coil Springs 1989 Coil Springs 1988 Coil Springs 1987 Coil Springs 1986 Coil Springs 1985 Coil Springs