×
- Hello
- Login or Register
- Quick Links
- Live Chat
- Track Order
- Parts Availability
- RMA
- Help Center
- Contact Us
- Shop for
- Nissan Parts
- Nissan Accessories
My Garage
My Account
Cart
Genuine Nissan Maxima Flywheel
Clutch Flywheel- Select Vehicle by Model
- Select Vehicle by VIN
Select Vehicle by Model
orMake
Model
Year
Select Vehicle by VIN
For the most accurate results, select vehicle by your VIN (Vehicle Identification Number).
11 Flywheels found


Nissan Maxima Flywheel Assembly
Part Number: 12310-8J100$409.74 MSRP: $578.73You Save: $168.99 (30%)Ships in 1-3 Business Days


Nissan Maxima Drive & Gear Plate Assembly
Part Number: 12331-JA10C$197.85 MSRP: $279.44You Save: $81.59 (30%)Ships in 1-2 Business Days

Nissan Maxima Flywheel Assembly
Part Number: 12310-40U21$406.89 MSRP: $547.33Limited AvailabilityYou Save: $140.44 (26%)Nissan Maxima Flywheel Assembly
Part Number: 12310-40U10$406.89 MSRP: $547.33Limited AvailabilityYou Save: $140.44 (26%)Nissan Maxima Flywheel Assembly
Part Number: 12310-40U00$406.89 MSRP: $547.33Limited AvailabilityYou Save: $140.44 (26%)
Nissan Maxima Flywheel Assembly
Part Number: 12310-40U20$406.89 MSRP: $547.33You Save: $140.44 (26%)

Nissan Maxima Flywheel Assembly
Part Number: 12310-2Y910$406.89 MSRP: $547.33You Save: $140.44 (26%)
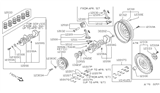
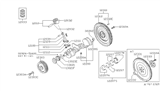
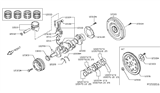
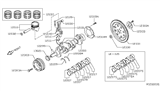
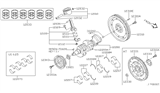
Nissan Maxima Flywheel
Nissan Maxima Flywheel smooths engine pulses and allows the starter to turn the crank. It also provides a friction surface for the clutch. Thus, it offers smooth power delivery and seamless gear changes. The Flywheel stores rotational energy. It is bolted to the crankshaft. It enables the V6 to deliver continuous thrust instead of jerky bursts. The starter motor's outer ring gear meshes with the starter motor at ignition before an overrunning clutch backs off once the engine fires. Nissan has demonstrated two major designs for their sedans, including the above Maxima, through the years. The solid single piece Flywheel is one style, while the dual mass Flywheel, pairing two linked discs with internal springs to quell drivetrain vibration, is the other. The solid type can often be resurfaced if it suffers from heat spots or minor warpage. The dual mass unit, on the other hand, usually must simply be replaced if its damper fails or its face wears. That is because machining the part might disturb its precisely calibrated spring assembly. When you see excessive runout, cracked faces, as well as chipped ring gear teeth, this is a sign that you need a new part. Every Nissan and every Maxima will continue launching smoothly with a healthy Flywheel and clutch in unity.
If you need any OEM Nissan Maxima Flywheel, feel free to choose them out of our huge selection of genuine Nissan Maxima Flywheel. All our parts are offered at unbeatable prices and are supported by the manufacturer's warranty. In addition, we offer quick shipping to have your parts delivered to your door step in a matter of days.
Nissan Maxima Flywheel Parts Questions & Experts Answers
- Q: How to properly remove and reinstall a flywheel or driveplate on Nissan Maxima with SOHC engine?A:Raise the vehicle and support it securely on jackstands. If equipped with a manual transaxle, remove the pressure plate and clutch disc, taking the opportunity to check or replace the clutch components and pilot bearing if necessary. For vehicles with an automatic transaxle, check and replace the front pump seal or O-ring. Use paint or a center-punch to make alignment marks on the flywheel or driveplate and crankshaft to ensure correct alignment during reinstallation. Remove the bolts securing the flywheel or driveplate to the crankshaft, using a screwdriver or pry bar to prevent the flywheel or driveplate from turning. If the crankshaft turns, hold the flywheel or driveplate with a pry bar or jam a screwdriver into the ring gear teeth. Carefully remove the flywheel or driveplate from the crankshaft, supporting it while removing the last bolt. Clean the flywheel to remove grease and oil, inspecting the surface for cracks, rivet grooves, burned areas, and score marks, with light scoring removable using emery cloth. Check for cracked or broken ring gear teeth and ensure the flywheel is flat by using a straightedge. Clean and inspect the mating surfaces of the flywheel or driveplate and crankshaft, replacing the crankshaft rear seal if leaking before reinstalling. Position the flywheel or driveplate against the crankshaft, aligning the marks made during removal, and apply thread locking compound to the bolt threads before installation. Use a screwdriver to prevent the flywheel or driveplate from turning while tightening the bolts, noting that the mounting bolts should only be used once and must be replaced if previously used. Complete the installation by reversing the removal steps.

Related Nissan Maxima Parts

Browse by Year
2023 Flywheel 2022 Flywheel 2021 Flywheel 2020 Flywheel 2019 Flywheel 2018 Flywheel 2017 Flywheel 2016 Flywheel 2014 Flywheel 2013 Flywheel 2012 Flywheel 2011 Flywheel 2007 Flywheel 2006 Flywheel 2005 Flywheel 2004 Flywheel 2003 Flywheel 2002 Flywheel 2001 Flywheel 2000 Flywheel 1999 Flywheel 1998 Flywheel 1997 Flywheel 1996 Flywheel 1995 Flywheel 1994 Flywheel 1993 Flywheel 1992 Flywheel 1991 Flywheel 1990 Flywheel 1989 Flywheel 1988 Flywheel 1987 Flywheel 1986 Flywheel 1985 Flywheel