×
- Hello
- Login or Register
- Quick Links
- Live Chat
- Track Order
- Parts Availability
- RMA
- Help Center
- Contact Us
- Shop for
- Nissan Parts
- Nissan Accessories
My Garage
My Account
Cart
Genuine Nissan Maxima Piston
Engine Pistons- Select Vehicle by Model
- Select Vehicle by VIN
Select Vehicle by Model
orMake
Model
Year
Select Vehicle by VIN
For the most accurate results, select vehicle by your VIN (Vehicle Identification Number).
65 Pistons found


Nissan Maxima Piston W/Pin
Part Number: A2010-8J110$88.44 MSRP: $130.82You Save: $42.38 (33%)Ships in 1-2 Business Days
Nissan Maxima Piston With Pin
Part Number: 12010-V7103$58.87 MSRP: $99.87You Save: $41.00 (42%)Ships in 1-2 Business DaysNissan Maxima Piston W/Pin
Part Number: A2010-8J172$63.25 MSRP: $89.33You Save: $26.08 (30%)Ships in 1-2 Business Days
Nissan Maxima Piston With Pin
Part Number: 12010-4RA2A$173.67 MSRP: $245.30You Save: $71.63 (30%)Ships in 1-3 Business DaysNissan Maxima Piston With Pin
Part Number: 12010-4RA1A$182.91 MSRP: $258.35You Save: $75.44 (30%)Ships in 1-3 Business DaysNissan Maxima Piston With Pin
Part Number: 12010-4RA0A$186.45 MSRP: $263.35You Save: $76.90 (30%)Ships in 1-3 Business Days
Nissan Maxima Piston,W/Pin
Part Number: A2010-7Y002$51.99 MSRP: $71.67You Save: $19.68 (28%)Ships in 1-3 Business DaysNissan Maxima Piston,W/Pin
Part Number: A2010-7Y001$63.13 MSRP: $86.95You Save: $23.82 (28%)Ships in 1-2 Business Days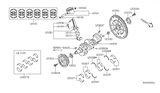
Nissan Maxima Piston W/Pin
Part Number: 12010-9N02C$171.90 MSRP: $236.77You Save: $64.87 (28%)Ships in 1-2 Business DaysNissan Maxima Piston W/Pin
Part Number: 12010-9N01C$171.90 MSRP: $236.77You Save: $64.87 (28%)Ships in 1-2 Business DaysNissan Maxima Piston W/Pin
Part Number: 12010-9N00C$171.90 MSRP: $236.77You Save: $64.87 (28%)Ships in 1-2 Business Days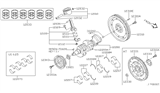
Nissan Maxima Piston,W/Pin
Part Number: A2010-8J171$63.25 MSRP: $89.33You Save: $26.08 (30%)Ships in 1-3 Business Days
Nissan Maxima Piston,W/Pin
Part Number: A2010-39U71$67.43 MSRP: $95.23Limited AvailabilityYou Save: $27.80 (30%)Nissan Maxima Piston,W/Pin
Part Number: A2010-2Y971$72.35 MSRP: $102.18Limited AvailabilityYou Save: $29.83 (30%)Nissan Maxima Piston,W/Pin
Part Number: A2010-2Y900$78.61 MSRP: $111.03Limited AvailabilityYou Save: $32.42 (30%)Nissan Maxima Piston,W/Pin
Part Number: A2010-39U02$85.41 MSRP: $120.63Limited AvailabilityYou Save: $35.22 (30%)Nissan Maxima Piston,W/Pin
Part Number: A2010-39U00$85.41 MSRP: $120.63Limited AvailabilityYou Save: $35.22 (30%)
| Page 1 of 4 |Next >
1-20 of 65 Results
Nissan Maxima Piston
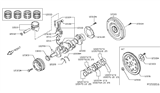
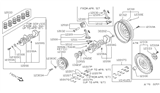
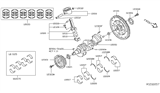
The Piston is an integral component of the Nissan Maxima which is the flagship model of the Nissan brand. Extremely useful as the tool to convert the power of combustion into kinetic energy, the piston stands as the primary component in the performance of the engine. The Piston made from tough materials such as aluminum alloy so the car mechanism can benefit from durability of difficult wearing conditions. Maxima's models use disparate types of pistons; racers using lightweight pistons ideal for performance at the top personnel RPM, and trunk pistons that can take side forces and have oil rings for lubrication. It adds to the efficiency of the Maxima not only because of the improved internal efficiency of the engine but also adds to the safety of the car by eliminating irregularities in the engines' combustion processes. It is noteworthy that the Piston is usable across generations of the car to sustain the dependability of Maxima in the market sphere. Additional constraints like cooling cavities as well as gas tight designs put the Piston under a special targeting in the automotive market which sets it out from the rest as a special part that improves the driving of the car. It is therefore evident that Piston is critical in the delivery of the energetic performance that is inherent with the Maxima, given the car comes with a mind-bowing 3.5L V6 engine and sophisticated transmission options. All in all, the Piston represents both the company's quality oriented policy and serves as an important building block for the Maxima as a sports luxury car.
If you need any OEM Nissan Maxima Piston, feel free to choose them out of our huge selection of genuine Nissan Maxima Piston. All our parts are offered at unbeatable prices and are supported by the manufacturer's warranty. In addition, we offer quick shipping to have your parts delivered to your door step in a matter of days.
Nissan Maxima Piston Parts Questions & Experts Answers
- Q: How to remove the piston and connect rod assemblies from an engine on Nissan Maxima?A:Prior to removing the piston and connecting rod assemblies, ensure the Cylinder Heads, oil pan, and oil pump pick-up are removed if not already done. Use your fingernail to check for a ridge at the upper limit of ring travel, approximately 1/4-inch down from the top of each cylinder. If ridges are present due to carbon deposits or cylinder wear, they must be completely removed with a special tool according to the manufacturer's instructions, as failure to do so may result in piston breakage. After removing the cylinder ridges, turn the engine upside-down with the Crankshaft facing up. Before removing the connecting rods, check the side clearance with feeler gauges, sliding them between the first connecting rod and the crankshaft throw until the play is eliminated; the side clearance should not exceed the service limit. If new connecting rods or a new crankshaft are installed, ensure the side clearance meets the specified minimum, and consult an automotive machine shop if machining is necessary. Check the connecting rods and caps for identification marks, and if they are not marked, use a small center punch to create indentations. Loosen each connecting rod cap nut by 1/2-turn until they can be removed by hand, then take off the number one connecting rod cap and bearing insert without dropping the bearing insert. Protect the crankshaft journal and cylinder wall by slipping a short length of plastic or rubber hose over each connecting rod cap bolt as the piston is removed. Remove the bearing insert and push the connecting rod/piston assembly out through the top of the engine using a wooden hammer handle, ensuring all ridges have been removed if resistance is felt. Repeat this process for the remaining cylinders. After removal, reassemble the connecting rod caps and bearing inserts in their respective connecting rods and install the cap nuts finger tight to prevent accidental damage to the bearing surfaces. Avoid separating the pistons from the connecting rods.

Related Nissan Maxima Parts
 Nissan Maxima Crankshaft Gear
 Nissan Maxima Crankshaft Pulley
 Nissan Maxima Crankshaft Thrust Washer Set
 Nissan Maxima Crankshaft
 Nissan Maxima Alternator Bracket
 Nissan Maxima Belt Tensioner Bolt
 Nissan Maxima Brake Caliper Bracket
Browse by Year
2023 Piston 2022 Piston 2021 Piston 2020 Piston 2019 Piston 2018 Piston 2017 Piston 2016 Piston 2014 Piston 2013 Piston 2012 Piston 2011 Piston 2010 Piston 2009 Piston 2008 Piston 2007 Piston 2006 Piston 2005 Piston 2004 Piston 2003 Piston 2002 Piston 2001 Piston 2000 Piston 1999 Piston 1998 Piston 1997 Piston 1996 Piston 1995 Piston 1994 Piston 1993 Piston 1992 Piston 1991 Piston 1990 Piston 1989 Piston 1988 Piston 1987 Piston 1986 Piston 1985 Piston