×
- Hello
- Login or Register
- Quick Links
- Live Chat
- Track Order
- Parts Availability
- RMA
- Help Center
- Contact Us
- Shop for
- Nissan Parts
- Nissan Accessories
My Garage
My Account
Cart
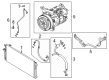
Genuine Nissan Murano A/C Compressor
Air Conditioning Compressor- Select Vehicle by Model
- Select Vehicle by VIN
Select Vehicle by Model
orMake
Model
Year
Select Vehicle by VIN
For the most accurate results, select vehicle by your VIN (Vehicle Identification Number).
13 A/C Compressors found


Nissan Murano Compressor Assy-Cooler
Part Number: 92600-JP01C$644.35 MSRP: $983.43You Save: $339.08 (35%)Ships in 1-3 Business Days


Nissan Murano Cooler Compressor
Part Number: 92600-CA01C$752.80 MSRP: $1157.87You Save: $405.07 (35%)Ships in 1-3 Business Days


Nissan Murano Cooler Compressor
Part Number: 92600-JP00C$644.35 MSRP: $983.43You Save: $339.08 (35%)Ships in 1-3 Business Days


Nissan Murano Cooler Compressor
Part Number: 92600-CA010$752.80 MSRP: $1157.87You Save: $405.07 (35%)Ships in 1-3 Business Days
Nissan Murano Compressor Assy-Cooler
Part Number: 92600-5AA0A$766.38 MSRP: $1178.75You Save: $412.37 (35%)Ships in 1-3 Business Days
Nissan Murano Compressor Assy-Cooler
Part Number: 92600-9UA0A$766.38 MSRP: $1178.75You Save: $412.37 (35%)Ships in 1-3 Business Days

Nissan Murano Compressor Assy-Cooler
Part Number: 92600-5AF0A$858.68 MSRP: $1320.72You Save: $462.04 (35%)Ships in 1-3 Business DaysNissan Murano Cooler Compressor
Part Number: 92600-JP00B$644.35 MSRP: $983.43You Save: $339.08 (35%)Ships in 1-3 Business DaysNissan Murano Cooler Compressor
Part Number: 92600-CA01A$752.80 MSRP: $1157.87You Save: $405.07 (35%)Ships in 1-3 Business Days
Nissan Murano Compressor Wo Cl
Part Number: 92610-JP00C$508.30 MSRP: $717.93You Save: $209.63 (30%)Ships in 1-3 Business DaysNissan Murano Compressor Wo Cl
Part Number: 92610-JP00B$508.30 MSRP: $717.93You Save: $209.63 (30%)Ships in 1-3 Business Days
Nissan Murano COMPRESSOR ASSY-COOLER
Part Number: 92600-7BL0A$766.38 MSRP: $1178.75You Save: $412.37 (35%)
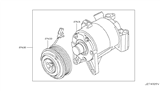
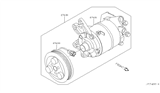
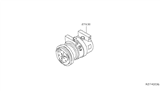
Nissan Murano A/C Compressor
Nissan Murano A/C Compressor keeps the cabin temperature comfortable by pressurizing the refrigerant so that the system can release a steady flow of cool air. Within the unit, the low-pressure gas drawn from the evaporator gets compressed into high-pressure vapor. When this happens, heat leaves the refrigerant and moves to the condenser. Then the cooled fluid returns to the evaporator and absorbs cabin warmth. Thus, the process repeats, producing a cool flow of air. Early Murano models manufactured when R12 was still a commonplace refrigerant relied on compressors designed to work with that mineral oil refrigerant. Over the years, the OEM switched to R134a compatible designs that use different lubricants and seals, which made the two different styles incompatible. Even with this change, each A/C Compressor applied on the crossover employs the same pump and convert method of changing refrigerant from gas to liquid and back to gas to control interior climate. The recent Nissan A/C Compressor design was refined to be quieter when in operation. So if your A/C Compressor is overdue, airflow may be weak. Choosing the right replacement means matching the exact compressor model and verifying the type of refrigerant, which helps the Nissan climate system work well during scorching summers. With a healthy A/C Compressor, any Murano stays refreshingly cool on the road.
If you need any OEM Nissan Murano A/C Compressor, feel free to choose them out of our huge selection of genuine Nissan Murano A/C Compressor. All our parts are offered at unbeatable prices and are supported by the manufacturer's warranty. In addition, we offer quick shipping to have your parts delivered to your door step in a matter of days.
Nissan Murano A/C Compressor Parts Questions & Experts Answers
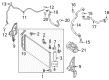
- Q: How to remove and install the A/C Compressor in a Nissan Murano's air conditioning system?A:Have the refrigerant discharged at a dealer service department or an automotive air conditioning repair facility. Disconnect the cable from the negative terminal of the battery. Raise the vehicle and support it securely on jackstands. Remove the lower engine splash shield. Remove the drivebelt. Disconnect both refrigerant lines from the compressor and seal all openings with tape to prevent contamination. Disconnect the wiring from the compressor. Remove the bolts from the oil cooler lines, then move them aside. Remove the compressor mounting bolts and remove the compressor from the bottom of the engine compartment. These bolts secure the compressor at the front of the engine. Compressor side mounting bolts. Note: Keep the compressor level during handling and storage. If the compressor seized or you find metal particles in the refrigerant lines, the system must be flushed out by an air conditioning technician and the receiverdrier must be replaced. Prior to installation, turn the center of the clutch six times to evenly disperse any oil that has collected in the head. Install the compressor in the reverse order of removal. If you are installing a new compressor, the cycling clutch assembly may have to be transferred to the new compressor. Note: The removal of the clutch assembly will require the use of several special tools. You may want to have the clutch assembly transferred to the new compressor by an air conditioning shop or dealer service department. The compressor manufacturer's instructions for adding refrigerant oil to the system. Caution: Use only refrigerant oil compatible with the R-134a system in your vehicle. Reconnect the battery and perform the necessary re-learn procedures. Have the system evacuated, charged and leak tested by the shop that discharged it.

Related Nissan Murano Parts
 Nissan Murano Blend Door Actuator
 Nissan Murano Blower Motor
 Nissan Murano Evaporator
 Nissan Murano A/C Idler Pulley
 Nissan Murano A/C Clutch
 Nissan Murano A/C Hose
 Nissan Murano A/C Accumulator
 Nissan Murano A/C Condenser Fan
 Nissan Murano A/C Expansion Valve
 Nissan Murano A/C Switch
Browse by Year
2025 A/C Compressor 2024 A/C Compressor 2023 A/C Compressor 2022 A/C Compressor 2021 A/C Compressor 2020 A/C Compressor 2019 A/C Compressor 2018 A/C Compressor 2017 A/C Compressor 2016 A/C Compressor 2015 A/C Compressor 2014 A/C Compressor 2013 A/C Compressor 2012 A/C Compressor 2011 A/C Compressor 2010 A/C Compressor 2009 A/C Compressor 2008 A/C Compressor 2007 A/C Compressor 2006 A/C Compressor 2005 A/C Compressor 2004 A/C Compressor 2003 A/C Compressor