×
- Hello
- Login or Register
- Quick Links
- Live Chat
- Track Order
- Parts Availability
- RMA
- Help Center
- Contact Us
- Shop for
- Nissan Parts
- Nissan Accessories
My Garage
My Account
Cart
Genuine Nissan Murano Coil Springs
Strut Spring- Select Vehicle by Model
- Select Vehicle by VIN
Select Vehicle by Model
orMake
Model
Year
Select Vehicle by VIN
For the most accurate results, select vehicle by your VIN (Vehicle Identification Number).
26 Coil Springs found


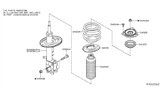
Nissan Murano Front Spring
Part Number: 54010-5AA0C$180.04 MSRP: $254.30You Save: $74.26 (30%)Ships in 1-3 Business Days


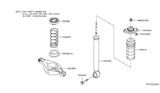
Nissan Murano Spring-Rear SUSPENSIONON
Part Number: 55020-5AA0C$101.15 MSRP: $142.87You Save: $41.72 (30%)Ships in 1-3 Business Days


Nissan Murano Front Spring
Part Number: 54010-1AA3B$232.60 MSRP: $328.40You Save: $95.80 (30%)Ships in 1-2 Business Days


Nissan Murano Rear Suspension Spring
Part Number: 55020-CA000$156.00 MSRP: $240.36You Save: $84.36 (36%)Ships in 1-3 Business Days


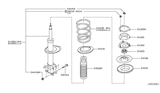
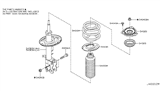
Nissan Murano Front Spring
Part Number: 54010-CA102$178.82 MSRP: $252.57You Save: $73.75 (30%)Ships in 1-3 Business Days
Nissan Murano Front Spring
Part Number: 54010-1AA0B$232.51 MSRP: $328.40You Save: $95.89 (30%)Ships in 1-3 Business Days

Nissan Murano Front Spring
Part Number: 54010-CA010$178.82 MSRP: $252.57You Save: $73.75 (30%)Ships in 1-3 Business Days


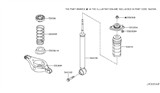
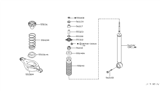
Nissan Murano Rear Suspension Spring
Part Number: 55020-1AA0A$291.05 MSRP: $411.08You Save: $120.03 (30%)Ships in 1-3 Business Days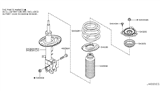
Nissan Murano Front Spring
Part Number: 54010-1GR0A$229.26 MSRP: $323.82You Save: $94.56 (30%)Ships in 1-3 Business DaysNissan Murano Front Spring
Part Number: 54010-CA004$109.54 MSRP: $164.60You Save: $55.06 (34%)Ships in 1-2 Business Days

Nissan Murano Front Spring
Part Number: 54010-5AF0B$189.94 MSRP: $268.28You Save: $78.34 (30%)Ships in 1-3 Business Days

Nissan Murano Rear Suspension Spring
Part Number: 55020-1GR0B$363.99 MSRP: $514.12You Save: $150.13 (30%)Ships in 1-3 Business DaysNissan Murano Front Spring
Part Number: 54010-1AA3A$232.51 MSRP: $328.40You Save: $95.89 (30%)Ships in 1-3 Business DaysNissan Murano Front Spring
Part Number: 54010-1AA0A$232.51 MSRP: $328.40You Save: $95.89 (30%)Ships in 1-3 Business DaysNissan Murano Rear Suspension Spring
Part Number: 55020-CA005$252.67 MSRP: $356.88You Save: $104.21 (30%)Ships in 1-3 Business DaysNissan Murano Rear Suspension Spring
Part Number: 55020-1AD0B$291.05 MSRP: $411.08You Save: $120.03 (30%)Ships in 1-3 Business DaysNissan Murano Rear Suspension Spring
Part Number: 55020-1AD0A$291.05 MSRP: $411.08You Save: $120.03 (30%)Nissan Murano Rear Suspension Spring
Part Number: 55020-1AA0B$291.05 MSRP: $411.08You Save: $120.03 (30%)Ships in 1-3 Business Days
Nissan Murano Rear Suspension Spring
Part Number: 55020-5AA0D$111.58 MSRP: $157.60You Save: $46.02 (30%)
| Page 1 of 2 |Next >
1-20 of 26 Results
Nissan Murano Coil Springs
Nissan Murano Coil Springs help in carrying the weight of the car and absorb the bumps. They also keep the suspension at the right ride height for balanced handling. Coil Springs are installed on each wheel for the Nissan Murano. When the car hits bumps and potholes, the Coil Springs compress and then return to their original free length. The return of the car to its original free length prevents the car from bottoming out. It also smoothens rides on bumpy roads. The free length is the height with no load on the suspension spring, and the spring rate is the load required to compress the Nissan suspension springs one inch further. They are both critical specifications that drive their effectiveness. There are three forms for Murano Coil Springs, linear rate, progressive, and dual rate. Coil Springs with linear rates have evenly spaced coils, providing constant stiffness. Progressive springs start soft and become firmer as the coils close, while dual rate springs switch between two distinct stiffness stages. The appropriate selection of Coil Springs revives the original Murano ride height and ensures the working of the suspension within Nissan alignment tolerances.
If you need any OEM Nissan Murano Coil Springs, feel free to choose them out of our huge selection of genuine Nissan Murano Coil Springs. All our parts are offered at unbeatable prices and are supported by the manufacturer's warranty. In addition, we offer quick shipping to have your parts delivered to your door step in a matter of days.
Nissan Murano Coil Springs Parts Questions & Experts Answers
- Q: How to remove and install the rear coil springs on the suspension arm of a Nissan Murano?A:Loosen the rear wheel lug nuts, raise the rear of the vehicle, support it securely on jackstands, and remove the wheels. Disconnect the stabilizer bar link from the stabilizer bar. Position a floor jack under the lower rear suspension arm and raise it slightly. Mark the relationship of the adjusting cam to the subframe before loosening the bolt for the rear lower suspension arm at the subframe. Remove the bolt and nut for the lower rear suspension arm at the knuckle. Carefully lower the suspension arm using the floor jack until the coil spring is fully extended, then remove the coil spring, the rubber mount, and the rubber seal. For installation, raise the lower suspension arm with a floor jack until it is at normal ride height, then tighten the suspension arm bolt/nuts to the specified torque, ensuring the marks on the adjusting cam and the subframe are aligned before tightening the fasteners. Finally, tighten the wheel lug nuts to the specified torque.

Related Nissan Murano Parts
 Nissan Murano Shock Absorber
 Nissan Murano Coil Spring Insulator
 Nissan Murano Shock And Strut Mount
 Nissan Murano Strut Bearing
 Nissan Murano Rear Crossmember
 Nissan Murano Bump Stop
 Nissan Murano Front Cross-Member
Browse by Year
2025 Coil Springs 2024 Coil Springs 2023 Coil Springs 2022 Coil Springs 2021 Coil Springs 2020 Coil Springs 2019 Coil Springs 2018 Coil Springs 2017 Coil Springs 2016 Coil Springs 2015 Coil Springs 2014 Coil Springs 2013 Coil Springs 2012 Coil Springs 2011 Coil Springs 2010 Coil Springs 2009 Coil Springs 2008 Coil Springs 2007 Coil Springs 2006 Coil Springs 2005 Coil Springs 2004 Coil Springs 2003 Coil Springs