×
- Hello
- Login or Register
- Quick Links
- Live Chat
- Track Order
- Parts Availability
- RMA
- Help Center
- Contact Us
- Shop for
- Nissan Parts
- Nissan Accessories
My Garage
My Account
Cart
Genuine Nissan Murano Parking Brake Shoe
Emergency Parking Brake Shoe- Select Vehicle by Model
- Select Vehicle by VIN
Select Vehicle by Model
orMake
Model
Year
Select Vehicle by VIN
For the most accurate results, select vehicle by your VIN (Vehicle Identification Number).
4 Parking Brake Shoes found


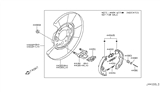
Nissan Murano Shoe Set-Parking Brake
Part Number: D4060-CA01A$57.99 MSRP: $83.98You Save: $25.99 (31%)Ships in 1-3 Business Days

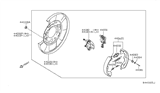
Nissan Murano Shoe Set Parking Brake
Part Number: D4060-3JA0C$61.61 MSRP: $89.23You Save: $27.62 (31%)Ships in 1-3 Business Days
Nissan Murano Shoe Set Parking Brake
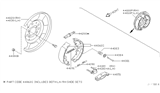
Part Number: 44060-CA00J$57.99 MSRP: $83.98You Save: $25.99 (31%)Ships in 1-3 Business DaysNissan Murano Shoe Set-Parking Brake
Part Number: 44060-WL026$57.99 MSRP: $83.98You Save: $25.99 (31%)Ships in 1-3 Business Days
Nissan Murano Parking Brake Shoe
When the lever, pedal, or electronic switch is activated on the parking brake, this Nissan Murano Parking Brake Shoe generates clamp force that locks the rear wheels. The Parking Brake Shoe is composed of a curved metal frame that is attached to friction lining. It is located inside a small drum that is formed on the rear rotor. Cables or an electric motor will activate the Parking Brake Shoe so that the lining will press against the wall of the drum, generating friction to prevent rotation of the wheel. Releasing the control allows springs to pull the Parking Brake Shoe away from the drum for normal driving. The mechanical setup operates independently of hydraulic service brakes, allowing the Nissan Murano to reliably hold station on an incline or prevent the vehicle from rolling when stopped for a moment. The Nissan Murano Parking Brake Shoe does not operate on brake fluid. It requires cleanliness and periodic movement of the linkage to keep free of corrosion in order to function properly and provide sufficient holding power in the rear assembly.
If you need any OEM Nissan Murano Parking Brake Shoe, feel free to choose them out of our huge selection of genuine Nissan Murano Parking Brake Shoe. All our parts are offered at unbeatable prices and are supported by the manufacturer's warranty. In addition, we offer quick shipping to have your parts delivered to your door step in a matter of days.
Nissan Murano Parking Brake Shoe Parts Questions & Experts Answers
- Q: How to replace parking brake shoes and ensure proper installation on Nissan Murano?A:Loosen the rear wheel lug nuts, raise the vehicle, and support it securely on jackstands before removing the rear wheels. Release the parking brake and remove the discs. Inspect the parking brake surfaces of each disc for wear or damage, replacing them if necessary. If the disc can't be removed when the parking brake is fully released, remove the rubber plug and use a screwdriver to turn the star wheel to retract the parking brake shoes. Clean the assembly with brake system cleaner without using compressed air to blow off brake dust. Remove the upper spring, then take out the adjuster, using pliers to remove the lower spring. Turn the shoe hold-down springs to release them and lift off the shoe, repeating for the remaining shoe. After cleaning the backing plates, apply brake grease to the raised contact surfaces around the perimeter and check the actuator assembly for wear or damage before setting it into place. Install the new parking brake shoes and secure them with their hold-down springs, disassembling the adjuster to clean and lightly lubricate the threads with high-temperature brake grease before placing it between the shoes. Install the top spring to engage the star wheel, attach the lower spring, then reinstall the disc and adjust the shoes. When reinstalling the calipers, ensure the mounting bolts are tightened, and the rest of the replacement procedure follows the reverse of removal. Working through the hole in the center of the Brake Disc, turn the adjuster star wheel with a screwdriver until the disc is locked, then turn the adjuster star wheel the other way 5 or 6 clicks and verify that the parking brake shoes don't drag by turning the disc. Finally, install the rubber plug in the adjuster hole, noting that the parking brake pedal or lever may need adjustment a few weeks later as the parking brake shoes become seated.

Related Nissan Murano Parts
 Nissan Murano Brake Bleeder Screw
 Nissan Murano Parking Brake Cable
 Nissan Murano Brake Backing Plate
 Nissan Murano Brake Shoe Set
 Nissan Murano Wheel Cylinder Repair Kit
 Nissan Murano Wheel Seal
Browse by Year
2024 Parking Brake Shoe 2023 Parking Brake Shoe 2022 Parking Brake Shoe 2021 Parking Brake Shoe 2020 Parking Brake Shoe 2019 Parking Brake Shoe 2018 Parking Brake Shoe 2017 Parking Brake Shoe 2016 Parking Brake Shoe 2015 Parking Brake Shoe 2014 Parking Brake Shoe 2013 Parking Brake Shoe 2012 Parking Brake Shoe 2011 Parking Brake Shoe 2010 Parking Brake Shoe 2009 Parking Brake Shoe 2008 Parking Brake Shoe 2007 Parking Brake Shoe 2006 Parking Brake Shoe 2005 Parking Brake Shoe 2004 Parking Brake Shoe 2003 Parking Brake Shoe