×
- Hello
- Login or Register
- Quick Links
- Live Chat
- Track Order
- Parts Availability
- RMA
- Help Center
- Contact Us
- Shop for
- Nissan Parts
- Nissan Accessories
My Garage
My Account
Cart
How to use OE catalog
Genuine Nissan Oil Pan
Oil Drain Pan
Currently shopping for
2001 Nissan Pathfinder
Change VehicleCategories Close X
Axle & Suspension
Body (Back Door & Rear Body)
Body (Front, Roof & Floor)
Body (Side & Rear)
Body Electrical
Brake
Engine Electrical
Engine Mechanical
Exhaust & Cooling
Fuel & Engine Control
Miscellaneous
Power Train
Seat & Seat Belt
Steering
4 Oil Pans found


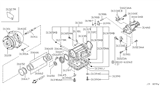
Oil Pan
Part Number: 31390-41X07$87.41 MSRP: $123.47You Save: $36.06 (30%)Ships in 1-2 Business Days1Product Specifications- Other Name: Pan Assy-Oil; Transmission Pan
- Replaces: 31390-41X01, 31390-41X08, 31391-41X01
- Lookup Code: 31390
- Item Weight: 3.10 Pounds
- Item Dimensions: 16.3 x 12.7 x 6.1 inches
- Condition: New
- Fitment Type: Direct Replacement
- SKU: 31390-41X07
- Warranty: This genuine part is guaranteed by Nissan's factory warranty.

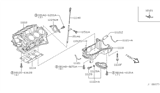
Oil Pan Assembly
Part Number: 11110-4W010$131.62 MSRP: $185.90You Save: $54.28 (30%)Ships in 1-3 Business Days1Product Specifications- Other Name: Pan Assy-Oil; Oil Pan
- Lookup Code: 11110+A
- Item Weight: 0.60 Pounds
- Item Dimensions: 3.1 x 6.6 x 11.6 inches
- Condition: New
- Fitment Type: Direct Replacement
- SKU: 11110-4W010
- Warranty: This genuine part is guaranteed by Nissan's factory warranty.
 Product Specifications
- Other Name: Pan Assy-Oil; Oil Pan
- Lookup Code: 11110
- Item Weight: 15.60 Pounds
- Item Dimensions: 20.9 x 17.7 x 11.6 inches
- Condition: New
- Fitment Type: Direct Replacement
- SKU: 11111-4W000
- Warranty: This genuine part is guaranteed by Nissan's factory warranty.
- Product Specifications
- Other Name: Pan Assy-Oil; Oil Pan
- Lookup Code: 11110
- Item Weight: 7.30 Pounds
- Item Dimensions: 17.5 x 11.1 x 10.4 inches
- Condition: New
- Fitment Type: Direct Replacement
- SKU: 11110-0W000
- Warranty: This genuine part is guaranteed by Nissan's factory warranty.
2001 Nissan Pathfinder Oil Pan
Committed to delivering top-notch quality at affordable prices, our website is your go-to source for OEM 2001 Nissan Pathfinder Oil Pan worldwide. Each of our genuine 2001 Nissan Pathfinder Oil Pan come with a manufacturer's warranty, so rest assured, quality and cost are covered. With us, you're making a smart choice that stands the test of time.
Nissan Pathfinder Oil Pan Parts Questions & Experts Answers
- Q: How to remove an oil pan on 3.5L V6 Nissan Pathfinder?A: Begin the removal process by disconnecting the battery cable, engaging the parking brake, and securing the rear wheels. Raise the front of the vehicle and support it with jackstands, then remove any engine splash shields if they are present. Proceed to drain the engine oil and remove the oil filter. Disconnect the front exhaust pipe, remove catalytic converter heat shields, and take out the starter motor. Eliminate the suspension crossmember brace, and on 4WD models, remove the front differential by detaching the front driveaxles without disconnecting them from the steering knuckles. Next, remove the engine drivebelts and the lower idler pulley bracket, followed by the alternator and power steering pump. Ensure the power steering pump bracket is also removed. Take out the crankshaft position sensors from the front timing chain cover and transmission bellhousing. For vehicles with automatic transmissions, disconnect the transmission lines from the oil pan and the hoses from the Engine Oil Cooler. Disconnect the electrical connector from the oil pressure switch and loosen the steering gear lower pinch bolt. Support the engine/transmission from above using a hoist or engine support fixture and remove the lower engine mount retaining nuts. Lower the suspension crossmember brace and the steering gear to provide clearance for oil pan removal. If there's an automatic transmission, position its lines aside. Then, remove the lower steel pan from the upper aluminum section of the oil pan, ensuring not to damage the sealing surfaces. Remove the transmission mounting bolts from the upper aluminum section of the oil pan and the bolts attaching the upper aluminum section to the block, working from the ends towards the center in reverse order of the tightening sequence to prevent warping. To loosen the aluminum section of the oil pan, carefully insert a flathead screwdriver or pry bar into the provided notch on the side of the oil pan, taking care not to damage the sealing surfaces. For installation, use a scraper to eliminate all old gasket material and sealant from the upper aluminum section of the oil pan, the lower steel pan, and the engine block, and clean the mating surfaces with lacquer thinner or acetone. Make sure the threaded bolt holes in the block and aluminum section of the oil pan are clean. Apply a bead of ATV sealant to the ends of the front timing cover gasket and the rear oil seal retainer gasket, then place these gaskets in position on the oil pan. Apply a bead of ATV sealant around the upper aluminum oil pan flange. The oil pan must be installed within 15 minutes after applying the sealant. Position the upper aluminum section of the oil pan on the engine block and install the bolts, tightening them in three or four steps following the recommended sequence to the specified torque. Install the transmission mounting bolts. Examine the lower steel oil pan flange for distortion, particularly around the bolt holes, and flatten it if necessary. Apply a bead of RTV sealant around the steel oil pan flange and install the steel oil pan. Like before, the oil pan must be installed within 15 minutes after applying the sealant. Tighten the fasteners in several steps following the recommended sequence to the specific torque. Complete the installation by reversing the removal steps, remembering to install a new oil filter and allowing at least one hour before adding oil.
- Q: How to remove and install an oil pan on 2.4L four cylinder Nissan Pathfinder?A: Disconnect the cable from the negative terminal of the battery. Raise the vehicle and support it securely on jackstands. Remove the engine under-cover if equipped. Drain the engine oil and remove the oil filter. Unbolt and remove front exhaust pipe from the exhaust system. Detach the bellhousing cover. On 2WD models, remove the front suspension crossmember from beneath the oil pan. On 4WD models, remove the front axle/differential assembly. Remove the oil pan bolts, following the reverse of the tightening sequence. Detach the oil pan. Don't pry between the pan and engine block or damage to the sealing surfaces may result and oil leaks could develop. If the pan is stuck, dislodge it with a soft-face hammer. Use a gasket scraper to remove all traces of old gasket material and sealant from the engine block and pan. Clean the mating surfaces with lacquer thinner or acetone. Ensure that the threaded holes in the engine block are clean. Apply a continuous 5/32-inch (3.5 mm) bead of RTV sealant to the inner sealing surface of the oil pan. Install the oil pan and tighten the bolts in three or four steps following the sequence to the specific torque. The remaining installation steps are the reverse of removal. Allow at least 30 minutes for the sealant to dry, add oil and a new oil filter, start the engine and check for oil pressure and leaks.
- Q: How to remove and install an oil pan on 3.3L V6 Nissan Pathfinder?A: Disconnect the cable from the negative terminal of the battery. Raise the vehicle and support it securely on jackstands. Remove the engine under-cover (if equipped). Drain the engine oil and remove the oil filter. Unbolt and remove front exhaust pipes from the exhaust system. Also remove the front stabilizer bar and the relay rod. On vehicles equipped with automatic transmissions detach the bellhousing cover. On vehicles equipped with manual transmissions detach the transmission support brace from the left side of the engine. On 2WD models, remove the front suspension crossmember from beneath the oil pan. On 4WD models, remove the front differential. Remove the starter motor. Disconnect the steering relay rod from the idler arm and swing it out of the way. Support it so it isn't hanging by the ballstud at the Pit-man arm. Unbolt the power steering line brackets. Support the engine/transmission securely from above with a hoist. Unbolt the left and right engine mounts from the frame rail brackets and lilt the engine enough to allow clearance for removal of the oil pan. Work carefully and be sure not to wedge any parts such as the accelerator cable against any surrounding components. Remove the oil pan bolts, following the reverse of the tightening sequence. Detach the oil pan. Don't pry between the pan and engine block or damage to the sealing surfaces may result and oil leaks could develop. If the pan is stuck, dislodge it with a soft-face hammer. Use a gasket scraper to remove all traces of old gasket material and sealant from the engine block and pan. Clean the mating surfaces with lacquer thinner or acetone. Also ensure that the threaded holes in the engine block are clean. Apply RTV sealant to the ends of the seal sand position them on the Oil Pump and rear.seal housings. Apply a continuous 5/32-inch (3.5 mm) bead of RTV sealant to the inner sealing surface of the oil pan. Install the oil pan and tighten the bolts in three or lour steps following the sequence to the specific torque. The remaining installation steps are the reverse of removal. Allow at least 30 minutes for the sealant to dry, add oil and a new oil filter, start the engine and check for oil pressure and leaks.
Categories Close X
Axle & Suspension
Body (Back Door & Rear Body)
Body (Front, Roof & Floor)
Body (Side & Rear)
Body Electrical
Brake
Engine Electrical
Engine Mechanical
Exhaust & Cooling
Fuel & Engine Control
Miscellaneous
Power Train
Seat & Seat Belt
Steering