×
- Hello
- Login or Register
- Quick Links
- Live Chat
- Track Order
- Parts Availability
- RMA
- Help Center
- Contact Us
- Shop for
- Nissan Parts
- Nissan Accessories
My Garage
My Account
Cart
Genuine Nissan Quest Automatic Transmission Filter
AT Filter- Select Vehicle by Model
- Select Vehicle by VIN
Select Vehicle by Model
orMake
Model
Year
Select Vehicle by VIN
For the most accurate results, select vehicle by your VIN (Vehicle Identification Number).
14 Automatic Transmission Filters found


Nissan Quest Filter Assembly-Oil Governor
Part Number: 31726-28X0A$19.71 MSRP: $27.83You Save: $8.12 (30%)Ships in 1-2 Business Days


Nissan Quest Oil Strainer Assembly
Part Number: 31728-29X0D$54.35 MSRP: $76.77You Save: $22.42 (30%)Ships in 1-2 Business Days

Nissan Quest Oil Filter Assembly
Part Number: 31726-1XE0A$48.06 MSRP: $69.59You Save: $21.53 (31%)Ships in 1-3 Business Days

Nissan Quest Oil Strainer Assembly
Part Number: 31728-80X04$28.98 MSRP: $39.95You Save: $10.97 (28%)Ships in 1-3 Business Days


Nissan Quest Oil Strainer Assembly
Part Number: 31728-8Y000$41.14 MSRP: $56.72You Save: $15.58 (28%)Ships in 1-3 Business Days


Nissan Quest Oil Filter Assembly
Part Number: 31726-41X00$15.55 MSRP: $22.52You Save: $6.97 (31%)Ships in 1-3 Business Days

Nissan Quest Oil Strainer Assembly
Part Number: 31728-85X0A$77.81 MSRP: $109.90You Save: $32.09 (30%)Ships in 1-3 Business DaysNissan Quest Automatic Transmission Filter
Part Number: 31728-85X01$77.81 MSRP: $109.90You Save: $32.09 (30%)Ships in 1-3 Business Days
Nissan Quest Oil Strainer Assembly
Part Number: 31728-80L01$28.98 MSRP: $39.95You Save: $10.97 (28%)Ships in 1-3 Business Days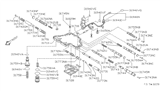
Nissan Quest Oil Strainer Assembly
Part Number: 31728-80X03$28.98 MSRP: $39.95You Save: $10.97 (28%)Ships in 1-3 Business Days


Nissan Quest Automatic Transmission Filter
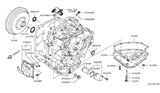
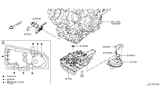
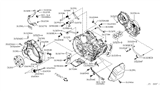
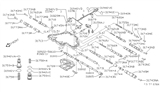
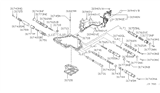
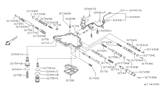
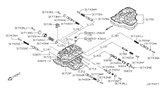
The Nissan Quest Automatic Transmission Filter prevents dirt and grit from circulating in the fluid before it can cause damage to internal components and parts. The Automatic Transmission Filter is a filter that is placed above the sump inside the transmission pan. Its function is to filter out metal shavings, clutch dust, and road debris. This ensures the fluid that is pumped under pressure for the operation of the gears remains clean, cool, and has the ability to build full hydraulic force. The Automatic Transmission Filter reaches capacity and become dirty, causing restriction of flow to clutches and bands, as well as tiny valve-body passages. All of this can starve the lubrication and pressure needed for smooth operation. Due to this, Nissan suggests the regular replacement of the Automatic Transmission Filter and fluid, a simple service that keeps shifts crisp, prevents overheating, and protects against expensive internal damage. Throughout every Quest generation, a single flat replaceable filter element with pickup tube and gasket has sufficed so drivers won't have to rummage through a variety of designs. By replacing the Automatic Transmission Filter at the suggested interval, it can prevent contamination, maintain consistent pump pressure, and enable any Nissan Quest transmission to serve efficiently for longer. Additionally, the Quest's design ensures optimal performance and reliability.
If you need any OEM Nissan Quest Automatic Transmission Filter, feel free to choose them out of our huge selection of genuine Nissan Quest Automatic Transmission Filter. All our parts are offered at unbeatable prices and are supported by the manufacturer's warranty. In addition, we offer quick shipping to have your parts delivered to your door step in a matter of days.
Nissan Quest Automatic Transmission Filter Parts Questions & Experts Answers
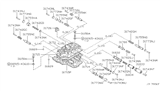
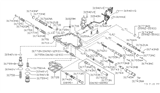
- Q: How to drain and replace transaxle fluid and Automatic Transmission Filter on Nissan Quest?A:At the specified time intervals, the transaxle fluid should be drained and replaced. Since the fluid will remain hot long after driving, perform this procedure only after everything has cooled down completely. Before beginning work, purchase the specified transaxle fluid and a new filter. Other tools necessary for this job include jackstands to support the vehicle in a raised position, a drain pan capable of holding several quarts, newspapers and clean rags. Raise the vehicle and support it securely on jackstands. With a drain pan in place, remove the drain plug, allow the fluid to drain fully, then remove the pan bolts. Note: Measure the amount of fluid drained and record it; when refilling the transaxle, start with that amount. Carefully pry the transaxle pan loose with a screwdriver and detach the pan and gasket. Carefully clean the gasket surface of the transaxle to remove all traces of the old gasket and sealant. Drain the remaining fluid from the transaxle pan, clean the pan with solvent and dry it with compressed air or a clean rag. Be careful not to lose the magnets. Remove the bolts and detach the filter. Install the new filter. Make sure the gasket surface on the transaxle pan is clean, then install the magnet and a new gasket. Put the pan in place against the transaxle and install the bolts. Working around the pan tighten each bolt a little at a time until the final torque figure. Don't overtighten the bolts! Lower the vehicle and add the same amount of new automatic transmission fluid that was measured through the filler tube. With the shift lever in Park and the parking brake set, run the engine at a fast idle, but don't race it. Move the shift lever through each gear and back to Park. Check the fluid level and add some, as necessary, to bring it to the appropriate level. Caution: Add fluid a little at a time to avoid overfilling. Check under the vehicle for leaks during the first few trips.

Related Nissan Quest Parts
 Nissan Quest Automatic Transmission Shifter
 Nissan Quest Automatic Transmission Shift Position Sensor Switch
Browse by Year
2017 Automatic Transmission Filter 2016 Automatic Transmission Filter 2015 Automatic Transmission Filter 2014 Automatic Transmission Filter 2013 Automatic Transmission Filter 2012 Automatic Transmission Filter 2011 Automatic Transmission Filter 2010 Automatic Transmission Filter 2009 Automatic Transmission Filter 2008 Automatic Transmission Filter 2007 Automatic Transmission Filter 2006 Automatic Transmission Filter 2005 Automatic Transmission Filter 2004 Automatic Transmission Filter 2003 Automatic Transmission Filter 2002 Automatic Transmission Filter 2001 Automatic Transmission Filter 2000 Automatic Transmission Filter 1999 Automatic Transmission Filter 1998 Automatic Transmission Filter 1997 Automatic Transmission Filter 1996 Automatic Transmission Filter 1995 Automatic Transmission Filter 1994 Automatic Transmission Filter 1993 Automatic Transmission Filter