×
- Hello
- Login or Register
- Quick Links
- Live Chat
- Track Order
- Parts Availability
- RMA
- Help Center
- Contact Us
- Shop for
- Nissan Parts
- Nissan Accessories
My Garage
My Account
Cart
Genuine Nissan Quest Brake Booster
Brake Power Booster- Select Vehicle by Model
- Select Vehicle by VIN
Select Vehicle by Model
orMake
Model
Year
Select Vehicle by VIN
For the most accurate results, select vehicle by your VIN (Vehicle Identification Number).
6 Brake Boosters found

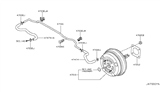
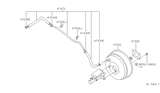
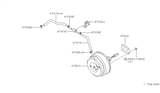
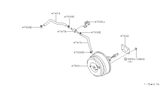
Nissan Quest Master Vacuum Assembly
Part Number: D7210-1JA0B$1192.33 MSRP: $1642.33You Save: $450.00 (28%)Ships in 1-2 Business Days


Nissan Quest Brake Booster
By multiplying the pressure before it reaches the master cylinder, the Nissan Quest Brake Booster decreases the pedal force a driver has to apply to stop the minivan. The Brake Booster is located between the brake pedal and the master cylinder. It contains an assisting chamber so that every brake in the Nissan feels lighter and quicker. It gives the Quest a confidence that you need. There are two basic designs available in the Nissan applications, vacuum operated boosters and hydraulic boosters. A Brake Booster containing a vacuum uses the pressure difference between engine vacuum and outside air. When the pedal is pressed, a valve lets atmospheric pressure into the rear half of the shell, pushing a diaphragm and power piston forward to apply the master cylinder. With the pedal released, equal vacuum on both sides resets the system. The hydraulic style Brake Booster uses pressurized fluid supplied by a steering pump or electric pump to provide similar assistance. The Brake Booster assembly on the Nissan Quest is designed to deliver a reliable pedal feel with low effort for everyday Quest driving.
If you need any OEM Nissan Quest Brake Booster, feel free to choose them out of our huge selection of genuine Nissan Quest Brake Booster. All our parts are offered at unbeatable prices and are supported by the manufacturer's warranty. In addition, we offer quick shipping to have your parts delivered to your door step in a matter of days.
Nissan Quest Brake Booster Parts Questions & Experts Answers
- Q: How to perform an operating check and replace the power brake booster on Nissan Quest?A:To perform an operating check, depress the Brake Pedal several times with the engine off to ensure there's no change in the pedal reserve distance. Then, depress the pedal and start the engine; if the pedal goes down slightly, operation is normal. For an airtightness check, start the engine and turn it off after one or two minutes, then depress the brake pedal slowly several times; if the pedal depresses less each time, the booster is airtight. Next, while the engine is running, depress the brake pedal and stop the engine with the pedal depressed; if there's no change in the pedal reserve travel after holding the pedal for 30 seconds, the booster is airtight. When replacing or adjusting the power brake booster, note that these units shouldn't be disassembled due to their complexity and critical relationship to brake performance, so they should be replaced with a new or rebuilt one. Begin by removing the Brake Master Cylinder, then disconnect the vacuum hose from the booster, taking care not to damage it. Remove the trim panel below the steering column and locate the pushrod clevis connecting the booster to the brake pedal; detach the pushrod by removing the retaining clip and clevis pin. Next, remove the four nuts and washers holding the brake booster to the firewall, then slide the booster straight out until the studs clear the holes. Before installing the new booster, measure the distance between the power brake booster and the hole in the clevis, adjusting the clevis if necessary to match the specified length. Apply about 20 in-Hg of vacuum to the brake booster with a hand-operated vacuum pump, measure the length of the output rod, and adjust as needed. Finally, installation is the reverse of removal, and if the Brake Lines were detached from the master cylinder, ensure to bleed the brake system, including the master cylinder.

Related Nissan Quest Parts
 Nissan Quest Brake Proportioning Valve
 Nissan Quest Brake Fluid Level Sensor
 Nissan Quest Brake Fluid Pump
 Nissan Quest Brake Master Cylinder
 Nissan Quest Master Cylinder Repair Kit
Browse by Year
2017 Brake Booster 2016 Brake Booster 2015 Brake Booster 2014 Brake Booster 2013 Brake Booster 2012 Brake Booster 2011 Brake Booster 2010 Brake Booster 2009 Brake Booster 2008 Brake Booster 2007 Brake Booster 2006 Brake Booster 2005 Brake Booster 2004 Brake Booster 2003 Brake Booster 2002 Brake Booster 2001 Brake Booster 2000 Brake Booster 1999 Brake Booster 1998 Brake Booster 1997 Brake Booster 1996 Brake Booster 1995 Brake Booster 1994 Brake Booster 1993 Brake Booster