×
- Hello
- Login or Register
- Quick Links
- Live Chat
- Track Order
- Parts Availability
- RMA
- Help Center
- Contact Us
- Shop for
- Nissan Parts
- Nissan Accessories
My Garage
My Account
Cart
Genuine Nissan Quest Door Handle
Inside Door Handle- Select Vehicle by Model
- Select Vehicle by VIN
Select Vehicle by Model
orMake
Model
Year
Select Vehicle by VIN
For the most accurate results, select vehicle by your VIN (Vehicle Identification Number).
262 Door Handles found


Nissan Quest Passenger Side Outside Handle Grip
Part Number: 82640-1JA2A$140.30 MSRP: $216.17You Save: $75.87 (36%)Ships in 1-2 Business Days


Nissan Quest Back Door Pull Handle
Part Number: 90940-1JA0A$39.75 MSRP: $59.78You Save: $20.03 (34%)Ships in 1-3 Business Days

Nissan Quest Back Door Pull Handle
Part Number: 90940-1JA0C$31.22 MSRP: $46.95You Save: $15.73 (34%)Ships in 1-3 Business Days


Nissan Quest Front Outside Door Handle Assembly, Left
Part Number: 80607-5Z059$57.72 MSRP: $86.73You Save: $29.01 (34%)Ships in 1-2 Business Days

Nissan Quest Front Outside Door Handle Assembly, Left
Part Number: 80607-ZM71A$76.52 MSRP: $114.98You Save: $38.46 (34%)Ships in 1-2 Business Days
Nissan Quest Front Left Door Inside Handle Beige
Part Number: 80671-ZM71B$23.84 MSRP: $35.85You Save: $12.01 (34%)Ships in 1-3 Business Days
Nissan Quest Interior Door Handle Assembly, Left
Part Number: 80671-1AN9A$62.41 MSRP: $96.16You Save: $33.75 (36%)Ships in 1-3 Business Days
Nissan Quest Front Door Outside Handle Assembly Right
Part Number: 80606-ZM90A$54.41 MSRP: $81.82You Save: $27.41 (34%)Ships in 1-3 Business DaysNissan Quest Front Outside Door Handle Assembly, Left
Part Number: 80607-ZM90A$74.62 MSRP: $114.98You Save: $40.36 (36%)Ships in 1-3 Business Days
Nissan Quest Outside Handle Assembly, Right
Part Number: 82606-ZM90A$92.85 MSRP: $143.02You Save: $50.17 (36%)Ships in 1-2 Business DaysNissan Quest Door Inside Handle Assembly Left Hand
Part Number: 80671-1AN0A$50.39 MSRP: $75.78You Save: $25.39 (34%)Ships in 1-3 Business Days
Nissan Quest Door Inside Handle Assembly, Passenger Side
Part Number: 80670-1AN0A$50.39 MSRP: $75.78You Save: $25.39 (34%)Ships in 1-3 Business DaysNissan Quest Front Door Outside Handle Assembly Right
Part Number: 80606-5Z058$57.72 MSRP: $86.73You Save: $29.01 (34%)Ships in 1-2 Business DaysNissan Quest Front Door Outside Handle Assembly Left
Part Number: 80607-7Y198$60.04 MSRP: $90.22You Save: $30.18 (34%)Ships in 1-2 Business Days
Nissan Quest Front Outside Door Handle Assembly, Right
Part Number: 80606-ZF00F$60.97 MSRP: $91.62You Save: $30.65 (34%)Ships in 1-2 Business Days
Nissan Quest Slide Door Handle Assembly Inside Right
Part Number: 82670-WL600$90.57 MSRP: $139.55You Save: $48.98 (36%)Ships in 1-3 Business Days
Nissan Quest Back Door Pull Handle
Part Number: 90940-ZM70A$8.70 MSRP: $13.09You Save: $4.39 (34%)Ships in 1-3 Business DaysNissan Quest Back Door Pull Handle
Part Number: 90940-ZM70B$8.95 MSRP: $13.45You Save: $4.50 (34%)Ships in 1-3 Business Days
Nissan Quest Slide Door Handle Assembly, Left
Part Number: 82672-ZM70B$28.38 MSRP: $42.67You Save: $14.29 (34%)Ships in 1-2 Business Days
Nissan Quest Front Door Outside Handle Assembly Right
Part Number: 80606-0B700$40.44 MSRP: $60.82Limited AvailabilityYou Save: $20.38 (34%)
| Page 1 of 14 |Next >
1-20 of 262 Results
Nissan Quest Door Handle
The Nissan Quest Door Handle enables an occupant to pull to open the door of the minivan for everyday use. Found both outside and inside each door, the Door Handle connects to the latch by a sturdy metal rod, which pulls the rod, sliding it away from the latch and allowing the door to swing free. The Door Handle version on the outside is exposed to the weather and repeated grasping from the outside, while the interior Door Handle is shaped for comfortable use in the cabin. But mechanically, they work the same. Made of either a durable plastic or metal, the assembly is designed to resist wear, though constant use can eventually lead to the need for replacement. In every Nissan Quest model, this small piece allows for easy entry and exit from the vehicle and is one of the frequently operated components on the vehicle. The Nissan Quest Door Handle may not affect engine performance, but it is instrumental in the daily ease of use for anyone using a Nissan Quest.
If you need any OEM Nissan Quest Door Handle, feel free to choose them out of our huge selection of genuine Nissan Quest Door Handle. All our parts are offered at unbeatable prices and are supported by the manufacturer's warranty. In addition, we offer quick shipping to have your parts delivered to your door step in a matter of days.
Nissan Quest Door Handle Parts Questions & Experts Answers
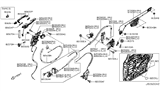
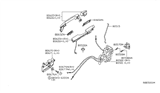
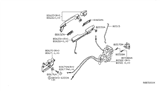
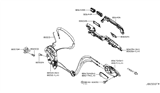
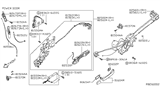
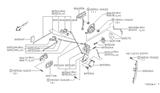
- Q: How to remove and install the door handle, door latch assembly, and door lock cylinder on a Nissan Quest?A:The procedures apply to both front doors and the sliding door except where noted. To address the door latch, begin by removing the door trim panel and watershield, then take out the screws securing the latch to the door. Detach the locking rods and pull the latch assembly through the access hole, ensuring to position it as necessary to disengage the outside door handle and lock cylinder from the latch rods. All door locking rods are attached by plastic clips, which can be removed by unsnapping the engaging portion and pulling the rod out. Next, position the latch to disengage it from the door lock solenoid if equipped, and remove the latch assembly. For the lock cylinder and outside handle, raise the window and remove the door trim panel and watershield. Disengage the plastic clip securing the lock cylinder to the latch rod, then slide the lock cylinder retaining clip out and remove the lock cylinder. For front doors, remove the door glass run retaining screw, then disengage the outside handle-to-latch rod and remove the two handle retaining nuts to take off the handle. On sliding doors, remove the outside handle retaining nuts, detach the link, and pull the handle from the door. The installation process is the reverse of removal. For the inside handle, remove the door trim panel and watershield, then on front doors, take out the bolt securing the inside handle, rotate it out, detach the two links, and remove it. On sliding doors, remove the screws and link securing the inside handle control mechanism. Installation is again the reverse of removal.

Related Nissan Quest Parts
 Nissan Quest Door Lock Actuator
 Nissan Quest Door Jamb Switch
 Nissan Quest Lift Support
 Nissan Quest Armrest
 Nissan Quest Door Hinge
 Nissan Quest Rear Passenger Door Handle Latch
 Nissan Quest Door Latch Cable
 Nissan Quest Door Check
Browse by Year
2017 Door Handle 2016 Door Handle 2015 Door Handle 2014 Door Handle 2013 Door Handle 2012 Door Handle 2011 Door Handle 2010 Door Handle 2009 Door Handle 2008 Door Handle 2007 Door Handle 2006 Door Handle 2005 Door Handle 2004 Door Handle 2003 Door Handle 2002 Door Handle 2001 Door Handle 2000 Door Handle 1999 Door Handle 1998 Door Handle 1997 Door Handle 1996 Door Handle 1995 Door Handle 1994 Door Handle 1993 Door Handle