×
- Hello
- Login or Register
- Quick Links
- Live Chat
- Track Order
- Parts Availability
- RMA
- Help Center
- Contact Us
- Shop for
- Nissan Parts
- Nissan Accessories
My Garage
My Account
Cart
Genuine Nissan Quest Hazard Warning Switch
Hazard Warning Emergency Light Switch- Select Vehicle by Model
- Select Vehicle by VIN
Select Vehicle by Model
orMake
Model
Year
Select Vehicle by VIN
For the most accurate results, select vehicle by your VIN (Vehicle Identification Number).
6 Hazard Warning Switches found


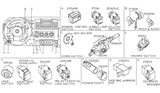
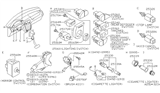
Nissan Quest Hazard Switch Assembly
Part Number: 25290-EA000$68.86 MSRP: $106.11You Save: $37.25 (36%)Ships in 1-3 Business Days
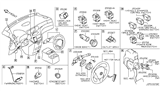
Nissan Quest Hazard Switch Assembly
Part Number: 25290-1JA0A$43.27 MSRP: $65.07You Save: $21.80 (34%)Ships in 1-3 Business Days

Nissan Quest Hazard Switch Assembly
Part Number: 25290-5Z000$20.30 MSRP: $30.53You Save: $10.23 (34%)Ships in 1-3 Business Days
Nissan Quest Hazard Warning Switch
The Nissan Quest Hazard Warning Switch enables the driver of the van to send an unmistakable alert that has a bright light to those nearby. The Hazard Warning Switch, mounted on the center dash, connects directly to the flasher relay. So when the switch is activated, every turn signal lamp blinks away in unison. In other words, that is an unequivocal signal that says trouble ahead or vehicle stopped on shoulder. During the early Nissan minivan production years, the first generation Quest applied a simple rectangular Hazard Warning Switch that had a red triangle icon. Basically, the later generations had the red triangle but had a different housing with a more sleek rounded push pad. In other words, the core circuitry and one touch activation were not changed subsequently. Regardless of the configuration, the Hazard Warning Switch does the same thing. When the regular brake lights and signals may not get everyone's attention, this switch will ensure the vehicle is visible from all angles. Due to the fast-changing nature of road situations, Nissan has designed the Hazard Warning Switch for fingertip reach so Quest owners can warn other road users almost instantly and minimize the chance of a collision.
If you need any OEM Nissan Quest Hazard Warning Switch, feel free to choose them out of our huge selection of genuine Nissan Quest Hazard Warning Switch. All our parts are offered at unbeatable prices and are supported by the manufacturer's warranty. In addition, we offer quick shipping to have your parts delivered to your door step in a matter of days.
Nissan Quest Hazard Warning Switch Parts Questions & Experts Answers
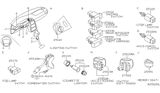
- Q: How to check the cruise control switch, rear hazard warning switch, and rear wiper switch on Nissan Quest?A:There are two switch "pods" on either side of the Instrument Cluster; the left pod includes the cruise control switch, headlight switch, dashboard light rheostat, and Autolamp switch, while the right pod contains the rear wiper/washer switch, rear defogger, and hazard switch. To check the cruise control switch, it must be removed first, and then continuity should be tested between terminals 5 and 7, 5 and 4, and 7 and 4 only when the switch is ON. For the headlight switch, dashboard light dimmer, and Autolamp switch, removal is also necessary, followed by continuity testing as specified. The rear wiper/washer switch requires removal as well, with continuity checks between terminals 5 and 6 when the wiper is ON, and between 4 and 5 when the washer is ON. The rear window defogger switch should be removed to test continuity between terminals 4 and 6, which should only show continuity when the switch is depressed. The hazard warning switch also needs to be removed for testing continuity between its terminals, which should show specific connections when the switch is ON. To remove any switch from the pods, use a screwdriver to pry it from the instrument panel, disconnect the electrical connector, and take care to tape the screwdriver tip to prevent damage to the panel covering; installation follows the reverse process of removal.

Related Nissan Quest Parts
 Nissan Quest Door Jamb Switch
 Nissan Quest Power Window Switch
 Nissan Quest Brake Light Switch
 Nissan Quest Headlight Switch
 Nissan Quest Oil Pressure Switch
 Nissan Quest Turn Signal Switch
 Nissan Quest Neutral Safety Switch
 Nissan Quest Wiper Switch
 Nissan Quest Mirror Switch
 Nissan Quest Seat Switch
 Nissan Quest Dimmer Switch
 Nissan Quest Seat Heater Switch
Browse by Year
2017 Hazard Warning Switch 2016 Hazard Warning Switch 2015 Hazard Warning Switch 2014 Hazard Warning Switch 2013 Hazard Warning Switch 2012 Hazard Warning Switch 2011 Hazard Warning Switch 2010 Hazard Warning Switch 2009 Hazard Warning Switch 2008 Hazard Warning Switch 2007 Hazard Warning Switch 2006 Hazard Warning Switch 2005 Hazard Warning Switch 2004 Hazard Warning Switch 2003 Hazard Warning Switch 2002 Hazard Warning Switch 2001 Hazard Warning Switch 2000 Hazard Warning Switch 1999 Hazard Warning Switch 1998 Hazard Warning Switch 1997 Hazard Warning Switch 1996 Hazard Warning Switch 1995 Hazard Warning Switch 1994 Hazard Warning Switch 1993 Hazard Warning Switch