×
- Hello
- Login or Register
- Quick Links
- Live Chat
- Track Order
- Parts Availability
- RMA
- Help Center
- Contact Us
- Shop for
- Nissan Parts
- Nissan Accessories
My Garage
My Account
Cart
Genuine Nissan Quest Oil Pan
Oil Drain Pan- Select Vehicle by Model
- Select Vehicle by VIN
Select Vehicle by Model
orMake
Model
Year
Select Vehicle by VIN
For the most accurate results, select vehicle by your VIN (Vehicle Identification Number).
17 Oil Pans found


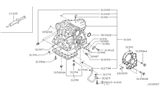
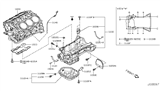
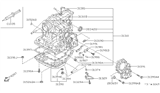
Nissan Quest Oil Pan Assembly
Part Number: 31390-29X0B$59.97 MSRP: $82.67You Save: $22.70 (28%)Ships in 1-3 Business Days


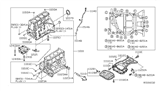
Nissan Quest Oil Pan
Part Number: 31390-1XE0A$100.19 MSRP: $141.52You Save: $41.33 (30%)Ships in 1-3 Business Days


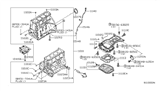
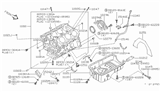
Nissan Quest Oil Pan Assembly
Part Number: 11110-JA10B$149.26 MSRP: $210.82You Save: $61.56 (30%)Ships in 1-3 Business Days


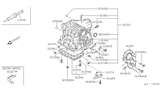
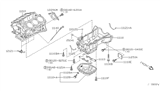
Nissan Quest Oil Pan Assembly
Part Number: 11110-ZA000$131.31 MSRP: $185.47You Save: $54.16 (30%)Ships in 1-3 Business Days


Nissan Quest Oil Pan Assembly
Part Number: 31390-80X06$45.39 MSRP: $62.57You Save: $17.18 (28%)Ships in 1-3 Business Days
Nissan Quest Oil Pan Assembly
Part Number: 11110-JP00B$252.87 MSRP: $357.17You Save: $104.30 (30%)Ships in 1-3 Business Days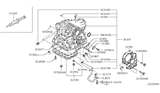
Nissan Quest Oil Pan Assembly
Part Number: 31390-88X00$92.02 MSRP: $129.97You Save: $37.95 (30%)Ships in 1-3 Business Days
Nissan Quest Oil Pan Assembly
Part Number: 11110-0B700$126.46 MSRP: $174.18You Save: $47.72 (28%)Ships in 1-2 Business Days
Nissan Quest Pan Assembly Oil
Part Number: 11110-8Y00A$194.24 MSRP: $274.35You Save: $80.11 (30%)Ships in 1-3 Business Days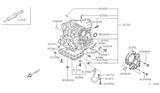
Nissan Quest Oil Pan Assembly
Part Number: 31390-80L00$45.39 MSRP: $62.57You Save: $17.18 (28%)Ships in 1-3 Business Days


Nissan Quest Oil Pan
The Oil Pan is one of the important parts of the Nissan Quest mainly concerned with the engine lubrication in all the models of Nissan Quest. The Oil Pan is located right under the engine and is in actuality, a tank which stores engine oil needed to lubricate, cool and protect the moving parts of the engine mechanism. This progression of the Oil Pan from stamped steel to the cast aluminum is the growth in the engineering, increasing the durability and performance of the pan while at the same time making it lighter. This design evolution is necessary for maintaining efficiency, more especially in areas that can lead to swaying of oil such as in turns. This component fits models of the Nissan Quest of several generations and promotes the effectiveness of protection for every creation. The Oil Pan is an important component that partakes in regulating the flow of oil and contributes in a way to the general safety as well as efficiency, making Nissan Quest a dependable car. In the same manner, key attributes of the Oil Pan like enhanced oil management system are exceptional characteristics which play a vital role in the vehicle's performance in the automotive market. In conclusion, the Oil Pan is one of the optimal samples that can represent the brand's idea about quality and innovation among the Nissan Quest series.
If you need any OEM Nissan Quest Oil Pan, feel free to choose them out of our huge selection of genuine Nissan Quest Oil Pan. All our parts are offered at unbeatable prices and are supported by the manufacturer's warranty. In addition, we offer quick shipping to have your parts delivered to your door step in a matter of days.
Nissan Quest Oil Pan Parts Questions & Experts Answers
- Q: How to remove and reinstall Oil Pan on Nissan Quest?A:To remove the engine, first disconnect the negative cable from the battery, then raise the vehicle and support it securely on jackstands. Remove the under-vehicle splash pan, drain the engine oil, and take off the oil filter. Unbolt the exhaust pipe from the front manifold and lower it. Remove the braces connecting the engine to the transaxle by detaching the bolts on each side and then take off the bellhousing cover. Support the engine/transaxle securely with a hoist or two hydraulic jacks, using wood blocks to protect the pulley and bellhousing. Unbolt the two passenger-side Engine Mounts from the crossmember and remove the engine-mount crossmember from beneath the oil pan, ensuring to detach the rear heater/air conditioning lines first. Remove the alternator, then take off the oil pan bolts in reverse order of tightening. Detach the oil pan carefully to avoid damaging the sealing surfaces, using a soft-face hammer if necessary. Clean all traces of old gasket material and sealant from the engine block and pan with a gasket scraper and solvent. Unbolt the oil pick-up tube and screen assembly. For installation, replace the O-ring on the oil pick-up tube flange before reinstalling it and tighten the bolts to the specified torque. Ensure the threaded holes in the engine block are clean, apply ATV sealant to the ends of the seals, and a continuous bead of sealant to the inner sealing surface of the oil pan, installing it within five minutes. Tighten the oil pan bolts in three or four steps following the proper sequence. The remaining steps follow the reverse order of removal. Allow at least 30 minutes for the sealant to dry, then add oil and a new oil filter, start the engine, and check for oil pressure and leaks.

Related Nissan Quest Parts
 Nissan Quest Drain Plug Washer
 Nissan Quest Oil Filter
 Nissan Quest Rod Bearing
 Nissan Quest Dipstick
 Nissan Quest Drain Plug
 Nissan Quest Oil Pump
 Nissan Quest Oil Pressure Switch
 Nissan Quest Oil Cooler
 Nissan Quest Crankshaft Thrust Washer Set
 Nissan Quest Piston Ring Set
 Nissan Quest Crankshaft Pulley
 Nissan Quest Dipstick Tube
Browse by Year
2017 Oil Pan 2016 Oil Pan 2015 Oil Pan 2014 Oil Pan 2013 Oil Pan 2012 Oil Pan 2011 Oil Pan 2010 Oil Pan 2009 Oil Pan 2008 Oil Pan 2007 Oil Pan 2006 Oil Pan 2005 Oil Pan 2004 Oil Pan 2003 Oil Pan 2002 Oil Pan 2001 Oil Pan 2000 Oil Pan 1999 Oil Pan 1998 Oil Pan 1997 Oil Pan 1996 Oil Pan 1995 Oil Pan 1994 Oil Pan 1993 Oil Pan