×
- Hello
- Login or Register
- Quick Links
- Live Chat
- Track Order
- Parts Availability
- RMA
- Help Center
- Contact Us
- Shop for
- Nissan Parts
- Nissan Accessories
My Garage
My Account
Cart
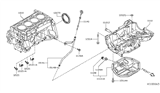
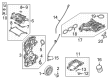
Genuine Nissan Rogue Oil Pan
Oil Drain Pan- Select Vehicle by Model
- Select Vehicle by VIN
Select Vehicle by Model
orMake
Model
Year
Select Vehicle by VIN
For the most accurate results, select vehicle by your VIN (Vehicle Identification Number).
21 Oil Pans found


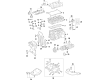
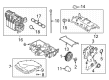
Nissan Rogue Oil Pan Assembly
Part Number: 31390-1XF00$59.18 MSRP: $83.58You Save: $24.40 (30%)Ships in 1-3 Business Days


Nissan Rogue Oil Pan Assembly
Part Number: 31390-1XF01$75.65 MSRP: $106.85You Save: $31.20 (30%)Ships in 1-3 Business Days


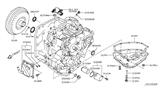
Nissan Rogue Oil Pan Assembly
Part Number: 11110-JG31A$162.32 MSRP: $229.27You Save: $66.95 (30%)Ships in 1-2 Business Days

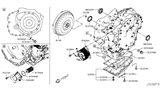
Nissan Rogue Pan Assembly Oil
Part Number: 11110-3TA3A$245.81 MSRP: $347.18You Save: $101.37 (30%)Ships in 1-3 Business Days


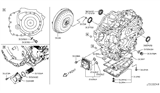
Nissan Rogue Pan Assembly Oil
Part Number: 11110-3TA0B$155.75 MSRP: $219.98You Save: $64.23 (30%)Ships in 1-3 Business Days

Nissan Rogue Oil Pan Assembly
Part Number: 31390-3VX0C$91.56 MSRP: $129.32You Save: $37.76 (30%)Ships in 1-3 Business Days
Nissan Rogue Oil Pan Assembly
Part Number: 11110-3TS1B$155.75 MSRP: $219.98You Save: $64.23 (30%)Ships in 1-3 Business DaysNissan Rogue Oil Pan Assembly
Part Number: 11110-3TS0B$155.75 MSRP: $219.98You Save: $64.23 (30%)Ships in 1-3 Business Days
Nissan Rogue Oil Pan Assembly
Part Number: 11110-4BB1C$220.98 MSRP: $312.12You Save: $91.14 (30%)Ships in 1-3 Business Days
Nissan Rogue Pan Assembly Oil
Part Number: 11110-4BB1B$192.53 MSRP: $271.93You Save: $79.40 (30%)Ships in 1-3 Business Days
Nissan Rogue Pan Assembly Oil
Part Number: 11110-6CA1A$395.50 MSRP: $558.62You Save: $163.12 (30%)Ships in 1-3 Business Days
Nissan Rogue Pan Assembly Oil
Part Number: 11110-6RA2A$395.50 MSRP: $558.62You Save: $163.12 (30%)Ships in 1-3 Business Days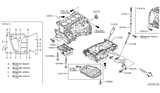
Nissan Rogue Pan Assembly Oil
Part Number: 11110-JH00B$220.80 MSRP: $311.87You Save: $91.07 (30%)Ships in 1-3 Business DaysNissan Rogue Oil Pan Assembly
Part Number: 11110-4BB0B$192.53 MSRP: $271.93You Save: $79.40 (30%)Ships in 1-3 Business Days


| Page 1 of 2 |Next >
1-20 of 21 Results
Nissan Rogue Oil Pan
The Nissan Rogue Oil Pan is a key component that serves as the main storage container for the engine lubricating oil in vehicles that use a wet sump system. In this system, the engine draws oil whenever it needs lubricating fluid. The Oil Pan, located directly below the engine, collects oil after it circulates through moving parts. A tightly sealed Oil Pan keeps lubricant from leaking out of the system. When oil collects in this sump, it is continuously lubricated when the pump pulls oil back up into the Nissan engine. The engine must be positioned slightly higher for the component's placement to accommodate the sump volume. When taking sharp corners, the oil inside the Oil Pan may slosh sideways and excessive movement may briefly prevent oil from being picked up. This is addressed by a dry sump system that is made optional on certain performance machines but not with the Nissan Rogue. The Oil Pan, in the case of everyday driving Rogue, remains a sealed container allowing the Nissan powerplant to retain, recirculate, and cool its own oil supply for dependable Rogue operation.
If you need any OEM Nissan Rogue Oil Pan, feel free to choose them out of our huge selection of genuine Nissan Rogue Oil Pan. All our parts are offered at unbeatable prices and are supported by the manufacturer's warranty. In addition, we offer quick shipping to have your parts delivered to your door step in a matter of days.
Nissan Rogue Oil Pan Parts Questions & Experts Answers
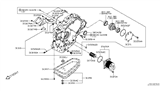
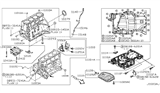
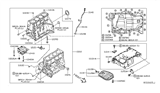
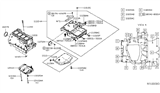
- Q: What does the procedure describe regarding the removal of the lower steel oil pan and the upper aluminum oil pan on Nissan Rogue?A:Much attention is paid to the procedure of the lower steel oil pan and the upper aluminum oil pan removal, whereas it is stated that if the only with lower pan is carried out, many steps can be omitted due to its accessibility. First, remove the nutrients of negative battery terminal, then loosen the lug nuts of the right front wheel and jack up the vehicle, and at last, take out the right front wheel off from the car. Suck out the engine oil and remove the engine oil filter next, and remove the engine oil dipstick tube this time and fit a new O-ring ring on the tube. Take out next the front part of the exhaust pipe, the drivebelt, as well as the right side driveaxle bearing bracket; next, the air conditioning compressor with its lines remaining connected. As the following step, you have to take out the lower torque rod and the transfer case for the AWD car models, after that you have to unbolt the stabilizer bar link and unbolt pr front subframe. The oil pan as a two-part construction: a steel pan, which is welded to an aluminum part which is sculpture to the block head. Uncrown the bolts that hold the oil pan starting from the reverse sequence in which you tightened them and use a thin putty knife to detach the steel pan but ensure that the sealing surface is not damaged. Label all the bolts for re-assembly next, then unscrew and pull out the oil pump screen and its supporting bolts. Unfasten the bolts that hold the aluminum section to the engine block turning the bolts in the reverse order of tightening and proceed to cut the sealant on the aluminum section before finally prying it down. Regarding installation, it is advisable to cut and remove all the old gasket material and sealant on the block and the oil pan without scratching the surfaces. Ensure the steel pan flange is not distorted and place a strip of RTV sealant on the perimeter of the aluminum section and place in within 15 minutes. If it's required new shorter O-rings to fit them, place the aluminum section on the engine block, and fasten all bolts in a sequence in correct torque limit. Where required, use RTV sealant on the steel pan, then place the steel pan in the location and refraining from loosening the bolts tighten them in concentric pattern to the indicated torque. To complete the removal process, reverse the outlined tasks, include the installation of a new oil filter, wait for the RTV to set for at least half an hour, join the battery terminals if required to perform re-learn procedures.

Related Nissan Rogue Parts
 Nissan Rogue Drain Plug Washer
 Nissan Rogue Oil Filter
 Nissan Rogue Dipstick
 Nissan Rogue Drain Plug
 Nissan Rogue Rod Bearing
 Nissan Rogue Oil Pressure Switch
 Nissan Rogue Oil Cooler
 Nissan Rogue Piston Ring Set
 Nissan Rogue Crankshaft Pulley
 Nissan Rogue Oil Pump
 Nissan Rogue Dipstick Tube
 Nissan Rogue Crankshaft Thrust Washer Set