×
- Hello
- Login or Register
- Quick Links
- Live Chat
- Track Order
- Parts Availability
- RMA
- Help Center
- Contact Us
- Shop for
- Nissan Parts
- Nissan Accessories
My Garage
My Account
Cart
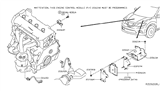
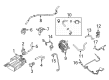
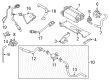
Genuine Nissan Rogue Oxygen Sensor
Oxygen O2 Sensor- Select Vehicle by Model
- Select Vehicle by VIN
Select Vehicle by Model
orMake
Model
Year
Select Vehicle by VIN
For the most accurate results, select vehicle by your VIN (Vehicle Identification Number).
23 Oxygen Sensors found


Nissan Rogue Air Fuel Ratio Sensor
Part Number: 22693-9HP0A$244.69 MSRP: $362.32You Save: $117.63 (33%)Ships in 1-2 Business Days


Nissan Rogue Air Fuel Ratio Sensor
Part Number: 22693-1AA0A$219.47 MSRP: $324.97You Save: $105.50 (33%)Ships in 1-2 Business Days


Nissan Rogue Rear Heated Oxygen Sensor
Part Number: 226A0-EN21A$200.53 MSRP: $296.92You Save: $96.39 (33%)Ships in 1-3 Business Days


Nissan Rogue Heated Oxygen Sensor
Part Number: 226A0-JA10C$217.41 MSRP: $321.92You Save: $104.51 (33%)Ships in 1-3 Business Days


Nissan Rogue Rear Heated Oxygen Sensor
Part Number: 226A0-9BF0B$219.49 MSRP: $325.00You Save: $105.51 (33%)Ships in 1-2 Business Days


Nissan Rogue Air Fuel Ratio Sensor Assembly
Part Number: 22693-ZX70A$232.90 MSRP: $344.85You Save: $111.95 (33%)Ships in 1-2 Business Days


Nissan Rogue Air Fuel Ratio Sensor Oxygen Sensor
Part Number: 22693-1NA0A$264.83 MSRP: $404.20You Save: $139.37 (35%)Ships in 1-2 Business Days

Nissan Rogue Air Fuel Ratio Sensor
Part Number: 22693-4CL0A$260.60 MSRP: $385.87You Save: $125.27 (33%)Ships in 1-3 Business Days


Nissan Rogue Air Fuel Ratio Sensor
Part Number: 22693-JA00B$219.47 MSRP: $324.97You Save: $105.50 (33%)Ships in 1-3 Business Days

Nissan Rogue Heated Oxygen Sensor
Part Number: 226A4-JA00A$196.05 MSRP: $290.28You Save: $94.23 (33%)Ships in 1-2 Business Days


Nissan Rogue Air Fuel Ratio Sensor
Part Number: 22693-JA00A$219.47 MSRP: $324.97You Save: $105.50 (33%)Ships in 1-2 Business Days
Nissan Rogue Sensor Assy Air Fuel Ratio
Part Number: 22693-6CA0C$189.04 MSRP: $279.92You Save: $90.88 (33%)Ships in 1-3 Business Days
Nissan Rogue Rear Heated Oxygen Sensor
Part Number: 226A0-6CC0B$104.98 MSRP: $152.03You Save: $47.05 (31%)Ships in 1-3 Business Days
Nissan Rogue Sensor Assembly Air Fuel Ratio
Part Number: 22693-5RB0A$294.47 MSRP: $449.43You Save: $154.96 (35%)Ships in 1-3 Business Days
Nissan Rogue Air Fuel Ratio Sensor
Part Number: 22693-4BA0A$244.65 MSRP: $362.25You Save: $117.60 (33%)Ships in 1-3 Business Days
Nissan Rogue Heated Oxygen Sensor
Part Number: 226A0-6RC1B$168.29 MSRP: $249.18You Save: $80.89 (33%)Ships in 1-3 Business Days
Nissan Rogue Air Fuel Ratio Sensor
Part Number: 22693-6RC1B$276.44 MSRP: $421.92You Save: $145.48 (35%)Ships in 1-3 Business Days
Nissan Rogue Rear Heated Oxygen Sensor
Part Number: 226A0-5CA0A$233.30 MSRP: $345.45You Save: $112.15 (33%)Ships in 1-3 Business DaysNissan Rogue Air Fuel Ratio Sensor
Part Number: 22693-6RC0A$276.73 MSRP: $422.37You Save: $145.64 (35%)Ships in 1-3 Business DaysNissan Rogue Heated Oxygen Sensor
Part Number: 226A0-6RC1A$270.41 MSRP: $412.72You Save: $142.31 (35%)Ships in 1-3 Business Days
| Page 1 of 2 |Next >
1-20 of 23 Results
Nissan Rogue Oxygen Sensor
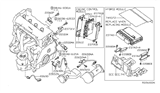
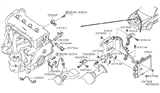
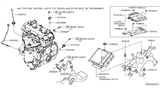
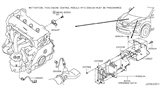
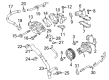
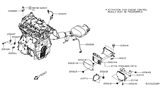
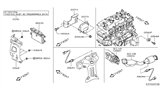
The Nissan Rogue Oxygen Sensor keeps track of the unburned oxygen in the exhaust so the engine control computer can maintain a balanced air fuel mixture and lesser emissions. Each Oxygen Sensor in the pipes, pre and post catalytic converter, is contained within a steel shell and consists of a zirconium dioxide element which is coated with platinum electrodes. The zirconium dioxide sensor is protected by ceramic and has a vented steel shell. The built-in heater will heat the sensing element to roughly 600°F. This causes oxygen ions to move from one platinum layer to another and produce a voltage that moves between about 0.1 and 0.9 volt. A high voltage indicates a rich mixture, whereas a low voltage signifies a lean mixture. Therefore, closed-loop fuel control optimizes catalytic converter efficiency. At least two of these Oxygen Sensor assemblies are applied by late-model Rogue vehicles, with the upstream unit providing primary feedback and the downstream unit acting as a catalyst monitor. A malfunctioning Oxygen Sensor may cause the engine computer of the Nissan to default to a richer mixture which uses more fuel. Nissan Rogue replacement replenishes control while maintaining rapid cycling of the Oxygen Sensor signal. Nissan Rogue's emissions consistently stay within standards.
If you need any OEM Nissan Rogue Oxygen Sensor, feel free to choose them out of our huge selection of genuine Nissan Rogue Oxygen Sensor. All our parts are offered at unbeatable prices and are supported by the manufacturer's warranty. In addition, we offer quick shipping to have your parts delivered to your door step in a matter of days.
Nissan Rogue Oxygen Sensor Parts Questions & Experts Answers
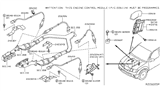
- Q: What are the precautions to take when servicing an oxygen sensor on Nissan Rogue?A:Be cautious when servicing an oxygen sensor since it has a permanently attached pigtail and electrical connector that should not be removed. Removing the pigtail or electrical connector can make the sensor to stop functioning properly. Stay away from dirt and grease on the louvered end of the sensor and electrical connector. Avoid using any cleaning solvents on the oxygen sensor. It is not recommended that you drop or mishandle it roughly. The silicone boot needs to be placed rightly so as to prevent melting and also allow for proper operation of the sensor. Locate the electrical connector and disconnect it in order to replace an upstream oxygen sensor. Separate the clips from which the sensor wiring harness is hung. In case you have an oxygen socket, unscrew it using one. You will possibly have to lift up the vehicle securely with jackstands so as reach it properly. If reinstalling old sensors, put anti-seize compounds on threads for easier removal at a future date. Anti-seize is already present on new sensors' threads before installation though. The installation process is just undoing everything that was done when removing something. Tighten down firmly by hand again for safety reasons. To install a downstream oxygen sensor: raise your car, secure it using jack stands; disconnect wiring harness from pigtail of this sensor; unscrew with an oxygen socket if available; For installing old sensors only, apply anti-seize compound to threads for easy removal later; New ones always come with anti-seize on their threads, so don't add more of this; Installation part reverses everything that had been done during un-installation hence tighten hand tight again for security purposes.

Related Nissan Rogue Parts
 Nissan Rogue Engine Control Module
 Nissan Rogue Catalytic Converter
 Nissan Rogue Canister Purge Valve
 Nissan Rogue Knock Sensor
 Nissan Rogue Ambient Temperature Sensor
 Nissan Rogue Vapor Canister
 Nissan Rogue Vapor Pressure Sensor
 Nissan Rogue Vehicle Speed Sensor
 Nissan Rogue Brake Fluid Level Sensor
 Nissan Rogue Yaw Sensor
Browse by Year
2025 Oxygen Sensor 2024 Oxygen Sensor 2023 Oxygen Sensor 2022 Oxygen Sensor 2021 Oxygen Sensor 2020 Oxygen Sensor 2019 Oxygen Sensor 2018 Oxygen Sensor 2017 Oxygen Sensor 2016 Oxygen Sensor 2015 Oxygen Sensor 2014 Oxygen Sensor 2013 Oxygen Sensor 2012 Oxygen Sensor 2011 Oxygen Sensor 2010 Oxygen Sensor 2009 Oxygen Sensor 2008 Oxygen Sensor