×
- Hello
- Login or Register
- Quick Links
- Live Chat
- Track Order
- Parts Availability
- RMA
- Help Center
- Contact Us
- Shop for
- Nissan Parts
- Nissan Accessories
My Garage
My Account
Cart
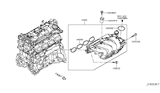
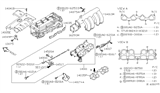
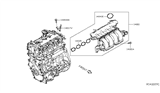
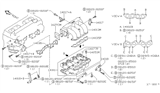
Genuine Nissan Sentra Intake Manifold
Engine Intake Manifold- Select Vehicle by Model
- Select Vehicle by VIN
Select Vehicle by Model
orMake
Model
Year
Select Vehicle by VIN
For the most accurate results, select vehicle by your VIN (Vehicle Identification Number).
61 Intake Manifolds found


Nissan Sentra Intake Manifold
Part Number: 14001-3RC6A$559.36 MSRP: $790.05You Save: $230.69 (30%)Ships in 1-3 Business Days


Nissan Sentra Intake Manifold
Part Number: 14001-3YM0C$462.32 MSRP: $653.00You Save: $190.68 (30%)Ships in 1-2 Business Days


Nissan Sentra Intake Manifold Assembly
Part Number: 14001-3YM0A$462.32 MSRP: $653.00You Save: $190.68 (30%)Ships in 1-3 Business Days


Nissan Sentra Intake Manifold Collector
Part Number: 14010-8J010$144.49 MSRP: $204.00You Save: $59.51 (30%)Ships in 1-2 Business Days


Nissan Sentra Intake Manifold
Part Number: 14001-8J001$299.65 MSRP: $423.23You Save: $123.58 (30%)Ships in 1-3 Business Days


Nissan Sentra Intake Manifold
Part Number: 14001-ET80A$311.77 MSRP: $440.35You Save: $128.58 (30%)Ships in 1-3 Business Days
Nissan Sentra Intake Manifold
Part Number: 14001-3RC0B$462.12 MSRP: $652.72You Save: $190.60 (30%)Ships in 1-3 Business Days

Nissan Sentra Intake Manifold Assembly
Part Number: 14001-3RC0A$559.36 MSRP: $790.05You Save: $230.69 (30%)Ships in 1-3 Business DaysNissan Sentra Intake Manifold
Part Number: 14001-3RC6B$462.12 MSRP: $652.72You Save: $190.60 (30%)Ships in 1-3 Business DaysNissan Sentra Intake Manifold Assembly
Part Number: 14001-ET00A$342.94 MSRP: $484.38You Save: $141.44 (30%)Ships in 1-3 Business DaysNissan Sentra Intake Manifold
Part Number: 14001-ZT60A$411.14 MSRP: $580.70You Save: $169.56 (30%)Ships in 1-3 Business Days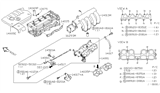
Nissan Sentra Intake Manifold Collector
Part Number: 14010-6M400$623.58 MSRP: $880.77You Save: $257.19 (30%)Ships in 1-3 Business Days
Nissan Sentra Intake Manifold
Part Number: 14001-ZJ60A$272.58 MSRP: $378.69You Save: $106.11 (29%)Ships in 1-3 Business DaysNissan Sentra Intake Manifold
Part Number: 14001-3RC1B$462.12 MSRP: $652.72You Save: $190.60 (30%)Ships in 1-3 Business Days
Nissan Sentra Intake Manifold Assembly
Part Number: 14001-ET000$342.94 MSRP: $484.38You Save: $141.44 (30%)Nissan Sentra Intake Manifold
Part Number: 14001-3RC1A$559.36 MSRP: $790.05You Save: $230.69 (30%)Ships in 1-3 Business DaysNissan Sentra Intake Manifold Collector
Part Number: 14010-8J002$144.43 MSRP: $204.00You Save: $59.57 (30%)Ships in 1-3 Business DaysNissan Sentra Intake Manifold Collector
Part Number: 14010-8J000$144.43 MSRP: $204.00You Save: $59.57 (30%)
Nissan Sentra Intake Manifold
Part Number: 14001-F4300$196.61 MSRP: $277.70Limited AvailabilityYou Save: $81.09 (30%)Nissan Sentra Intake Manifold Assembly
Part Number: 14001-8J000$299.65 MSRP: $423.23You Save: $123.58 (30%)Ships in 1-3 Business Days
| Page 1 of 4 |Next >
1-20 of 61 Results
Nissan Sentra Intake Manifold
The function of the Nissan Sentra Intake Manifold is to distribute the incoming air or air-fuel mixture to the cylinders evenly. This ensures smooth burning and consistent engine output. The Intake Manifold lies beyond the throttle body and is the final part of the air stream into an engine whose mixture distribution affects power and drivability. Today's designs feature lightweight composite plastic that helps to keep the charge cooler than aluminum or cast iron. The sealing of the gasket between the upper and lower sections of many units is given. The seal between the Intake Manifold and cylinder head must remain airtight. Any leakage can cause lean mixtures that will affect the performance of the engine. Some designs channel coolant within passages of the Intake Manifold to facilitate thermostat placement and monitoring. Engine coolant temperature and intake air temperature sensors can also mount here, allowing for exact fuel adjustments via data exchange. The Nissan Sentra system promotes equal runner length and smoothness of internal surfaces to assist with airflow while also managing low levels of turbulence to help break up fuel droplets. The Nissan Sentra Intake Manifold effectively seals and regulates temperature within the engine compartment and contributes to the overall efficient performance of the Nissan Sentra engine.
If you need any OEM Nissan Sentra Intake Manifold, feel free to choose them out of our huge selection of genuine Nissan Sentra Intake Manifold. All our parts are offered at unbeatable prices and are supported by the manufacturer's warranty. In addition, we offer quick shipping to have your parts delivered to your door step in a matter of days.
Nissan Sentra Intake Manifold Parts Questions & Experts Answers
- Q: How to remove and install the intake manifold on Nissan Sentra?A:On 2.5L engines, relieve the fuel system pressure. Remove the engine cover fasteners and take off the cover from the top of the engine. Detach the air inlet duct from the throttle body and air filter housing. Disconnect the cable from the negative terminal of the battery. Label and detach the PCV hose, brake booster hose, throttle control actuator, EVAP hose, and the purge control solenoid. Clamp off and disconnect the coolant hoses connected to the throttle body, then remove the throttle body and gasket. For the 2.0L engine, take out the intake manifold support bracket fasteners on each end of the manifold and remove the brackets. Remove the engine oil dipstick and cover the tube to prevent debris from entering. For the 2.5L engine, remove the battery tray, coolant reservoir, and disconnect the MAF sensor electrical connector. Remove the intake manifold support bracket fasteners and the bracket, then take off the cowl panel. Disconnect the injector rail fuel line quick-disconnect connector; it may be necessary to remove the fuel injectors and fuel rail to access the mounting bolts. Remove the front and rear intake manifold support bracket fasteners and brackets. Remove the intake manifold mounting nuts and bolts in reverse order of tightening, then take off the intake manifold from the cylinder head, ensuring to remove the intake manifold adapter on 2.5L engines after the manifold is removed. For installation, use a scraper to eliminate all old gasket material and sealant from the manifold and cylinder head, then clean the mating surfaces with brake system cleaner. Install a new gasket, position the intake manifold adapter on the cylinder head studs, then install another new gasket and position the intake manifold on the adapter, securing it with nuts/bolts. Tighten the nuts/bolts in sequence to the specified torque, then re-torque bolt number one. The remainder of the installation follows the reverse order of removal. Reconnect the battery and perform the necessary re-learn procedures.

Related Nissan Sentra Parts

Browse by Year
2025 Intake Manifold 2024 Intake Manifold 2023 Intake Manifold 2022 Intake Manifold 2021 Intake Manifold 2020 Intake Manifold 2019 Intake Manifold 2018 Intake Manifold 2017 Intake Manifold 2016 Intake Manifold 2015 Intake Manifold 2014 Intake Manifold 2013 Intake Manifold 2012 Intake Manifold 2011 Intake Manifold 2010 Intake Manifold 2009 Intake Manifold 2008 Intake Manifold 2007 Intake Manifold 2006 Intake Manifold 2005 Intake Manifold 2004 Intake Manifold 2003 Intake Manifold 2002 Intake Manifold 2001 Intake Manifold 2000 Intake Manifold 1999 Intake Manifold 1998 Intake Manifold 1997 Intake Manifold 1996 Intake Manifold 1995 Intake Manifold 1994 Intake Manifold 1993 Intake Manifold 1992 Intake Manifold 1991 Intake Manifold 1990 Intake Manifold 1989 Intake Manifold 1988 Intake Manifold 1987 Intake Manifold 1986 Intake Manifold 1985 Intake Manifold 1984 Intake Manifold 1983 Intake Manifold 1982 Intake Manifold