×
- Hello
- Login or Register
- Quick Links
- Live Chat
- Track Order
- Parts Availability
- RMA
- Help Center
- Contact Us
- Shop for
- Nissan Parts
- Nissan Accessories
My Garage
My Account
Cart
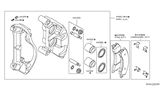
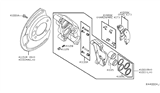
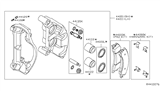
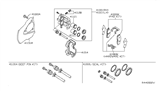
Genuine Nissan Titan Brake Pad Set
Disc Brake Pad Set- Select Vehicle by Model
- Select Vehicle by VIN
Select Vehicle by Model
orMake
Model
Year
Select Vehicle by VIN
For the most accurate results, select vehicle by your VIN (Vehicle Identification Number).
19 Brake Pad Sets found


Nissan Titan Front Brake Pads Kit
Part Number: D1060-9FE0A$81.70 MSRP: $118.32You Save: $36.62 (31%)Ships in 1-3 Business Days


Nissan Titan Disc Brake Pads Kit
Part Number: D4060-1PA0A$90.41 MSRP: $130.93You Save: $40.52 (31%)Ships in 1-3 Business Days
Nissan Titan Front Brake Pads Kit
Part Number: D1060-EZ00A$96.99 MSRP: $140.47You Save: $43.48 (31%)Ships in 1-2 Business Days
Nissan Titan Rear Brake Pads Kit
Part Number: D4060-EZ60A$84.93 MSRP: $123.00You Save: $38.07 (31%)Ships in 1-2 Business Days


Nissan Titan Front Brake Pads Kit
Part Number: D1060-ZC60J$81.70 MSRP: $118.32You Save: $36.62 (31%)Ships in 1-3 Business Days
Nissan Titan Front Brake Pads Kit
Part Number: 41060-ZC027$77.38 MSRP: $112.07You Save: $34.69 (31%)Ships in 1-3 Business Days


Nissan Titan Front Brake Pads Kit
Part Number: 41060-ZC025$77.38 MSRP: $112.07You Save: $34.69 (31%)Ships in 1-3 Business Days

Nissan Titan Front Brake Pads Kit
Part Number: D1060-1LA1A$81.70 MSRP: $118.32You Save: $36.62 (31%)Ships in 1-3 Business Days
Nissan Titan Disc Brake Pad Kit
Part Number: D1060-9FV0A$84.93 MSRP: $123.00You Save: $38.07 (31%)Ships in 1-3 Business Days

Nissan Titan Pad Kit-Disc Br
Part Number: D4060-9FV0D$73.47 MSRP: $106.40You Save: $32.93 (31%)Ships in 1-3 Business Days

Nissan Titan Pad Kit-Disc Br
Part Number: D4060-9FV1B$98.28 MSRP: $142.34You Save: $44.06 (31%)Ships in 1-3 Business Days
Nissan Titan Disc Brake Pad Kit
Part Number: D1060-9FV0C$106.45 MSRP: $154.17You Save: $47.72 (31%)Ships in 1-3 Business Days


Nissan Titan Brake Pad Set
Nissan Titan Brake Pad Set slows down the truck by pressing a friction material against the rotating brake rotors. This action turns the motion into heat to stop the truck. This Brake Pad Set's backing plate is made of steel, which is either bonded or riveted to a composite material of metals and synthetic fibers that can withstand temperatures often reaching 400 degrees Fahrenheit. Through the caliper, two pads impose on each rotor, and the material moved generates the needed grip. When the lining is worn out, the manufacturers specify a minimum thickness. It would include useful wear sensors or audible indicators that indicate when to replace the set. Routine inspections help to make sure the Nissan braking system provides consistent performance, as an excessively worn Titan rotor surface can extend stopping distances. Routine replacement of the Brake Pad Set at regular service intervals restricts fade and excessive wear of the rotor. When the friction layer wears out, a new Nissan Titan Brake Pad Set will return the brakes to a reliable state. A Nissan Titan's everyday driving needs demand an authentic Brake Pad Set that strikes a balance among friction, wear resistance, and noise.
If you need any OEM Nissan Titan Brake Pad Set, feel free to choose them out of our huge selection of genuine Nissan Titan Brake Pad Set. All our parts are offered at unbeatable prices and are supported by the manufacturer's warranty. In addition, we offer quick shipping to have your parts delivered to your door step in a matter of days.
Nissan Titan Brake Pad Set Parts Questions & Experts Answers
- Q: How to replace Brake Pad Set on Nissan Titan?A:On Armada models equipped with a rear auto-leveling suspension, turn the ignition key to the OFF position before raising the vehicle. This procedure applies to front and rear disc brakes. Remove the cap from the brake fluid reservoir and remove about two-thirds of the fluid. Discard the used brake fluid properly. Loosen the wheel lug nuts, raise the front or rear of the vehicle and support it securely on jackstands. Remove the front or rear wheels. Position a drain pan under the Brake Caliper assembly and thoroughly clean it with brake system cleaner. Always wash the brakes with brake cleaner before disassembling anything. Inspect the Brake Disc carefully. If machining is necessary, follow the information to remove the disc, at which time the calipers and pads can be removed as well. Push the piston(s) completely back into the bore(s) using a C-clamp. This is necessary to provide space for the new brake pads. When a piston is depressed to the bottom of the caliper bore, the fluid in the master cylinder will rise. Make sure that it doesn't overflow by removing more fluid as necessary. For front pad replacement, work on one brake assembly at a time using the assembled brake for reference if necessary. For rear pad replacement, follow illustrations for the actual pad replacement procedure. Work on one brake assembly at a time using the assembled brake for reference if necessary. When reinstalling the caliper, be sure to tighten the mounting bolt to the torque. After the job has been completed, perform the following: Slowly depress the brake pedal about two-thirds of its travel a few times until the pedal is firm. This will bring the pads into contact with the brake disc. Install the wheels and lug nuts. Lower the vehicle to the ground and tighten the lug nuts to the torque. Check the level of the brake fluid, adding some if necessary. In an isolated area, drive the vehicle and make a few hard stops to seat the pads to the disc. Allow the brakes to cool by driving the vehicle at least one minute in between stops. Continue making stops until the brakes feel responsive and normal. Remember to cool the brakes in between stops. Finally, check the operation of the brakes carefully before placing the vehicle into normal service.

Related Nissan Titan Parts
 Nissan Titan Brake Backing Plate
 Nissan Titan Brake Disc
 Nissan Titan Brake Caliper
 Nissan Titan Brake Fluid Pump
 Nissan Titan Brake Caliper Repair Kit
 Nissan Titan Brake Shoe Set
 Nissan Titan Brake Pedal
 Nissan Titan Parking Brake Shoe
 Nissan Titan Master Cylinder Repair Kit
Browse by Year
2024 Brake Pad Set 2023 Brake Pad Set 2022 Brake Pad Set 2021 Brake Pad Set 2020 Brake Pad Set 2019 Brake Pad Set 2018 Brake Pad Set 2017 Brake Pad Set 2016 Brake Pad Set 2015 Brake Pad Set 2014 Brake Pad Set 2013 Brake Pad Set 2012 Brake Pad Set 2011 Brake Pad Set 2010 Brake Pad Set 2009 Brake Pad Set 2008 Brake Pad Set 2007 Brake Pad Set 2006 Brake Pad Set 2005 Brake Pad Set 2004 Brake Pad Set