×
- Hello
- Login or Register
- Quick Links
- Live Chat
- Track Order
- Parts Availability
- RMA
- Help Center
- Contact Us
- Shop for
- Nissan Parts
- Nissan Accessories
My Garage
My Account
Cart
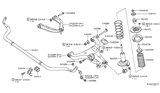
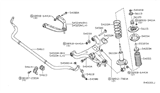
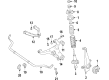
Genuine Nissan Titan Control Arm
Suspension Arm- Select Vehicle by Model
- Select Vehicle by VIN
Select Vehicle by Model
orMake
Model
Year
Select Vehicle by VIN
For the most accurate results, select vehicle by your VIN (Vehicle Identification Number).
24 Control Arms found


Nissan Titan Link COMPL-FRT Suspension UPPR
Part Number: 54524-ZR00B$155.72 MSRP: $230.57You Save: $74.85 (33%)Ships in 1-3 Business Days


Nissan Titan Link COMPL-FRT Suspension UPPR
Part Number: 54525-ZR00B$155.72 MSRP: $230.57You Save: $74.85 (33%)Ships in 1-3 Business Days


Nissan Titan Link Complete-Front Suspension, Lower LH
Part Number: 54501-ZR00A$149.77 MSRP: $221.77You Save: $72.00 (33%)Ships in 1-2 Business Days

Nissan Titan Front Suspension Link Complete Lower Right Hand
Part Number: 54500-EZ00B$209.70 MSRP: $310.50You Save: $100.80 (33%)Ships in 1-3 Business Days


Nissan Titan Link Complete-Front Suspension, Lower LH
Part Number: 54501-EZ00B$179.50 MSRP: $265.78You Save: $86.28 (33%)Ships in 1-3 Business Days


Nissan Titan Front Suspension Link Complete Lower Right Hand
Part Number: 54500-ZR00A$165.36 MSRP: $244.85You Save: $79.49 (33%)Ships in 1-2 Business Days
Nissan Titan Link Complete-Front Suspension, Upper RH
Part Number: 54524-ZR00A$155.72 MSRP: $230.57You Save: $74.85 (33%)Ships in 1-3 Business Days


Nissan Titan Link Complete-Front Suspension, Upper LH
Part Number: 54525-ZR00A$155.72 MSRP: $230.57You Save: $74.85 (33%)Ships in 1-3 Business Days


Nissan Titan Link Complete-Front Suspension, Upper RH
Part Number: 54524-7S000$155.72 MSRP: $230.57You Save: $74.85 (33%)Ships in 1-3 Business Days
Nissan Titan Link Complete-Front Suspension Upper
Part Number: 54524-EZ50C$213.10 MSRP: $315.53You Save: $102.43 (33%)Ships in 1-3 Business Days


Nissan Titan Link Complete-Front Suspension, Upper LH
Part Number: 54525-7S000$155.72 MSRP: $230.57You Save: $74.85 (33%)Ships in 1-3 Business Days


Nissan Titan Front Suspension Link Complete Lower Right Hand
Part Number: 54500-EZ50B$442.75 MSRP: $675.75You Save: $233.00 (35%)Ships in 1-3 Business Days
Nissan Titan Link COMPL-Front Suspension, Lower LH
Part Number: 54501-EZ50C$442.75 MSRP: $675.75You Save: $233.00 (35%)Nissan Titan Link COMPL-Front Suspension, Lower RH
Part Number: 54500-EZ50C$442.75 MSRP: $675.75You Save: $233.00 (35%)Ships in 1-3 Business DaysNissan Titan Link Complete-Front Suspension Upper
Part Number: 54525-EZ50C$213.10 MSRP: $315.53You Save: $102.43 (33%)Ships in 1-3 Business DaysNissan Titan Link Complete-Front Suspension, Upper RH
Part Number: 54524-EZ50A$213.10 MSRP: $315.53You Save: $102.43 (33%)Ships in 1-3 Business DaysNissan Titan Link Complete-Front Suspension, Lower LH
Part Number: 54501-EZ50B$442.75 MSRP: $675.75You Save: $233.00 (35%)Ships in 1-3 Business DaysNissan Titan Link Complete-Front Suspension, Upper LH
Part Number: 54525-EZ50A$213.10 MSRP: $315.53You Save: $102.43 (33%)Ships in 1-3 Business DaysNissan Titan Link Complete-Front Suspension Upper
Part Number: 54525-EZ50B$213.10 MSRP: $315.53You Save: $102.43 (33%)Ships in 1-3 Business DaysNissan Titan Link Complete-Front Suspension Upper
Part Number: 54524-EZ50B$213.10 MSRP: $315.53You Save: $102.43 (33%)Ships in 1-3 Business Days
| Page 1 of 2 |Next >
1-20 of 24 Results
Nissan Titan Control Arm
The purpose of the Nissan Titan Control Arm is to connect the vehicle's frame to the wheel assembly to allow the wheel to move up or down. Each Control Arm serves as a key linkage and is equipped with one bushing at the frame end, as well as a second bushing or ball joint at the knuckle or axle to direct suspension movement. In front suspensions, this Control Arm usually acts as the lower link with an additional rod or link controlling wheel movement fore and aft, particularly in layouts that use MacPherson struts. It is possible for a wheel to rely on one or two arms for support depending on suspension design, and the component will transfer load to springs or shock absorbers provided the system places the spring on the arm. Across automotive applications, construction will vary. For instance, stamped steel, cast iron, and cast aluminum construction highlight strength and weight. A properly functioning Control Arm helps keep Titan handling stable. However, damage from worn bushings, corrosion, or impact bending may require you to make Control Arm replacement on your Nissan Titan so that Nissan drivers continue to enjoy confident steering response on their Nissan Titan.
If you need any OEM Nissan Titan Control Arm, feel free to choose them out of our huge selection of genuine Nissan Titan Control Arm. All our parts are offered at unbeatable prices and are supported by the manufacturer's warranty. In addition, we offer quick shipping to have your parts delivered to your door step in a matter of days.
Nissan Titan Control Arm Parts Questions & Experts Answers
- Q: How to remove and install the upper control arm on Nissan Titan?A:When you want to lift the vehicle up, turn the ignition key to the OFF position on Armada models that have a rear auto-leveling suspension. During installation, new locknuts should be utilized for control arm pivot bolts as suggested by the manufacturer. The upper control arm can be removed by first loosening wheel lug nuts and raising the front of the vehicle onto jackstands. After removing the wheel and fenderwell liner, detach the upper control arm from the Steering Knuckle by taking out a cotter pin, loosening the upper balljoint nut, and applying a balljoint separator to pry off the balljoint from its socket in the knuckle. The nut is then taken off. For protection purposes, wire is used to hold together steering knuckle. Locate where you had positioned upper control arm pivot bolts and notes how they were fixed; thereafter remove them along with their nuts. As far as this new control arm is concerned, do not fasten it yet but put it between frame brackets with both its bolts and nuts. Thereafter install a new cotter pin before finally tightening ballstud nut that holds tie rod end into place at inside of steering knuckle while attaching balljoint's bottom section to its top part on top of steering knuckle. Finally tighten control arm pivot bolts/nuts properly. When tightening these bolt ones must jack up lower control arm till it reaches normal ride height or just let wheel sit inside once more before it is ready to rest on floor jack anymore so that you are going move ahead with tightening upper controlling arms mounting fasteners now in this direction or else when wheel does not move but rest at ground level in order tighten those nuts too as well as complete their installation which will include lastly tightening wheel lugs nuts after reversing processes of removals step-by-step which also includes checkup of front-end alignment need for any adjustment lastly if any.

Related Nissan Titan Parts
 Nissan Titan Shift Cable
 Nissan Titan Control Arm Bushing
 Nissan Titan Control Arm Bracket
 Nissan Titan Control Arm Shaft Kit
Browse by Year
2024 Control Arm 2023 Control Arm 2022 Control Arm 2021 Control Arm 2020 Control Arm 2019 Control Arm 2018 Control Arm 2017 Control Arm 2016 Control Arm 2015 Control Arm 2014 Control Arm 2013 Control Arm 2012 Control Arm 2011 Control Arm 2010 Control Arm 2009 Control Arm 2008 Control Arm 2007 Control Arm 2006 Control Arm 2005 Control Arm 2004 Control Arm