×
- Hello
- Login or Register
- Quick Links
- Live Chat
- Track Order
- Parts Availability
- RMA
- Help Center
- Contact Us
- Shop for
- Nissan Parts
- Nissan Accessories
My Garage
My Account
Cart
Genuine Nissan Titan Differential Seal
- Select Vehicle by Model
- Select Vehicle by VIN
Select Vehicle by Model
orMake
Model
Year
Select Vehicle by VIN
For the most accurate results, select vehicle by your VIN (Vehicle Identification Number).
6 Differential Seals found


Nissan Titan Oil Seal
Part Number: 38189-EZ40A$37.02 MSRP: $51.03You Save: $14.01 (28%)Ships in 1-3 Business Days


Nissan Titan Drive Pinion Oil Seal
Part Number: 38189-8S100$26.85 MSRP: $37.02You Save: $10.17 (28%)Ships in 1-2 Business Days

Nissan Titan Oil Seal
Part Number: 38189-EZ20B$33.47 MSRP: $46.13You Save: $12.66 (28%)Ships in 1-3 Business Days
Nissan Titan Oil Seal
Part Number: 38189-EZ40B$32.20 MSRP: $44.38You Save: $12.18 (28%)Ships in 1-3 Business Days
Nissan Titan Oil Seal
Part Number: 38189-EZ20A$30.70 MSRP: $42.32You Save: $11.62 (28%)Ships in 1-3 Business Days
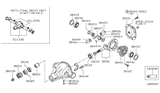
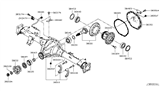
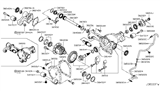
Nissan Titan Differential Seal
Nissan Titan Differential Seal keeps gear oil inside the axle housing while blocking dirt and water, letting the truck's differential do its job without grinding itself to pieces. Positioned where the drive shafts meet the front or rear differential, each Differential Seal forms a tight ring of synthetic rubber that flexes with shaft rotation yet refuses to leak, using a spring loaded lip and a thin oil film to stay pressed against the metal surface. Over the years the Nissan pickup has employed both open and limited slip differentials, and although their internal gear sets differ, each still relies on a healthy Differential Seal to prevent fluid loss that would otherwise overheat gears or clutches. The open unit splits torque evenly so a slipping tire can spin, while the limited slip packs clutches that send more power to the wheel with grip, a setup that runs hotter and places extra demand on the Differential Seal. Later Nissan versions of the Titan carry an updated housing that still accepts the same size Differential Seal, helping owners avoid redesign headaches and keeping Titan drivetrain performance consistent, protecting Titan market value as well.
If you need any OEM Nissan Titan Differential Seal, feel free to choose them out of our huge selection of genuine Nissan Titan Differential Seal. All our parts are offered at unbeatable prices and are supported by the manufacturer's warranty. In addition, we offer quick shipping to have your parts delivered to your door step in a matter of days.
Nissan Titan Differential Seal Parts Questions & Experts Answers
- Q: How to replace a differential seal on the pinion of a Nissan Titan?A:Firstly, in order to start the process of replacing the differential pinion seal, you have to loosen the lug nuts on the wheels and firmly raise the front or back of your vehicle with jacks while blocking off any other wheels to prevent them from moving . After this, take off your wheels and remove driveshaft from the differential companion flange and set it aside. Next, remove the rear brake discs and rotate manually a pinion shaft several times. Using a beam-type or dial-type inch-pound torque wrench measure torque needed for pinion rotation and note down this value for reference. Also, mark the position between pinion flange and shaft; count exposed threads over nut and note among others things about these details. In order to release a self-locking pinion nut use a flange holding tool, which will prevent movement of the companion flange. The nut is pulled carefully out by using two-jaw pullers if necessary. No attempt should be made at prying or hammering behind the flange or at hammering on the end of pinion shaft. Then pry out, discard old seal. After lubricating lips of new seal, fill wheel bearing grease into space between its lips evenly tapped into place with large socket while ensuring it sits squarely as well as reaches full depth within housing using either a seal installation tool or large socket.. While aligning marks that were previously made install pinion flange into place. If necessary, tighten pinion nut to draw flange into place without any need for hammering on it. Apply RTV sealant to visible ends of splines sticking out in middle of flanges as shown between arrows to seal in oil (Fig. 12). Install new pinion nut followed by new lockwasher (never reuse old ones) and tighten nut (Fig 11). Meanwhile recheck torque necessary for correct rotation rate of pinion and tighten gradually incrementally not exceeding 5ft-lbs until it increases to the value recorded. Finally, tighten the nut slightly more to accommodate new oil seal's drag, until pinion's rotational torque is 5 in-lbs greater than that previously recorded. Warning: if desired preload is not achieved before the maximum nut torque is reached, the differential should be disassembled and a new collapsible spacer installed. Re-install all items previously removed after reversing the steps for removal and tighten fasteners to specified torque values.

Related Nissan Titan Parts
 Nissan Titan Coolant Temperature Sensor
 Nissan Titan Axle Shaft
 Nissan Titan Differential
 Nissan Titan CV Joint Companion Flange
 Nissan Titan Differential Bearing
Browse by Year
2024 Differential Seal 2023 Differential Seal 2022 Differential Seal 2021 Differential Seal 2020 Differential Seal 2019 Differential Seal 2018 Differential Seal 2017 Differential Seal 2016 Differential Seal 2015 Differential Seal 2014 Differential Seal 2013 Differential Seal 2012 Differential Seal 2011 Differential Seal 2010 Differential Seal 2009 Differential Seal 2008 Differential Seal 2007 Differential Seal 2006 Differential Seal 2005 Differential Seal 2004 Differential Seal