×
- Hello
- Login or Register
- Quick Links
- Live Chat
- Track Order
- Parts Availability
- RMA
- Help Center
- Contact Us
- Shop for
- Nissan Parts
- Nissan Accessories
My Garage
My Account
Cart
Genuine Nissan Titan Door Lock Cylinder
Door Lock Cylinder Tumbler- Select Vehicle by Model
- Select Vehicle by VIN
Select Vehicle by Model
orMake
Model
Year
Select Vehicle by VIN
For the most accurate results, select vehicle by your VIN (Vehicle Identification Number).
13 Door Lock Cylinders found


Nissan Titan Cylinder Set-Rear Gate Lock
Part Number: K3477-EZ01A$96.48 MSRP: $148.65You Save: $52.17 (36%)Ships in 1-3 Business Days

Nissan Titan Trunk Lid Lock Cylinder Set
Part Number: H4660-7S215$117.91 MSRP: $181.67You Save: $63.76 (36%)Ships in 1-2 Business Days

Nissan Titan Cylinder Set-Door Lock,L
Part Number: H0601-7Y000$140.22 MSRP: $216.05You Save: $75.83 (36%)Ships in 1-2 Business Days

Nissan Titan Cylinder Set - Door Lock, LH
Part Number: H0601-7Y00J$230.40 MSRP: $355.00You Save: $124.60 (36%)Ships in 1-3 Business Days
Nissan Titan Cylinder Set-Door Lock,L
Part Number: H0601-7Y029$209.45 MSRP: $322.73You Save: $113.28 (36%)Ships in 1-3 Business Days

Nissan Titan Back Door Lock Cylinder
Part Number: K3477-7S20J$96.48 MSRP: $148.65You Save: $52.17 (36%)Ships in 1-2 Business Days
Nissan Titan Cylinder Assembly-Storage Bin
Part Number: H4660-7S21J$117.91 MSRP: $181.67You Save: $63.76 (36%)Ships in 1-3 Business Days
Nissan Titan Back Door Lock Cylinder Set
Part Number: K3477-7S201$96.48 MSRP: $148.65You Save: $52.17 (36%)Ships in 1-3 Business Days


Nissan Titan Cylinder Set-Door Lock,L
Part Number: 80601-7Y000$140.22 MSRP: $216.05You Save: $75.83 (36%)Ships in 1-3 Business Days
Nissan Titan Cylinder Set - Door Lock, RH
Part Number: H0600-7S00J$197.58 MSRP: $296.89You Save: $99.31 (34%)Ships in 1-2 Business DaysNissan Titan Back Door Lock Cylinder
Part Number: K3477-9FM0A$75.10 MSRP: $115.71You Save: $40.61 (36%)Ships in 1-2 Business DaysNissan Titan Cylinder Set-Rear Gate Lock
Part Number: 93477-EZ01A$96.48 MSRP: $148.65You Save: $52.17 (36%)Ships in 1-3 Business Days
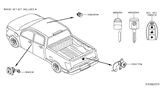
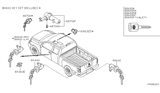
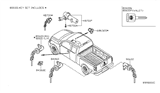
Nissan Titan Door Lock Cylinder
The Nissan Titan Door Lock Cylinder allows the pickup's front door to be accessed and locked via a physical key, providing the Titan with basic security and access to its cabin. This model of the Door Lock Cylinder is designed specifically for Nissan Titan door handles. The cylinder includes a metallic component that engages with the Nissan key. In other words, turning the key will interact with the internal tumblers of the cylinder to drive the latch linkage. This can either keep the designated door shut or open it. In normal service conditions, the Door Lock Cylinder faces friction from its pins and springs. As these components degrade, the key might seize, fail to turn, or align the tumblers, thus making it more difficult to operate. When a Door Lock Cylinder is replaced in a timely manner, it rotates smoothly and engages the latch properly. The Door Lock Cylinder works purely mechanically, with no electronics involved. Every Nissan pickup in the Titan range with keyed entry uses this unit, which Nissan's designers and engineers ensured had a simple design and would deliver security for the specific Titan owner. Above all, they wanted a durable unit, one that would stand up to tough tasks.
If you need any OEM Nissan Titan Door Lock Cylinder, feel free to choose them out of our huge selection of genuine Nissan Titan Door Lock Cylinder. All our parts are offered at unbeatable prices and are supported by the manufacturer's warranty. In addition, we offer quick shipping to have your parts delivered to your door step in a matter of days.
Nissan Titan Door Lock Cylinder Parts Questions & Experts Answers
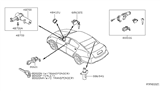
- Q: How to remove and install the Door Handle, Door Latch Assembly, and Door Lock Cylinder on the Nissan Titan?A:Remove the door trim panel and peel back the plastic water shield. Next, take out the latch retaining screws from the end of the door, then reach inside to release the latch from the control rods, noting that the latch retaining screws also secure the outside handle lock cylinder. For models with power door locks, disconnect the electrical connector, then detach the door latch and, if equipped, the door lock solenoid. Installation follows the reverse order of removal. To address the lock cylinder, detach the electrical connector if equipped, then remove the access plug at the end of the door and take out the Torx screw, which allows the lock cylinder to be angled out while pulling the handle. Use a screwdriver to disengage the lock rod and remove the lock cylinder. With the lock cylinder removed, pull the outside handle outwards, slide it to the rear, and disengage it from the door. For the inside handle, remove the door trim panel, release the control rod guide clip, and take out the retaining screws. Disconnect the control rod from the rear of the inside handle, pull the handle free from the door panel, and then installation is the reverse of removal.

Related Nissan Titan Parts


Browse by Year
2024 Door Lock Cylinder 2023 Door Lock Cylinder 2022 Door Lock Cylinder 2021 Door Lock Cylinder 2020 Door Lock Cylinder 2019 Door Lock Cylinder 2018 Door Lock Cylinder 2017 Door Lock Cylinder 2016 Door Lock Cylinder 2015 Door Lock Cylinder 2014 Door Lock Cylinder 2013 Door Lock Cylinder 2012 Door Lock Cylinder 2011 Door Lock Cylinder 2010 Door Lock Cylinder 2009 Door Lock Cylinder 2008 Door Lock Cylinder 2007 Door Lock Cylinder 2006 Door Lock Cylinder 2005 Door Lock Cylinder 2004 Door Lock Cylinder