×
- Hello
- Login or Register
- Quick Links
- Live Chat
- Track Order
- Parts Availability
- RMA
- Help Center
- Contact Us
- Shop for
- Nissan Parts
- Nissan Accessories
My Garage
My Account
Cart
Genuine Nissan Titan Fuel Level Sensor
Gas Gauge Sensor- Select Vehicle by Model
- Select Vehicle by VIN
Select Vehicle by Model
orMake
Model
Year
Select Vehicle by VIN
For the most accurate results, select vehicle by your VIN (Vehicle Identification Number).
15 Fuel Level Sensors found


Nissan Titan Fuel Tank Sending Unit
Part Number: 25060-EZ41B$157.93 MSRP: $223.07You Save: $65.14 (30%)


Nissan Titan Fuel Gauge Sender Unit
Part Number: 25060-ZQ60A$82.10 MSRP: $115.97You Save: $33.87 (30%)Ships in 1-3 Business Days


Nissan Titan Fuel Tank Sending Unit
Part Number: 25060-ZQ60D$82.15 MSRP: $116.03You Save: $33.88 (30%)Ships in 1-3 Business Days
Nissan Titan Fuel Tank Sending Unit
Part Number: 25060-ZH00A$81.74 MSRP: $115.45You Save: $33.71 (30%)Ships in 1-3 Business Days


Nissan Titan Fuel Tank Sending Unit
Part Number: 25060-7S00B$82.10 MSRP: $115.97You Save: $33.87 (30%)Ships in 1-3 Business Days
Nissan Titan Fuel Gauge Sender Unit
Part Number: 25060-EZ40A$157.93 MSRP: $223.07You Save: $65.14 (30%)Nissan Titan Fuel Tank Sending Unit
Part Number: 25060-ZQ60B$81.74 MSRP: $115.45You Save: $33.71 (30%)Ships in 1-3 Business DaysNissan Titan Fuel Sending Unit
Part Number: 25060-ZQ60C$82.55 MSRP: $116.60You Save: $34.05 (30%)Ships in 1-3 Business Days
Nissan Titan Fuel Gauge Sender Assembly
Part Number: 25060-EZ40B$201.51 MSRP: $284.62You Save: $83.11 (30%)Ships in 1-3 Business DaysNissan Titan Fuel Tank Sending Unit
Part Number: 25060-ZQ61E$79.02 MSRP: $111.62You Save: $32.60 (30%)Ships in 1-3 Business DaysNissan Titan Fuel Sending Unit
Part Number: 25060-ZQ60E$80.58 MSRP: $113.82You Save: $33.24 (30%)Ships in 1-3 Business DaysNissan Titan Fuel Tank Sending Unit
Part Number: 25060-ZR00A$80.58 MSRP: $113.82You Save: $33.24 (30%)Nissan Titan Fuel Tank Sending Unit
Part Number: 25060-7S00A$82.10 MSRP: $115.97You Save: $33.87 (30%)Nissan Titan Fuel Tank Sending Unit
Part Number: 25060-ZH00B$81.74 MSRP: $115.45You Save: $33.71 (30%)Ships in 1-3 Business DaysNissan Titan Fuel Tank Sending Unit
Part Number: 25060-ZR01A$79.02 MSRP: $111.62You Save: $32.60 (30%)
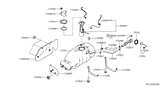
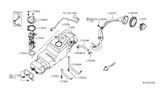
Nissan Titan Fuel Level Sensor
The Nissan Titan's Fuel Level Sensor is a critical gadget that communicates the fuel status of Nissan Titan cars. These electronic devices are intended for the accurate determination of fuel's state depending on the existing conditions, to give the driver instant and relevant data. This element is often integrated in the fuel tank and is composed of the float, the actuating rod and the resistor which is charged with transmitting signals to the fuel gauge. As far as the fuel level sensor is concerned, it should be noted that any problems with should be addressed to a professional service. This is because proper functioning of this Fuel Level Sensor offers notifications for refueling, which eliminates some common mistakes like the indication of a full tank of fuel for several days after refueling.
If you need any OEM Nissan Titan Fuel Level Sensor, feel free to choose them out of our huge selection of genuine Nissan Titan Fuel Level Sensor. All our parts are offered at unbeatable prices and are supported by the manufacturer's warranty. In addition, we offer quick shipping to have your parts delivered to your door step in a matter of days.
Nissan Titan Fuel Level Sensor Parts Questions & Experts Answers
- Q: How to disconnect the fuel pump module and Fuel Level Sensor in Nissan Titan?A:Take the cable away from the negative terminal of the battery. Relieve the fuel system pressure. With Titan models, you can't see or inspect the fuel pump like other models; you must remove the Fuel Tank. Pull out the fuel pump links, and detach the electrical cord from it. Make a note where the fuel pump module sits in relation to the tank before you loosen the lock ring holding it in place. A special tool from auto parts shops will loosen the lock ring, but large pliers work as an alternative. Gently take the fuel pump module out of the tank, turning it at an angle so you don't damage the arm that controls the fuel level sensor float. In certain cases, you need to disconnect the fuel level sensor from the pump module before taking it off. Look at the fuel pump and fuel level sensor O-ring, replace it when you see damage. To move a fuel level sensor to a new fuel pump module, follow the sensor wires until they meet its electrical plug and remove it. Separating the sensor from its pump section involves using needle-nose pliers to push down on the lock buttons on both sides and gently easing the sensor upwards. Snap the locks of the sensor module into their proper places during installation. Installation is the reverse of removal.

Related Nissan Titan Parts


Browse by Year
2019 Fuel Level Sensor 2018 Fuel Level Sensor 2017 Fuel Level Sensor 2016 Fuel Level Sensor 2015 Fuel Level Sensor 2014 Fuel Level Sensor 2013 Fuel Level Sensor 2012 Fuel Level Sensor 2011 Fuel Level Sensor 2010 Fuel Level Sensor 2009 Fuel Level Sensor 2008 Fuel Level Sensor 2007 Fuel Level Sensor 2006 Fuel Level Sensor 2005 Fuel Level Sensor 2004 Fuel Level Sensor