×
- Hello
- Login or Register
- Quick Links
- Live Chat
- Track Order
- Parts Availability
- RMA
- Help Center
- Contact Us
- Shop for
- Nissan Parts
- Nissan Accessories
My Garage
My Account
Cart
Genuine Nissan Titan Wheel Hub
Wheel Axle Hub- Select Vehicle by Model
- Select Vehicle by VIN
Select Vehicle by Model
orMake
Model
Year
Select Vehicle by VIN
For the most accurate results, select vehicle by your VIN (Vehicle Identification Number).
10 Wheel Hubs found


Nissan Titan Hub Assembly-Road Wheel, Front R
Part Number: 40202-7S000$264.73 MSRP: $391.98You Save: $127.25 (33%)Ships in 1-3 Business Days


Nissan Titan Hub Assembly
Part Number: 40202-7S100$370.02 MSRP: $564.75You Save: $194.73 (35%)Ships in 1-2 Business Days


Nissan Titan Hub Assembly Road Wheel
Part Number: 40202-EZ00A$361.88 MSRP: $552.31You Save: $190.43 (35%)Ships in 1-3 Business Days


Nissan Titan Road Wheel Hub
Part Number: 40202-ZR40B$277.06 MSRP: $422.87You Save: $145.81 (35%)Ships in 1-3 Business Days

Nissan Titan Road Wheel Hub
Part Number: 40202-9FG0A$265.92 MSRP: $405.87You Save: $139.95 (35%)Ships in 1-2 Business Days


Nissan Titan Hub Assembly Road Wheel
Part Number: 40202-EZ31A$321.82 MSRP: $491.19You Save: $169.37 (35%)Ships in 1-2 Business Days


Nissan Titan Road Wheel Hub
Part Number: 40202-ZR00B$245.32 MSRP: $363.25You Save: $117.93 (33%)Ships in 1-3 Business DaysNissan Titan Hub Assembly Road Wheel
Part Number: 40202-EZ30A$308.53 MSRP: $470.90You Save: $162.37 (35%)Nissan Titan Road Wheel Hub
Part Number: 40202-9FF0A$251.82 MSRP: $372.87You Save: $121.05 (33%)Ships in 1-3 Business DaysNissan Titan Hub Assembly Road Wheel
Part Number: 40202-EZ01A$253.68 MSRP: $375.62You Save: $121.94 (33%)Ships in 1-3 Business Days
Nissan Titan Wheel Hub
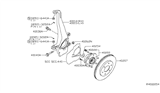
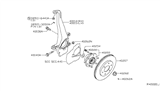
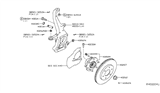
The Nissan Titan Wheel Hub connects each wheel to the truck to enable it to spin smoothly while firmly attached. The assembly is located between the drive axle and the brake drum or disc. The Wheel Hub bearings design reduces friction to allow free wheel rotation. The Wheel Hub has bolts and studs that connect one side to a chassis bracket and the other side to the wheel flange. There is a solid connection that can support the weight of the vehicle and maintain steering accuracy and braking response. On a Nissan truck that sees harsh use, a worn Wheel Hub may produce humming noises, loose steering, or excessive wheel play, which needs prompt replacement. A complete Wheel Hub unit is made from durable metal and is usually supplied as an assembly that provides a range of essential sensors to support systems such as the antilock brake system. This is important for the robust handling of the Titan. Direct-fit replacements retain the original ride quality for the Nissan Titan while maintaining Nissan reliability and restoring the confidence of any Titan driver.
If you need any OEM Nissan Titan Wheel Hub, feel free to choose them out of our huge selection of genuine Nissan Titan Wheel Hub. All our parts are offered at unbeatable prices and are supported by the manufacturer's warranty. In addition, we offer quick shipping to have your parts delivered to your door step in a matter of days.
Nissan Titan Wheel Hub Parts Questions & Experts Answers
- Q: How to remove and replace the Wheel Hub and bearing assembly on Nissan Titan?A:Once the hub and bearing unit wears down or breaks, you have to replace the entire unit because it doesn't come apart. To take off the parts, first release the cotter pin and reduce the driveaxle/hub nut on 4WD vehicles. First, loosen the wheel lug nuts. Raise the vehicle and place it safely on jackstands. Remove the wheel after that. First, take off the brake disc and wheel speed sensor from around the hub. Move the hub retaining bolts from the back of the knuckle. If you have the right tools, you can usually do this without taking out the driveaxle, although you may need to remove the entire driveaxle if you don't have the right tools. To finish, take off the disc shield and hub from the knuckle itself, and on 4WD vehicles, slide the assembly off the driveaxle splines. You need to clean up the matching areas of these components: the knuckle, bearing flange, and hole in the knuckle. Put the hub assembly with bearings into the knuckle and on 4WD driveaxle ends, applying multi-purpose grease on the spline connections before attaching them. Securely put the disc shield in place and screw in fresh bolts. Start by hooking up the wheel speed sensor, then put the brake disc on and its mounting plate, before adding the caliper. For vehicles with 4WD, first put the driveaxle/hub nut in place and tighten it, then put a new cotter pin in. By putting on the wheel, lowering the car, and making sure lug nuts are tight, you've finished the job.

Related Nissan Titan Parts


Browse by Year
2024 Wheel Hub 2023 Wheel Hub 2022 Wheel Hub 2021 Wheel Hub 2020 Wheel Hub 2019 Wheel Hub 2018 Wheel Hub 2017 Wheel Hub 2016 Wheel Hub 2015 Wheel Hub 2014 Wheel Hub 2013 Wheel Hub 2012 Wheel Hub 2011 Wheel Hub 2010 Wheel Hub 2009 Wheel Hub 2008 Wheel Hub 2007 Wheel Hub 2006 Wheel Hub 2005 Wheel Hub 2004 Wheel Hub