×
- Hello
- Login or Register
- Quick Links
- Live Chat
- Track Order
- Parts Availability
- RMA
- Help Center
- Contact Us
- Shop for
- Nissan Parts
- Nissan Accessories
My Garage
My Account
Cart
Genuine Nissan Versa Alternator
Generator- Select Vehicle by Model
- Select Vehicle by VIN
Select Vehicle by Model
orMake
Model
Year
Select Vehicle by VIN
For the most accurate results, select vehicle by your VIN (Vehicle Identification Number).
7 Alternators found


Nissan Versa Alternator Generator
Part Number: 23100-3BE1A$357.32 MSRP: $542.95You Save: $185.63 (35%)Ships in 1-3 Business Days
Nissan Versa Generator
Part Number: 23100-9VC0A$788.52 MSRP: $1210.38You Save: $421.86 (35%)Ships in 1-3 Business Days
Nissan Versa Generator
Part Number: 23100-5RA2B$529.68 MSRP: $806.02You Save: $276.34 (35%)Ships in 1-3 Business Days

Nissan Versa Reman Alternator Assembly
Part Number: 23100-EM01B$271.74 MSRP: $412.34You Save: $140.60 (35%)Ships in 1-3 Business Days


Nissan Versa Alternator Compatible
Part Number: 23100-ZW40A$351.81 MSRP: $494.68You Save: $142.87 (29%)


Nissan Versa Alternator Assembly
Part Number: 23100-ZW40B$351.81 MSRP: $494.68You Save: $142.87 (29%)
Nissan Versa Alternator
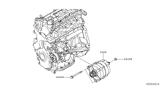
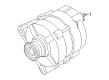
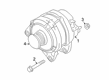
The Nissan Versa Alternator is the on-board generator that takes mechanical energy powered by the engine and converts it to electrical energy for the battery and electrical system. The Alternator, located close to the front of the engine, has a belt connected to the crankshaft that turns it. This causes the spinning rotor inside stationary stator windings to produce alternating current. The Alternator's generated AC fed through the rectifier assembly having diodes and heat sinks is direct current (DC) applied for battery recharge and lights and other circuits operation. The Alternator features a two-piece cast aluminum housing holding the stator. A shaft-mounted rotor, bearings, brushes, and, when equipped, an internal voltage regulator that varies field current to keep voltage within safe limits. There is a fan at the pulley end that aids in cooling. This rear housing supports the shaft and houses the regulator or brushes. Many modern Nissan Versa models incorporate regulator control through the powertrain control module, replacing external units. The Nissan Versa electrical system is consistently charged by its Alternator due to this integrated regulation.
If you need any OEM Nissan Versa Alternator, feel free to choose them out of our huge selection of genuine Nissan Versa Alternator. All our parts are offered at unbeatable prices and are supported by the manufacturer's warranty. In addition, we offer quick shipping to have your parts delivered to your door step in a matter of days.
Nissan Versa Alternator Parts Questions & Experts Answers
- Q: How to remove and install the alternator in a Nissan Versa?A:First of all, one should disconnect the cable from the negative terminal of the battery. This is for 2011 and earlier models whereby you remove the drivebelt, take out the drive belt. Take away the electrical connectors from alternator. Get rid of mounting bolts and separate the alternator from engine. Install it in a reverse manner that was used during removal. Tighten them to ensure that no movements are registered on alternator mounting bolts. Reconnect the battery and conduct relevant learning exercises. This regards 2012 and newer model automobiles where there is a need to remove the engine undercover including passenger's side inner fender liner. Secondly, after removing drivebelt or drive belt, what follows is disconnecting electrical connectors from alternator which need to be removed too. The mounting bolts are disconnected so as to detach the alternator from engine itself. In some instance, you may be required to get rid of alternator bracket for easy accessibility. After this, installation is put in reverse gear just like it was in previous stages of operations, surgery, replacement, removal, withdrawal, extraction, take off, disjoining, dismounting, separation, detachment, dismantling, disengagement, unfastening, unhooking, decoupling, departure, without any omission and absence or anything left which will remain or reside under these terms "opposite", "contrary" or "vice versa". Thus, tie up well those nuts for supporting generator between firm positions on both sides and thereby shoring up it against wobbling or happening, shaking, vibrating, moving, jolting, shuddering, or quivering which also can cause dynamic error disturbances occurring in power supply systems originating from it while using power wire cords connected with other units such as transformers resulting into voltage drop issues leaving this particular component utterly purposeless until afterwards when this operation has been done correctly but only then should give rise to necessary instructions for formation of new connections.

Related Nissan Versa Parts
 Nissan Versa Starter Motor
 Nissan Versa Voltage Regulator
 Nissan Versa Starter Solenoid
 Nissan Versa Alternator Pulley
 Nissan Versa Starter Brush
 Nissan Versa Alternator Bearing
 Nissan Versa Alternator Brush
 Nissan Versa Alternator Case Kit
 Nissan Versa Armature
 Nissan Versa Starter Drive
 Nissan Versa Starter Drive Gear
Browse by Year
2025 Alternator 2024 Alternator 2023 Alternator 2022 Alternator 2021 Alternator 2020 Alternator 2019 Alternator 2018 Alternator 2017 Alternator 2016 Alternator 2015 Alternator 2014 Alternator 2013 Alternator 2012 Alternator 2011 Alternator 2010 Alternator 2009 Alternator 2008 Alternator 2007 Alternator