×
- Hello
- Login or Register
- Quick Links
- Live Chat
- Track Order
- Parts Availability
- RMA
- Help Center
- Contact Us
- Shop for
- Nissan Parts
- Nissan Accessories
My Garage
My Account
Cart
Genuine Nissan Versa Flywheel
Clutch Flywheel- Select Vehicle by Model
- Select Vehicle by VIN
Select Vehicle by Model
orMake
Model
Year
Select Vehicle by VIN
For the most accurate results, select vehicle by your VIN (Vehicle Identification Number).
9 Flywheels found


Nissan Versa Drive & Gear Plate
Part Number: 12331-ED01A$228.19 MSRP: $322.30You Save: $94.11 (30%)Ships in 1-2 Business Days

Nissan Versa Flywheel Assembly
Part Number: 12310-1KA0A$547.73 MSRP: $773.63You Save: $225.90 (30%)Ships in 1-3 Business Days


Nissan Versa Flywheel Assembly
Part Number: 12310-3HC0A$547.73 MSRP: $773.63You Save: $225.90 (30%)Ships in 1-3 Business Days
Nissan Versa Drive & Gear Plate Assembly
Part Number: 12331-ED00A$389.36 MSRP: $549.95You Save: $160.59 (30%)Ships in 1-3 Business Days

Nissan Versa Flywheel Assembly
Part Number: 12310-ET00A$720.86 MSRP: $1018.17You Save: $297.31 (30%)Ships in 1-3 Business Days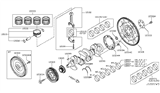
Nissan Versa Flywheel Assembly
Part Number: 12310-ET01C$720.86 MSRP: $1018.17You Save: $297.31 (30%)Ships in 1-3 Business Days
Nissan Versa Drive & Gear Plate
Part Number: 12331-1VA1A$431.37 MSRP: $609.28You Save: $177.91 (30%)Ships in 1-3 Business DaysNissan Versa Flywheel Assembly
Part Number: 12310-EE000$547.73 MSRP: $773.63You Save: $225.90 (30%)Ships in 1-3 Business DaysNissan Versa Flywheel Assembly
Part Number: 12310-ET000$720.86 MSRP: $1018.17You Save: $297.31 (30%)Ships in 1-3 Business Days
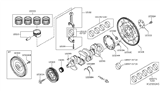
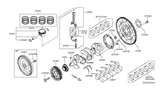
Nissan Versa Flywheel
The Flywheel in the Nissan Versa smooths engine power, enables the starter to crank the motor, and provides the clutch with a friction surface, giving the drivers steady acceleration and reliable starts. Every manual transmission Nissan features a spinning disc that bolts to the crankshaft. This component absorbs the pulsing force of each combustion event. As a result, the crank turns evenly. Additionally, this disc contains a ring gear for the starter drive. This ring gear also engages at ignition. When you press on the clutch pedal, the clutch disc separates from the Flywheel. When the clutch engages again after a break, that contact surface can take heat. That can present a problem. In some cases, it can leave grooves or hot spots in the surface. That may require refinishing or replacement. The traditional solid Flywheel and more complex dual mass Flywheel that sandwiches spring-loaded inner and outer sections to damp vibration have been the two main styles of Versa models over the years. The dual mass version excels at reducing cabin noise and improving shift feel, but it typically cannot be resurfaced and may fail internally. Conversely, a solid Flywheel can often be machined within factory limits, a practical advantage that many of today's Nissan drivers appreciate with recent Versa trims.
If you need any OEM Nissan Versa Flywheel, feel free to choose them out of our huge selection of genuine Nissan Versa Flywheel. All our parts are offered at unbeatable prices and are supported by the manufacturer's warranty. In addition, we offer quick shipping to have your parts delivered to your door step in a matter of days.
Nissan Versa Flywheel Parts Questions & Experts Answers
- Q: How to remove and reinstall the flywheel/driveplate when separating the transaxle from the engine on Nissan Versa?A:First, in order to affect the removal of the engine/transaxle assembly, the transaxle should be separated from the engine. Should a manual transaxle be present, first and foremost the pressure plate and the clutch disc should be taken off. Scribe alignment marks between the flywheel/driveplate and crankshaft so you can properly align the items the next time you will install them. Subsequently, undo the bolts fixing the flywheel/driveplate to the crankshaft and pull out the flywheel/driveplate. For installation, before assembling the flywheel clean it with spirit accountable to remove the grease and oils employed before for lubrication; the flywheel should not possess any crack, rivet grooves, burned area, or any score marks but in case of the later two, light scoring can be eradicated using emery cloth. Look for the crack or breakage of the ring-gear teeth and also the flatness of the flywheel, if it is warped or not. Mate, clean, and inspect flywheel/drive plate and crankshaft surfaces, replace the crankshaft rear seal if it is leaking. Locate the flywheel/driveplate against the crankshaft and if there's a spacer, put it in before lining up the marks that you have already made. Place a lock-tight thread-locking compound on the bolt's threading before its installation. This could be done with the use of a screwdriver to ease the process of tightening the bolts where the flywheel/driveplate will not turn until all the bolts are tightened in a scribe cross-hatch method until the final torque is attained. The other procedures of installation are executed with the opposite sequence of operations for removal and, at last, join the battery and carry out the required re-learn activities.
