×
- Hello
- Login or Register
- Quick Links
- Live Chat
- Track Order
- Parts Availability
- RMA
- Help Center
- Contact Us
- Shop for
- Nissan Parts
- Nissan Accessories
My Garage
My Account
Cart
Genuine Nissan Versa Piston
Engine Pistons- Select Vehicle by Model
- Select Vehicle by VIN
Select Vehicle by Model
orMake
Model
Year
Select Vehicle by VIN
For the most accurate results, select vehicle by your VIN (Vehicle Identification Number).
9 Pistons found


Nissan Versa Piston,W/Pin
Part Number: 12010-3HC0A$53.62 MSRP: $73.92You Save: $20.30 (28%)Ships in 1-3 Business Days


Nissan Versa Piston W/Pin
Part Number: 12010-ED500$67.17 MSRP: $94.87You Save: $27.70 (30%)Ships in 1-3 Business Days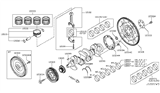
Nissan Versa Piston W/Pin
Part Number: A2010-ED81C$82.23 MSRP: $116.15You Save: $33.92 (30%)Ships in 1-3 Business DaysNissan Versa Piston W/Pin
Part Number: A2010-ED80C$82.23 MSRP: $116.15You Save: $33.92 (30%)Ships in 1-3 Business Days
Nissan Versa Piston
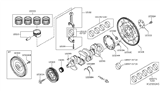
Piston of Nissan Versa is a moving part that converts pressure into a rotating motion that makes the vehicle run. Inside the cylinder, the Piston seals the chamber with the help of closely fitted rings. As gases expand, they remain contained, and the force of the gas travels through the connecting rod to the crankshaft. Constructed mostly from a lightweight aluminum alloy, it endures high heat and pressure and has less mass for quicker engine response. The Nissan engines use oil which is directed to go through internal cooling cavities which helps the Piston to maintain its temperature and strength during continuous cycles. Trunk style construction, common in petrol engines, supports side forces in the Versa powerplant. Furthermore, the designer places the oil rings below the gudgeon pin for effective lubrication. The sturdy Piston mechanism effectively reduces friction and safeguards the cylinder walls of the Nissan compact drivetrain. The Versa reliably transforms the chemical energy of its fuel into mechanical work for efficient acceleration and smooth cruising. The Nissan Versa Piston is key to making sure the car always works well.
If you need any OEM Nissan Versa Piston, feel free to choose them out of our huge selection of genuine Nissan Versa Piston. All our parts are offered at unbeatable prices and are supported by the manufacturer's warranty. In addition, we offer quick shipping to have your parts delivered to your door step in a matter of days.
Nissan Versa Piston Parts Questions & Experts Answers
- Q: What steps must be taken before removing the piston and connecting rod assemblies from an engine on Nissan Versa?A:Before starting the disassembly process of the piston and connecting rods the cylinder head, oil pans, and the oil pump have to be installed. First, look at the interference peaks in cylinder head at the maximum travel of the ring, they have to be smoothed with the special tool if they are present because their absence can lead to the break of piston. One time the ridges are cleared, position the engine in such a manner that the Crankshaft is at the top. Measure the end play of the connecting rod with feeler gauges so that it is to standard; if not, it may require new connecting rods. Make sure the correspondence between each connecting rod and cap is clear, then using the appropriate tool, remove the connecting rod cap which also contains the bearing insert, and do not lose the insert. Slide the connecting rod/piston assembly out through the top of the engine and make sure that all the ridge have been ground off. To avoid damaging the caps and inserts, ensure that once the process of removal is complete, they are replaced. During piston ring installation, make sure that the gaps of the ring ends and piston ring side clearances are set properly. The first one to be fitted is the oil control ring, then the middle and the top rings has to be placed facing correctly. Before assembling the piston/connecting road ensure that the cylinder walls are clean and the crank shaft is in place. Lubricate the bearing inserts; properly fit the new bearing inserts into their place without applying any lubricant. Ensure the gaps of the piston rings are properly located, apply some lubrication on the piston as well as the rings and use the Piston ring compressor to put them in. Make sure the oil clearance for connecting rod bearing is appropriate when examined by Plastigage; clearance should correspond with the standard; if not, confirm the bearing size and the journal diameter. Wipe off the flatest part of the bearing and lubricate with grease or assembly lube then screw on the rod cap, tighten to the recommended torque. Perform the washing and orientation on the rest of the assemblies following the step by step process while observing cleanliness. As a final step in installation, move the crankshaft and look for binding and again measure the rod end play and if necessary, then make correction.


