×
- Hello
- Login or Register
- Quick Links
- Live Chat
- Track Order
- Parts Availability
- RMA
- Help Center
- Contact Us
- Shop for
- Nissan Parts
- Nissan Accessories
My Garage
My Account
Cart
Genuine Nissan Xterra Timing Chain
Engine Timing Chain- Select Vehicle by Model
- Select Vehicle by VIN
Select Vehicle by Model
orMake
Model
Year
Select Vehicle by VIN
For the most accurate results, select vehicle by your VIN (Vehicle Identification Number).
7 Timing Chains found


Nissan Xterra Chain-Timing CAMSHAFT
Part Number: 13028-ZS00A$113.66 MSRP: $164.62You Save: $50.96 (31%)Ships in 1-3 Business Days


Nissan Xterra Camshaft Chain
Part Number: 13028-ZK01C$40.40 MSRP: $58.52You Save: $18.12 (31%)Ships in 1-3 Business Days

Nissan Xterra Camshaft Chain
Part Number: 13028-EA200$113.66 MSRP: $164.62You Save: $50.96 (31%)Ships in 1-3 Business Days


Nissan Xterra Camshaft Chain
Part Number: 13028-7Y010$40.40 MSRP: $58.52You Save: $18.12 (31%)Ships in 1-3 Business Days


Nissan Xterra Camshaft Chain
Part Number: 13028-9E010$68.46 MSRP: $166.57You Save: $98.11 (59%)Ships in 1 Business Day


Nissan Xterra Camshaft Chain
Part Number: 13028-ZK00B$40.40 MSRP: $58.52You Save: $18.12 (31%)Ships in 1-3 Business Days

Nissan Xterra Timing Chain
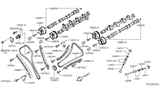
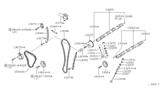
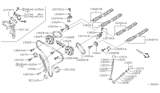
The Timing Chain of the Nissan Xterra ensures that the camshaft and crankshaft in the engine rotate in tandem to ensure intended opening and closing times of the valves. The front of the engine is fitted inside with a metal loop that rides on a cam and crank sprocket with a fixed tooth engagement. Thus, the valve timing will remain constant. The Timing Chain operates effortlessly due to continuous oil lubrication, which also reduces wear. As the chain guides and tensioner wear or lubrication is lost, slack builds in the Timing Chain, causing a rattling noise at the front of the engine that indicates the system is worn. In the event that a replacement is necessary, it recommends fitting the new Timing Chain with new sprockets, tensioner, and guides as a complete set to restore quiet, accurate operation. Unlike rubber belts, the steel Timing Chain is considered more durable and should not require any change intervals. The higher-displacement Nissan powerplant in the Xterra has reliable long-term timing control. Maintaining original components ensures the Nissan SUV's valve timing accuracy, performance, and smoothness specified for the Xterra by Nissan for every Xterra driver.
If you need any OEM Nissan Xterra Timing Chain, feel free to choose them out of our huge selection of genuine Nissan Xterra Timing Chain. All our parts are offered at unbeatable prices and are supported by the manufacturer's warranty. In addition, we offer quick shipping to have your parts delivered to your door step in a matter of days.
Nissan Xterra Timing Chain Parts Questions & Experts Answers
- Q: How to replace the timing chains in this engine on Nissan Xterra?A:The engine's timing chain assembly is made up of a lower chain that links the crankshaft sprocket to an idler sprocket on the cylinder head, and also an upper chain which connects the idler sprocket to both camshaft sprockets. Occasionally, replacing such timing chains is a complex process since they are usually meant to last for as long as the engine remains operational; doing so would require removal of the Oil Pan. To remove the upper timing chain, drain coolant system, removing valve cover, power steering pump, upper idler pulley and camshaft sprockets. Then move on to the lower timing chain by firstly removing the upper timing chain. Remove distributor, various hoses and Crankshaft Pulley/vibration damper while ensuring that engine remains at TDC for No. 1 piston throughout. If desired, drain engine oil as well as remove oil pan and oil pump pick-up. Take away lower timing chain cover, tensioner arm, tension arm guide piece, oil slinger and oil pump drive gear. In order to make head removal more convenient however, note that it's best in such cases to trim off the head gasket flush with cylinder head surface. Examine parts for wear or damage before installation by matching silver-colored link on lower timing chain with crankshaft sprocket mark and attentively following each step involving both idler sprocket (s), chain guide (s), tensioner arm (s) as well as tensioner (s) in order to ensure correct tensioning. Apply RTV sealant letting it cure prior to securing upper timing chain cover into its position together with installing all necessary components involving camshaft sprockets above: then fill fluids back in followed by running engine slowly looking out for possible leakages.


