My Garage
Cart
Make sure this part fits

Nissan 11220-8Y000 Engine Mounting Insulator Assembly, Front Left

2004-2010 Nissan 112208Y000

Customer Questions & Expert Answers (3)
Nissan 11220-8Y000 Engine Mounting Insulator Assembly, Front Left
  • Part Description
    Insulator Assy-Engine Mounting,Front Lh
  • Lookup Code
    11220M
  • Position
    Driver side
  • Manufacturer
    Nissan
  • Manufacturer's Notes
    This part is discontinued.
Make sure this part fits
  • Related Parts
  • Product Specifications
  • Vehicle Fitment
  • Customer Questions & Expert Answers
  • Product Specifications

    BrandGenuine Nissan
    Lookup Code11220M
    Manufacturer Part Number11220-8Y000
    Part DescriptionInsulator Assy-Engine Mounting,Front Lh
    Other NamesSide Mount, Transmission Mount
    Item Dimensions8.4 x 3.7 x 3.2 inches
    Item Weight3.10 Pounds
    PositionDriver side
    ConditionNew
    Fitment TypeDirect Replacement
    ManufacturerNissan
    SKU11220-8Y000
    WarrantyThis genuine Nissan part is guaranteed by Nissan's factory warranty.
    Shipping & ReturnShipping Policy Return Policy
    Warning: California's Proposition 65
  • Vehicle Fitment

    Year Make Model Trim & Engine Important vehicle option details
    2004-2006 Nissan AltimaSE, SE-R, SL|6 Cyl 3.5LVQ35DE
    2004-2007 Nissan MaximaSE, SL|6 Cyl 3.5LVQ35DE
    2004-2010 Nissan QuestBase, S, SE, SL|6 Cyl 3.5LVQ35DE
  • Customer Questions & Expert Answers

    Q:
    Will this part fit my car? Posted by NissanPartsDeal Specialist
    A:
    You can Select Your Vehicle to check if 11220-8Y000 fits your vehicle.
    Posted by NissanPartsDeal Specialist
    Q:
    What are the steps involved in checking and replacing powertrain mounts on Nissan Maxima with DOHC engine? Posted by Customer
    A:
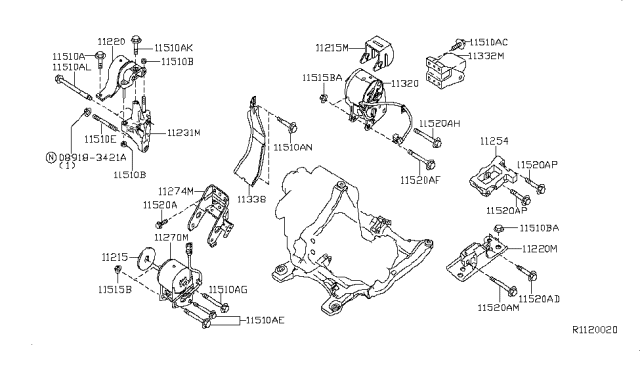
    There are four engine mounts,front and rear mounts at the center of the vehicle connected to the engine block and lower crossmember, a right side mount attached to the front of the timing cover and frame, and a left side mount connected to the transaxle and frame. To check the mounts, the engine must be raised slightly to relieve weight from them. The vehicle should be raised and securely supported on jackstands, with the engine/transaxle supported from above using a hoist or engine support fixture. The mounts should be inspected for movement; if any is detected, the engine should be lowered and the mount fasteners tightened. Additionally, rubber preservative should be applied to the mounts to slow deterioration. For replacement, disconnect the cable from the negative battery terminal, set the parking brake, block the rear wheels, raise the front of the vehicle, and support it securely on jackstands. Remove the splash shields and, if applicable, disconnect the wiring harness for the electronically controlled engine mount. Position a floor jack under the transaxle case with a wood block in between, then remove the through-bolts from the front and rear mounts, detach the crossmember from the vehicle, and remove the mount-to-engine bracket through-bolts. Installation follows the reverse order, ensuring bolts are tightened to specifications only after the engine weight is back on the mounts. For the right side engine mount, support the engine from above, remove the upper engine mount bracket and through-bolt, raise the engine slightly, and remove the mount. The left side transaxle mount requires positioning a floor jack under the transaxle housing, removing the air cleaner housing and intake duct, and then removing the transaxle-to-mount bolts. Final tightening should be done with the vehicle level and the engine weight on the mounts, using thread-locking compound on the nuts/bolts, ensuring bushings are not twisted or offset. If more than one mount has been replaced, the tightening order should be crossmember bolts, rear engine mount, front engine mount, left-side transaxle mount, and right side engine mount. If the vehicle has an electronic engine mount, the wiring harness should be reconnected, ensuring the distance between the two harness retainers on the mount is 6.69 inches (170 mm) for 2003 and earlier models.
    Posted by NissanPartsDeal Specialist
    Q:
    What should be inspected on the mounts for the 2002 Nissan Maxima? Posted by Customer
    A:
    Inspect the mounts for cracked, hardened rubber or separation from the bushing, and check for relative movement between the mounts and the engine or frame using a large screwdriver or prybar. If movement is noted, lower the engine and tighten the mount fasteners.
    Posted by NissanPartsDeal Specialist
    If you have any questions about this product, please don't hesitate to ask us. We will be happy to help you!

Genuine Nissan Part 11220-8Y000, the Right Choice

To ensure reliability, purchase Nissan part # 11220-8Y000 Engine Mounting Insulator Assembly, Front Left. It can be referred to as Engine Mount, Motor And Transmission Mount, Engine Mount Bracket. The first option would be to use OEM parts. Designed by Nissan manufacturer and are produced with stringent factory specifications, undergoing the quality control procedures. This part fits 2004-2006 Altima, 2004-2007 Maxima, 2004-2010 Quest.

NissanPartsDeal.com is a leading supplier of genuine Nissan parts and accessories, such as 112208Y000 Engine Mounting Insulator Assembly, Front Left. Welcome to our vast selection of competitively priced genuine Nissan parts available online. We provide each OEM part with a manufacturer's warranty and a straightforward return policy. Place your order now and receive your parts quickly, shipped directly to your doorstep.

Why choose Nissan Parts Deal

  • Dedicated Service

    Your complete satisfaction is our #1 goal

  • Lowest Prices

    Best deals on genuine OE parts from dealerships

  • Fast Delivery

    Orders are processed and delivered promptly