My Garage
Cart
Make sure this part fits

Nissan 11220-1KG0A Engine Mounting Insulator Left

2011-2019 Nissan 112201KG0A

Customer Questions & Expert Answers (4)
11220-1KG0A Nissan Engine Mounting Insulator Left Product Photo 1 of 3
  • Part Description
    Insulator-Engine Mounting,LH
  • Lookup Code
    11221Q
  • Position
    Driver Side
  • Manufacturer
    Nissan
Make sure this part fits
$113.93 MSRP: $165.00
You Save: $51.07 (31%)
Ships in 1-3 Business Days
1
ADD TO CART
  • Related Parts
  • Product Specifications
  • Vehicle Fitment
  • Customer Questions & Expert Answers
  • Product Specifications

    BrandGenuine Nissan
    Lookup Code11221Q
    Manufacturer Part Number11220-1KG0A
    Part DescriptionInsulator-Engine Mounting,LH
    Other NamesMount, Side Mount
    Item Dimensions6.9 x 4.1 x 3.2 inches
    Item Weight2.10 Pounds
    PositionDriver Side
    ConditionNew
    Fitment TypeDirect Replacement
    ManufacturerNissan
    SKU11220-1KG0A
    WarrantyThis genuine Nissan part is guaranteed by Nissan's factory warranty.
    Shipping & ReturnShipping Policy Return Policy
    Warning: California's Proposition 65
  • Vehicle Fitment

    Year Make Model Trim & Engine Important vehicle option details
    2011-2017 Nissan JukeLuxury, Nismo, SL, SV, Upper|4 Cyl 1.6LMR16DDT
    2013-2019 Nissan SentraFE, Nismo, S, SL, SR, SV|4 Cyl 1.6L, 4 Cyl 1.8LMR16DDT, MRA8DE
  • Customer Questions & Expert Answers

    Q:
    Will this part fit my car? Posted by NissanPartsDeal Specialist
    A:
    You can Select Your Vehicle to check if 11220-1KG0A fits your vehicle.
    Posted by NissanPartsDeal Specialist
    Q:
    How to inspect and renew the Engine Mount and Motor and Transmission Mount on a 1.2L petrol Nissan Juke? Posted by Customer
    A:
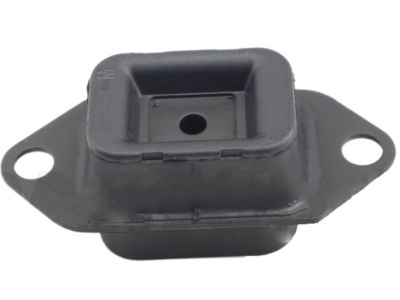
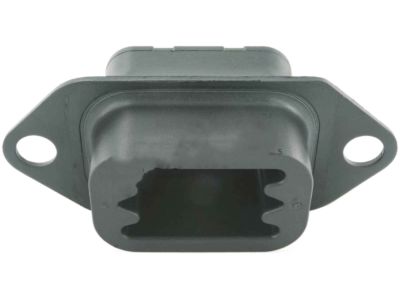
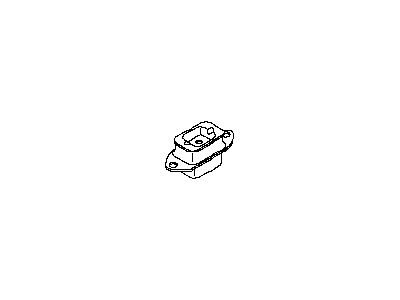
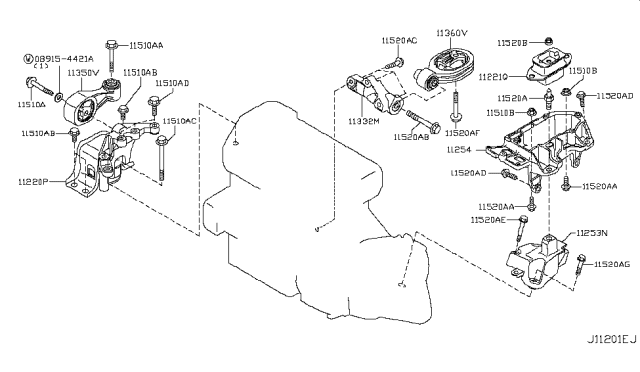
    To assess the brakes, make sure that the handbrake is on before jacking up the front part of the car and placing it on the axle stands. At the base of the mounting check the rubber for signs of cracking, hardening or if the rubber has separated from the metal, if there is any evidence to suggest that the rubber needs replacement, then then it should be replace by a new one. Tighten all fasteners to the appropriate level, if a torque wrench is available use it. A visible examination and an attempt to lever against the mounting should be made; If there is too much of free play, one should look at the fasteners and determine whether they are still tight or not and replace any worn out bearings. In the case of the right-hand mounting, the following procedures were taken; disconnect the battery negative terminal, jack up the engine with wood block support, removed the retaining bolt from the inner wing panel and engine mounting bracket and finally withdrew the complete mounting. Check and replace any worn or damaged part of the widget as and when needed. Loosen and remove the engine mounting and bracket and replace it then tightened the bolts and then slowly lower the jack and connect the battery. To replace left hand mounting pull out the battery and tray, lift up with jack the transmission and unscrew the nuts to pull out the mounting. If required, it is disengaged upper and lower mounting brackets, and that it is checked for wear or damage on this and renew certain parts of it. Replace the brackets back and fasten the retaining bolts properly in their respective positions, touching the lower bracket bolt to the left hand rubber mounting and fasten the nut. Replace the outer retaining nuts, remove the jack, replace the battery along with the tray. For the rear lower mounting one should use handbrake ,jack up the front of the car and secure it firmly. Unfasten all the bolts, which united the rear mounting bracket to the transmission, and take it out, then, unfasten the bolt, which united the rear mounting link to the subframe. Check for the levels of tear and wear and replace all the components that appear damaged. Reassemble by screwing the rear mounting into its place on the subframe and then tightening the retaining bolt followed by the mounting bracket into the transmission and fastening the bolts. Lastly, lower the vehicle back down to the ground to its recommended standard height.
    Posted by NissanPartsDeal Specialist
    Q:
    How to inspect and replace the Engine Mount and Motor and Transmission Mount on a 1.5L diesel Nissan Juke? Posted by Customer
    A:
    Moreover, to examine the wheels and suspension, apply the handbrake hard, lift the front wheel with the jack and secure it using stands. Inspect the mounts for signs of wear including cracks, hardening, or signs that rubber has separated from the metal and replace the rubber if needed. Check all the bolts are properly tightened, if not use a torque wrench to enforce proper tightening. Look out for its condition in a manner that involves applying some force against it; make sure that all bolts are tightened and replace any worn out parts of the mounting detected to be worn out with excessive free play. On the right-hand mounting, unscrew the battery negative terminal and place the engine on stand with wood and then unscrew the torque link and its retaining bolts to pull out the complete mounting. Check all elements for signs of wear or deterioration and replace as needed. Remove the engine mounting and bracket, being sure to tighten the screwed bolts then join the torque link and lower the jack. For the left-hand mounting, first, take out the battery and the tray, then take support of the transmission and pull out the mounting by using a screwdriver and take out the nuts. Inspect for signs of wear and / or damage, replace the brackets if they were removed, and tightened the bolts down to the manufactures specification. Tighten the nut of the right-hand rubber mounting to engage and move the jack to lift the car before refitting the battery. Regarding the rear lower mounting as described follow the steps; ensure that the hand brake is applied after jacking up the front of the vehicle and removing the engine undertray. Slacken and take out the bolts which hold the rear mounting link and pull it out to redesign it for wear or damage and replace as needed. Bolt the mounting bracket back to the sump and tighten the screws, done that bolt the rear mounting link to the vehicle and tighten the bolts with the help of Spanner and finally lower the car.
    Posted by NissanPartsDeal Specialist
    Q:
    What should be done after inspecting the rear lower mounting components for the 2011 Nissan Juke? Posted by Customer
    A:
    Inspect all components for wear or damage and renew as necessary. Reassemble by fitting the rear mounting to the subframe and tightening the retaining bolt, then refit the mounting bracket to the transmission and tighten its bolts. Finally, lower the vehicle to the ground.
    Posted by NissanPartsDeal Specialist
    See expert answers on similar Engine Mount
    If you have any questions about this product, please don't hesitate to ask us. We will be happy to help you!

Genuine Nissan Part 11220-1KG0A, the Right Choice

To ensure reliability, purchase Nissan part # 11220-1KG0A Engine Mounting Insulator Left. It can be referred to as Engine Mount, Motor And Transmission Mount, Engine Mount Bracket. The first option would be to use OEM parts. Designed by Nissan manufacturer and are produced with stringent factory specifications, undergoing the quality control procedures. This part fits 2011-2017 Juke, 2013-2019 Sentra.

NissanPartsDeal.com is a leading supplier of genuine Nissan parts and accessories, such as 112201KG0A Engine Mounting Insulator Left. Welcome to our vast selection of competitively priced genuine Nissan parts available online. We provide each OEM part with a manufacturer's warranty and a straightforward return policy. Place your order now and receive your parts quickly, shipped directly to your doorstep.

Why choose Nissan Parts Deal

  • Dedicated Service

    Your complete satisfaction is our #1 goal

  • Lowest Prices

    Best deals on genuine OE parts from dealerships

  • Fast Delivery

    Orders are processed and delivered promptly