My Garage
Cart
Make sure this part fits

Nissan 13042-D0100 Seal Oil CAMSHAFT

1982-2001 Nissan 13042D0100

Customer Questions & Expert Answers (5)
13042-D0100 Nissan Seal Oil CAMSHAFT Product Photo 1 of 1
  • Part Description
    Seal-Oil,Camshaft
  • Lookup Code
    13042N
  • Replaced By
    13042-0B001
  • Manufacturer
    Nissan
Make sure this part fits
$11.79 MSRP: $16.25
You Save: $4.46 (28%)
1
ADD TO CART
  • Related Parts
  • Product Specifications
  • Vehicle Fitment
  • Customer Questions & Expert Answers
  • Product Specifications

    BrandGenuine Nissan
    Lookup Code13042N
    Manufacturer Part Number13042-D0100
    Part DescriptionSeal-Oil,Camshaft
    Item Dimensions3.3 x 3.1 x 0.3 inches
    Item Weight0.30 Pounds
    ConditionNew
    Fitment TypeDirect Replacement
    ManufacturerNissan
    SKU13042-D0100
    WarrantyThis genuine Nissan part is guaranteed by Nissan's factory warranty.
    Shipping & ReturnShipping Policy Return Policy
    Warning: California's Proposition 65
  • Vehicle Fitment

    Year Make Model Trim & Engine Important vehicle option details
    1984-1988 Nissan 200SXGL, SGL|4 Cyl 1.8L, 4 Cyl 2.0L, 6 Cyl 3.0LCA18ET, CA20E, VG30E
    1984-1989 Nissan 300ZXGL, GLL, SF, SS|6 Cyl 3.0LVG30, VG30T
    1986-1994 Nissan Hardbody Pickup (D21)DX, GST, ST|6 Cyl 3.0LVG30, VG30E
    1985-1994 Nissan MaximaDX, GXE, SE, SL/GL|6 Cyl 3.0LVG30E
    1987-2001 Nissan PathfinderLE, SE, ST, XE|6 Cyl 3.0L, 6 Cyl 3.3LVG30E, VG30I, VG33E
    1993 Nissan QuestGXE, XE|6 Cyl 3.0LVG30E
    1982-1983 Nissan SentraDX|4 Cyl 1.7LCD17
    1982-1989 Nissan StanzaBase, G, GL, GXE, SGL, XE|4 Cyl 2.0LCA20E, CA20S
  • Customer Questions & Expert Answers

    Q:
    Will this part fit my car? Posted by NissanPartsDeal Specialist
    A:
    You can Select Your Vehicle to check if 13042-D0100 fits your vehicle.
    Posted by NissanPartsDeal Specialist
    Q:
    How to replace the Camshaft Seal and crankshaft seal on Nissan 300ZX? Posted by Customer
    A:
    Further to the removal of the crankshaft oil seal, the negative cable on the battery must be removed followed by securing it away from the terminal. Then, correctly unbolt the fan shroud, fan assembly, drive belts, pulleys, the vibration damper and timing belt. Remove the crankshaft timing pulley with two screwdrivers, if this doesn't work apply enough force and if that does not work, take out the timing pulley attaching bolt and thread it into the crankshaft to provide a pillar for the puller. After removing the pulley, override the timing belt plate, then using a screwdriver; push out the front oil seal. Glaze the inside of the new seal with assembly lube and fashion a seal installation tool from a piece of pipe about 30 cm long and the end should be polished. Force the new oil seal into its position using the tool until it is in the correct position and embedded firmly in the rubber boot. Place the timing belt plate back on its respective position over the crankshaft and fit the Woodruff key into the lark slot, this is followed by applying assembly lube to the crankshaft timing pulley before sliding it over. In the case of the camshaft oil seal, undo the following procedures then tight the camshaft pulley using a screwdriver as you un-screw the retain bolt. Disassemble the pulley and, if both are being exchanged, do not confuse the gears. Therefore, take out the old oil seal and use the same installation tool to press a new one onto the section. Remove the lock-washer and tighten the camshaft pulley retaining bolt until it is finger tight and then lock it in place with a screwdriver again.
    Posted by NissanPartsDeal Specialist
    Q:
    How to remove and install the camshaft, camshaft seal, and lash adjuster on the Nissan Maxima SOHC? Posted by Customer
    A:
    In order to drop the Lash Adjusters, it will be necessary to firstly take off the valve cover and the rocker arm shafts. Tighten secured the Lash Adjusters by lifting them up and placing a rubber band around each of them so that they don't come off the guides; if a Lash Adjuster is found off, put it back to its place. Subsequently, unbolt the Lash Adjuster guide assembly and pull out the Lash Adjusters out of the bores individually with the help of a pick and ensure that the Lash Adjusters are put back in the same manner as they were taken out. Do not lay the Lash Adjusters on their side or upside down as this increases the trap of air; they can only be laid on their side if they are submerged in clean engine oil. Place the tip of your finger on the plunger button, while the Lash Adjuster is in its bore, push up the plunger; if it moves more than 0.040-inch (1 mm) you may have trapped some air inside. If air is suspected, return the rocker arm shaft assemblies and valve cover, then tap on the Lash Adjusters until all the air is out of the Lash Adjusters by starting the engine under no load and letting idle for about 10 minutes with revs at 1000 rpm. After that, the valve cover and the rocker arm shaft assemblies have to be removed, and the plunger check has to be done one more time. If air remains, replace the Lash Adjuster with a new one. When the Lash Adjusters are out check for wear and during positioning, apply clean engine oil on each of the Lash Adjusters. To remove the camshaft, first, lose the cylinder heads and then use the camshaft cover plate bolts and remove the other one carefully at the transaxle side. Position holding lugs on the camshaft to prevent it from rotating as the retaining bolt is loosened to follow by the removal of the bolt and thrust plate. Carefully take out the camshaft oil seal without causing any doze on your camshaft and pull the camshaft by twisting it. To install, use moly-based engine assembly lube to the camshaft bearing journals and the lobes and then gently Vladimire the camshaft in the cylinder head. Place the thrust plate with the retaining bolt and fasten it to the required torque to check the end play of the camshaft; if the amount is higher than the recommended limit, then change the thrust plate. Last, replace the camshaft oil seal, while other parts of the cylinder head assembly should be put back in the reverse of the process of removal. Depending on what is being done, the camshaft seals can be replaced in-car provided the timing belt and camshaft sprockets are removed; special care should be taken not to harm the camshaft journal. It is recommended to use a seal installation tool or a proper diameter of pipe to force the new seal straightly into the cylinder head while seated.
    Posted by NissanPartsDeal Specialist
    Q:
    How to remove the camshaft, camshaft seal, and lash adjuster on the 3.3L V6 Nissan Pathfinder? Posted by Customer
    A:
    To take out the Lash Adjusters, begin by removing the valve cover and rocker arm shaft assemblies. Use rubber bands to keep them in place so that they don't come off from their guides. The Lash Adjuster guide assembly is then removed and Lash Adjusters are taken out of the bores one at a time, keeping them in order. They should not be laid on their side or upside down to avoid trapping air inside. If you feel like there is trapped air, put back the rocker arms, shafts as well as, valve covers and run the engine for 10 minutes at 1000 rpm to bleed the air out of the Lash Adjusters. While they are outside of the engine, check for wear by examining them again so that you can replace if needed. To get rid of camshafts remove heads and pry camshaft cover plate gently from there (Gillespie 7). When unscrewing retaining bolt hold it with holding lugs tightening it accordingly till you remove thrust plate and bolt. The camshaft oil seal should be removed with caution to prevent scuffing or scratching it as it is being pulled out. By rotating in twist squeeze motion pull oronsealpacificcamshaft out of cylinder head (Olay/Weisman Architects). Camshafts are lubricated on bearing journals and lobes using moly-based engine assembly lube before they are cautiously placed into position in the cylinder head (Olay/Weisman Architects). Install camshaft thrust plates with their retaining bolts and ensure that I have checked if my camshafts have any end play (Olay/Weisman Architects). In case endplay does not fall within certain range then thrust plate has to be replaced (Olay/Weisman Architects). Set up camshaft oil seal thus finishing assembling cylinder head.
    Posted by NissanPartsDeal Specialist
    Q:
    How to remove and install the camshaft, camshaft seal, and lash adjuster in an engine on Nissan Quest? Posted by Customer
    A:
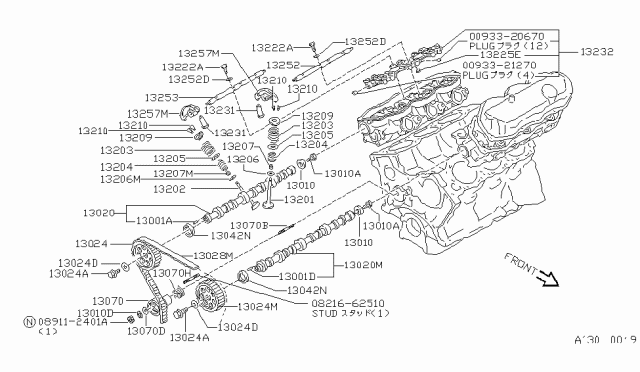
    To have the Lash Adjusters out of the way initial steps to maneuver include the removal of the valve cover and also the rocker arm shaft. Safeguard the Lash Adjusters by lifting a few inches off the guides and fasten it to avoid anymore dropping off the guides; In case of any Lash Adjuster drops off the guide, replace it quickly. After that, it is required to make the Lash Adjuster guide assembly removal with the help of the rubber bands and then to extract the Lash Adjusters from the corresponding bores, while pulling them out one by one and putting them into a correspondence with their number for the further putting-in. Some of the points that should not be done includes- Laying the Lash Adjusters on their side or upside down since this will trap air in them, they can only be placed on their sides if they are submerged in clean engine oil. According to Iles, if a Lash Adjuster moves more than 0.040-inch when it is pushed down in the bore, one should check if there is ingress of air. If you think there is trapped air, replace the rocker arm shaft assemblies and the valve cover then relieve the air by starting the engine and bringing the engine to 1,000 rpm under no load for roughly ten minutes. Subsequently, pull out the valve cover and the rocker arm shafts, carry out the push-down test again. If air is present replace the Lash Adjuster. When the Lash Adjusters are removed, check them for wear and then, apply clean engine oil to each of them; to reinstall the Lash Adjusters, it is as simple as how they were removed. During the camshaft removal procedure, one must first take off the cylinder heads, secondly, to loose the cover plate bolts and thirdly, and gently tilt the camshaft cover plate off. While this is being done on the corresponding end, turning is done to loosen the retaining bolt so that the camshaft holding lugs retain the thrust plate while it is being removed. Very gently, turn the camshaft oil seal counterclockwise and also gently twist the camshaft upward using the wrench lest you mar the bearing surfaces. For installation, coat the camshaft bearing journals and lobes with moly-based engine assembly lube and then, slowly 'Thread in' into the cylinder head. Screw in the camshaft thrust plate and its bolt and torque this to the required setting. Bolt another dial indicator in contact with the end play, shift the camshaft backward and set down the dial indicator then shift the camshaft to the front and take another reading. If the endplay is of the order of say 0.020 to 0.030 inches, progressively measure the old plate and if it is beyond this limit, then get a new plate to ensure that the end play does not exceed this range. The rest of the cylinder head assembly is done is reverse of the above procedure. When jumping a camshaft, take out the old seal and using and after placing the camshaft in, use the seal installation tool to force the new seal into place until it engages the cylinder head.
    Posted by NissanPartsDeal Specialist
    If you have any questions about this product, please don't hesitate to ask us. We will be happy to help you!

Genuine Nissan Part 13042-D0100, the Right Choice

To ensure reliability, purchase Nissan part # 13042-D0100 Seal Oil CAMSHAFT. It can be referred to as Camshaft Seal. The first option would be to use OEM parts. Designed by Nissan manufacturer and are produced with stringent factory specifications, undergoing the quality control procedures. This part fits 1984-1988 200SX, 1984-1989 300ZX, 1985-1994 Maxima, 1987-2001 Pathfinder.

NissanPartsDeal.com is a leading supplier of genuine Nissan parts and accessories, such as 13042D0100 Seal Oil CAMSHAFT. Welcome to our vast selection of competitively priced genuine Nissan parts available online. We provide each OEM part with a manufacturer's warranty and a straightforward return policy. Place your order now and receive your parts quickly, shipped directly to your doorstep.

Why choose Nissan Parts Deal

  • Dedicated Service

    Your complete satisfaction is our #1 goal

  • Lowest Prices

    Best deals on genuine OE parts from dealerships

  • Fast Delivery

    Orders are processed and delivered promptly