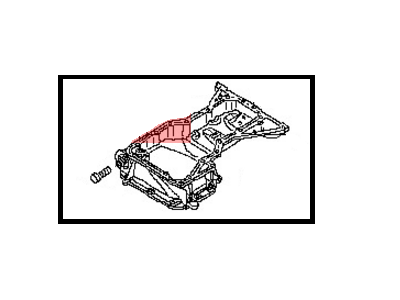
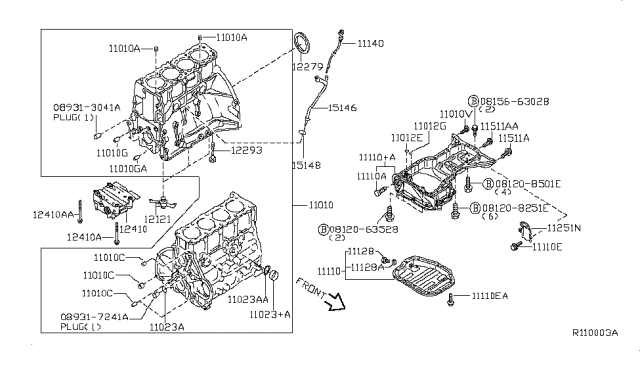
To remove the lower oil pan, first raise the vehicle and support it securely on jackstands, then remove the under-vehicle splash shield. Loosen the lower oil pan bolts in the reverse order of the tightening sequence and remove them. Use a plastic-face hammer to bump the side of the oil pan to break it loose; if that doesn't work, tap a putty knife or other thin tool between the upper and lower oil pans. Clean all remnants of silicone sealer from the sealing surfaces and wipe them with lacquer thinner to remove traces of oil. Check the lower steel oil pan flange for distortion, particularly around the bolt holes, and if necessary, flatten it using a hammer on a wood block. Apply a bead of RTV sealant around the steel oil pan flange and install the steel oil pan, ensuring it is installed within 15 minutes of applying the sealant. Tighten the oil pan fasteners in several steps to the specified torque. For the upper oil pan, disconnect the cable from the negative terminal of the battery and perform the idle air volume learning procedure when reconnecting. Set the parking brake, block the rear wheels, drain the oil, and remove the oil filter. Raise the front of the vehicle and support it securely on jackstands, then remove the lower oil pan. Remove the engine splash shield and the inner fender splash shields, drain the engine oil, and remove the dipstick and dipstick tube. Drain the coolant, remove the intake manifold collector, engine cooling fan, drivebelt, and front subframe. Unbolt the air conditioning compressor and move it aside without disconnecting the lines. Disconnect the engine coolant tubes from the oil cooler, tape the ends to prevent contamination, and remove the Crankshaft Position sensor and oil pressure switch. Remove the right driveaxle and its center bearing support, then remove the oxygen sensors from the catalytic converters. Remove the rear cover from the upper oil pan, the four bolts attaching the upper oil pan to the transmission, and the upper oil pan bolts in reverse order of the tightening sequence. Use a prying tool to break the oil pan loose and remove it, then take out the two O-rings from the block and the housing of the oil pump, as well as the gaskets from the front timing cover and rear seal retainer. For installation, use a scraper to remove all traces of old gasket material and sealant from the upper aluminum section of the oil pan, lower steel pan, and engine block, cleaning the mating surfaces with brake system cleaner while being careful not to scratch or gouge them. Ensure the threaded bolt holes in the block and aluminum section of the oil pan are clean, then apply a bead of RTV sealant to the ends of the timing chain cover gasket and rear oil seal retainer gasket, placing the gaskets in position on the oil pan. Apply a bead of RTV sealant around the upper aluminum oil pan flange, ensuring installation within 15 minutes of applying the sealant. Install new O-rings in the engine block and oil pump body, carefully position the upper aluminum section of the oil pan on the engine block, and install the bolts, tightening them in three or four steps to the specified torque. Finally, install the transmission mounting bolts, and complete the installation in reverse order of removal, ensuring to install a new oil filter and wait at least 30 minutes after applying the silicone sealer before adding oil.