×
- Hello
- Login or Register
- Quick Links
- Live Chat
- Track Order
- Parts Availability
- RMA
- Help Center
- Contact Us
- Shop for
- Nissan Parts
- Nissan Accessories
My Garage
My Account
Cart
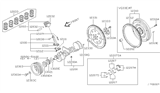
Genuine 2000 Nissan Quest Crankshaft
Crank Shaft- Select Vehicle by Model
- Select Vehicle by VIN
Select Vehicle by Model
orMake
Model
Year
Select Vehicle by VIN
For the most accurate results, select vehicle by your VIN (Vehicle Identification Number).
1 Crankshaft found

 Product Specifications
- Lookup Code: 12200
- Item Weight: 41.00 Pounds
- Item Dimensions: 20.4 x 8.4 x 8.4 inches
- Condition: New
- Fitment Type: Direct Replacement
- SKU: 12200-0W001
- Warranty: This genuine part is guaranteed by Nissan's factory warranty.
2000 Nissan Quest Crankshaft
Committed to delivering top-notch quality at affordable prices, our website is your go-to source for OEM 2000 Nissan Quest Crankshaft worldwide. Each of our genuine 2000 Nissan Quest Crankshaft come with a manufacturer's warranty, so rest assured, quality and cost are covered. With us, you're making a smart choice that stands the test of time.
2000 Nissan Quest Crankshaft Parts Questions & Experts Answers
- Q: How to crankshaft install in engine reassembly on 2000 Nissan Quest?A: Crankshaft installation is the first task in engine reassembly, assuming the engine block and crankshaft have been cleaned, inspected, and repaired. Position the engine on the stand with the crankcase facing up, then remove the main bearing cap bolts and lift out the cap assembly. If original bearing inserts remain, remove them and clean the bearing surfaces with a lint-free cloth. Clean the back sides of the new main bearing inserts and place one in each main bearing saddle in the block, ensuring that any grooved insert is installed correctly. Lay the corresponding bearing from each set in the main bearing cap, aligning the tabs and oil holes. The flanged thrust bearing must be installed in the fourth cap and saddle. Clean the bearing faces and crankshaft main bearing journals, checking the oil holes for dirt. Once the crankshaft is clean, lay it in position in the main bearings and check the main bearing oil clearance using Plastigage, ensuring it is slightly shorter than the width of the main bearings. Clean the cap assembly bearing faces, install it with the arrow pointing toward the timing belt end, and tighten the bolts in three steps to the specified torque without rotating the crankshaft. After removing the bolts, compare the width of the crushed Plastigage to determine the main bearing oil clearance, ensuring it meets specifications. If the clearance is incorrect, check for dirt or oil interference before considering different bearing inserts. Carefully scrape off any Plastigage material from the main bearing journals and bearing faces. For final crankshaft installation, lift the crankshaft out, clean the bearing faces in the block, and apply a thin layer of moly-base grease or engine assembly lube to each bearing surface, including the thrust faces. Ensure the crankshaft journals are clean before laying the crankshaft back in place, then clean the cap assembly bearing faces and apply lubricant. Install the cap assembly with the arrow pointing toward the timing belt end and tighten the bearing cap bolts to 10-to-12 ft-lbs. Gently tap the ends of the crankshaft to align the main bearing and crankshaft thrust surfaces, then retighten all main bearing cap bolts to the specified torque, starting with the center main and working outward. Rotate the crankshaft by hand to check for any binding, and finally, check the crankshaft endplay with a feeler gauge or dial indicator, ensuring it is correct if the thrust faces are not worn and new bearings are installed. Install the new seal and bolt the retainer to the block.
Related 2000 Nissan Quest Parts
 2000 Nissan Quest Oil Pump Gasket
 2000 Nissan Quest Oil Pan Gasket
 2000 Nissan Quest Rod Bearing
 2000 Nissan Quest Oil Pump
 2000 Nissan Quest Cam Gear
 2000 Nissan Quest Camshaft
 2000 Nissan Quest Oil Pan
 2000 Nissan Quest Crankshaft Gear
 2000 Nissan Quest Piston Ring Set
 2000 Nissan Quest Crankshaft Pulley