×
- Hello
- Login or Register
- Quick Links
- Live Chat
- Track Order
- Parts Availability
- RMA
- Help Center
- Contact Us
- Shop for
- Nissan Parts
- Nissan Accessories
My Garage
My Account
Cart
Genuine Nissan Quest Crankshaft
Crank Shaft- Select Vehicle by Model
- Select Vehicle by VIN
Select Vehicle by Model
orMake
Model
Year
Select Vehicle by VIN
For the most accurate results, select vehicle by your VIN (Vehicle Identification Number).
7 Crankshafts found


Nissan Quest Crankshaft Assembly
Part Number: 12200-7Y00A$228.50 MSRP: $322.73You Save: $94.23 (30%)Ships in 1-3 Business Days
Nissan Quest Crankshaft Assembly
Part Number: 12200-JA11A$1309.07 MSRP: $1584.83You Save: $275.76 (18%)Ships in 1-3 Business Days

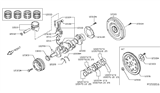


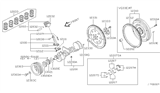

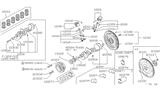

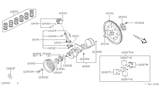
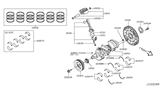
Nissan Quest Crankshaft
Nissan Quest Crankshaft helps to convert the pistons' downward stroke into a smooth spinning motion that powers the transmission and eventually the wheels. The robust steel or cast iron Crankshaft is mounted low in the engine block and has offset crank throws where connecting rods attach. These throws turn reciprocation into rotation on every stroke. Early production versions of the Quest applied cast iron, while later high-horsepower versions inside a Nissan V6 gained forged steel, a tougher metal that resists twisting and holds tighter tolerances. Every Crankshaft, regardless of material, is finished to accurate size, allowing the journals to run on a thin oil film and should last the life of the vehicle, provided that lubrication is consistent. Dirt or low oil pressure removes that film, allowing metal-to-metal contact that scores and scrapes, which can trigger knock plus severe vibration. Signs indicate Crankshaft damage, and the swap's difficulty rating is difficult and has a time frame of a multi-hour task. Regular oil changes keep your Nissan Quest running smoothly by protecting this vital Crankshaft.
If you need any OEM Nissan Quest Crankshaft, feel free to choose them out of our huge selection of genuine Nissan Quest Crankshaft. All our parts are offered at unbeatable prices and are supported by the manufacturer's warranty. In addition, we offer quick shipping to have your parts delivered to your door step in a matter of days.
Nissan Quest Crankshaft Parts Questions & Experts Answers
- Q: How should burrs be removed from the crankshaft oil holes and what steps should be taken to ensure the crankshaft is in good condition on Nissan Quest?A:Remove all burrs from the crankshaft oil holes using a stone, file, or scraper to ensure sharp edges do not gouge or scratch the new bearings. Clean the crankshaft with solvent and dry it with compressed air, ensuring the oil holes are cleaned with a stiff brush and flushed with solvent. Check the main and connecting rod bearing journals for uneven wear, scoring, pits, and cracks, and inspect the rest of the crankshaft for cracks and other damage, which should be magnafluxed by an automotive machine shop to reveal hidden issues. Measure the diameter of the main and connecting rod journals with a micrometer at several points to detect taper and out-of-round conditions, comparing the results to the specified limits. If the journals are damaged, tapered, out-of-round, or worn beyond acceptable limits, have the crankshaft reground by an automotive machine shop, ensuring the correct size bearing inserts are used if reconditioned. Check the oil seal journals at each end of the crankshaft for wear and damage, as worn grooves or nicks may cause new seals to leak; an automotive machine shop may repair the journal with a thin sleeve, or a new crankshaft may be necessary if repair is not feasible. Finally, examine the main and rod bearing inserts.

Related Nissan Quest Parts
 Nissan Quest Oil Pump Gasket
 Nissan Quest Oil Pan Gasket
 Nissan Quest Rod Bearing
 Nissan Quest Oil Pump
 Nissan Quest Cam Gear
 Nissan Quest Camshaft
 Nissan Quest Oil Pan
 Nissan Quest Crankshaft Gear
 Nissan Quest Crankshaft Thrust Washer Set
 Nissan Quest Piston Ring Set
 Nissan Quest Crankshaft Pulley
Browse by Year
2017 Crankshaft 2016 Crankshaft 2015 Crankshaft 2014 Crankshaft 2013 Crankshaft 2012 Crankshaft 2011 Crankshaft 2010 Crankshaft 2009 Crankshaft 2008 Crankshaft 2007 Crankshaft 2006 Crankshaft 2005 Crankshaft 2004 Crankshaft 2003 Crankshaft 2002 Crankshaft 2001 Crankshaft 2000 Crankshaft 1999 Crankshaft 1998 Crankshaft 1997 Crankshaft 1996 Crankshaft 1995 Crankshaft 1994 Crankshaft 1993 Crankshaft