×
- Hello
- Login or Register
- Quick Links
- Live Chat
- Track Order
- Parts Availability
- RMA
- Help Center
- Contact Us
- Shop for
- Nissan Parts
- Nissan Accessories
My Garage
My Account
Cart
Genuine Nissan 240SX ABS Sensor
ABS Wheel Speed Sensor- Select Vehicle by Model
- Select Vehicle by VIN
Select Vehicle by Model
orMake
Model
Year
Select Vehicle by VIN
For the most accurate results, select vehicle by your VIN (Vehicle Identification Number).
6 ABS Sensors found


Nissan 240SX ABS Sensor
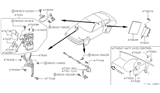
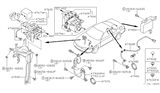
The Nissan 240SX ABS Sensor tracks how fast the wheels are turning and sends this information to the anti-lock brake control module to prevent the wheels from locking up when you stop. It is positioned next to a toothed ring on the hub or axle, wherein the moving teeth modify a magnetic field surrounding the sensor. The ABS Sensor utilizes a Hall effect element magnet or a coil of an electromagnetic type to convert the fluctuations into a voltage signal evaluated in the controller. When one wheel slows down much quicker than the others, the module decreases hydraulic pressure to that wheel to keep braking controlled. In the case of the 240SX, the component stays accurate through many speed ranges; however, low wheel speeds can reduce signal clarity. A fault detected by the ABS Sensor triggers the ABS warning light on the dashboard, and the braking system then operates without the anti-lock. With appropriate signal from the ABS Sensor, the Nissan 240SX is allowed to retain stopping capability on pavement. Every Nissan 240SX depends on this Nissan device, the ABS Sensor, for constant wheel speed information and a key part of the brake system.
If you need any OEM Nissan 240SX ABS Sensor, feel free to choose them out of our huge selection of genuine Nissan 240SX ABS Sensor. All our parts are offered at unbeatable prices and are supported by the manufacturer's warranty. In addition, we offer quick shipping to have your parts delivered to your door step in a matter of days.
Nissan 240SX ABS Sensor Parts Questions & Experts Answers
- Q: How to remove and install the front ABS sensor on Nissan 240sx?A:Before you work on the ABS Sensor, lift up your 240SX safely and firmly support it, then take off the front wheels. Open the power/ground connection, unscrew the sensor from its fixed position on the steering knuckle backplate. Carefully pull the sensor from the mounting brackets on the wiring while being careful not to scrape the sensor or rotor teeth. To put in the new sensor, place its mounting brackets on it first. Place the sensor through the back of the knuckle, aligning it with its rotor's teeth. Screw in the sensor's mounting bolts, measure the sensor-to-rotor gap, readjust if needed, and tighten the bolts to 8-12 ft. lbs. placing and attaching the sensor support parts, then plug in the wiring and secure the front wheels before letting the car go back down. To calibrate a wheel sensor, place it on the brake rotor and measure how close the sensor's edge is to the density on the rotor, making sure it's between 0.0108 - 0.0295 inches (0.27 - 0.75 mm) using a feeler stick. To correct the position, reduce the mounting bolt pressure, move the sensor, and set the specified gap, then tighten the bolts to 11-20 Nm.


