×
- Hello
- Login or Register
- Quick Links
- Live Chat
- Track Order
- Parts Availability
- RMA
- Help Center
- Contact Us
- Shop for
- Nissan Parts
- Nissan Accessories
My Garage
My Account
Cart
Genuine Nissan 240SX Radius Arm
Front Suspension Radius Arm- Select Vehicle by Model
- Select Vehicle by VIN
Select Vehicle by Model
orMake
Model
Year
Select Vehicle by VIN
For the most accurate results, select vehicle by your VIN (Vehicle Identification Number).
3 Radius Arms found


Nissan 240SX Radius Arm
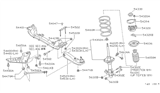
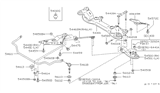
A vital part of Nissan 240SX suspension systems are Radius Arms which professionals call radius rods or torque arms for their function in controlling wheel movement to improve steering control. Named the Radius Arm the component connects the axle to vehicle frame structure to prevent wheel movement beyond limits which produces dependable handling and steering control. The Radius Arm builders utilize stamped steel or aluminum for their construction because these materials provide an optimal combination of weight reduction and operational effectiveness. The 240SX accepts different Radius Arm configurations which include transverse and longitudinal styles that function according to vehicle demands and road situations. Transverse Radius Arms function in trucks as a lateral load absorption mechanism and longitudinal arms control acceleration and braking-related excursions. A wristed Nissan Radius Arm featuring its bent construction delivers improved mobility to the suspension system. The performance together with safety ratings of any vehicle directly result from its Nissan 240SX replacement part's structural design and component materials.
If you need any OEM Nissan 240SX Radius Arm, feel free to choose them out of our huge selection of genuine Nissan 240SX Radius Arm. All our parts are offered at unbeatable prices and are supported by the manufacturer's warranty. In addition, we offer quick shipping to have your parts delivered to your door step in a matter of days.
Nissan 240SX Radius Arm Parts Questions & Experts Answers
- Q: How to remove and install front Radius Arm and Sway Bar Kit on Nissan 240sx?A:While keeping it safe, raise the vehicle to work with it. Then unscrew the lock nuts connecting the tension rod to the frame. Unbolt the two screws at the transverse link and lower Control Arm, then move the tension rod to the side. To take out the tension rod, remove the bolt holding the rod to its bracket through the bushing, lift the rod up, and detach the two transverse link bolts while also removing its nuts, bushings, and washers, replacing any damaged bushings. Use a wrench to tighten the flats of the Sway Bar Kit connecting rod while unscrewing the connecting rod nuts, to keep the stabilizer bar from moving around. Unscrew the four bolts and yank out the stabilizer bar. First, tighten all the connecting rod hardware. Bolt the transverse link to the stabilizer bar with 12-16 ft. lbs. force, then to the connecting rod with 34-38 ft. lbs., aligning the connecting rod rod. Also bolt the stabilizer bar bracket at 22-29 ft. lbs. then 29-36 ft. lbs. when attaching. Lastly, hold the connecting rod in place while tightening the Crush the tension rod-to-frame nut with 33-40 foot-pound torque, reinstall with a new locknut, and ensure both round bushings are in the right spots at each joint. Adjust all bolts and nuts only when the car is raised up and resting on its wheels.


