×
- Hello
- Login or Register
- Quick Links
- Live Chat
- Track Order
- Parts Availability
- RMA
- Help Center
- Contact Us
- Shop for
- Nissan Parts
- Nissan Accessories
My Garage
My Account
Cart
Genuine Nissan 300ZX Headlight
Headlamp- Select Vehicle by Model
- Select Vehicle by VIN
Select Vehicle by Model
orMake
Model
Year
Select Vehicle by VIN
For the most accurate results, select vehicle by your VIN (Vehicle Identification Number).
13 Headlights found


Nissan 300ZX Driver Side Headlamp Assembly
Part Number: B6060-30P00$457.10 MSRP: $704.31You Save: $247.21 (36%)
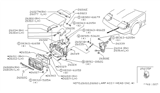


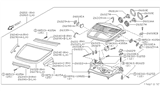
Nissan 300ZX Headlight
The Nissan 300ZX Headlight helps shed light forward, giving the driver visibility of the road at night and helping other motorists see the vehicle. The modern composite construction allows the Headlight housing to integrate seamlessly with the Nissan body, providing styling and aerodynamic benefits while also accommodating the turn signal or running light in the same housing. The lens is made of a plastic material which, over time, clouds due to sunlight and road debris. Various Headlight styles are available for the 300ZX, including Euro types, which are known for their bold looks, and halo projector types which utilize a halo element around a projector beam. Halogen, LED, or xenon light sources may be applied on the fixture according to brightness and service life. The Headlight assembly on any Nissan 300ZX must incorporate high and low beams to ensure visibility is safe under all conditions. Selecting an appropriate Headlight helps to retain the unique appearance many Nissan 300ZX owners like.
If you need any OEM Nissan 300ZX Headlight, feel free to choose them out of our huge selection of genuine Nissan 300ZX Headlight. All our parts are offered at unbeatable prices and are supported by the manufacturer's warranty. In addition, we offer quick shipping to have your parts delivered to your door step in a matter of days.
Nissan 300ZX Headlight Parts Questions & Experts Answers
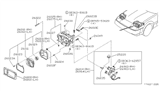
- Q: How can headlights be correctly aimed to prevent blinding oncoming drivers and ensure optimal visibility on the road on Nissan 300ZX?A:The positioning of headlights to the external visors should be well done to reduce comprising the sight of the oncoming vehicles and to enhance the vision on the road. Headlights feature two spring-loaded adjusting screws: One of the sockets is used for vertical mobilisation and the other for horizontal mobilisation and as for the auxiliary lights they have one screw for vertical mobilisation. To check the headlights, park it on a level ground, 25m away from a luminous white wall or any light colored wall, the tires are properly inflated the fuel tank is full and the weight of the driver sitting on the seat. First, bring the car in front of the wall and then switch on the car lights. To do this, use the masking tape and make a circle around the car then draw vertical lines passing through the middle of the car to make markings for each of the headlights. Horizontal tape line shall also be placed as the centerline of all headlights as well. First, position the low beam adjustment on the chassis, and set the point of high-intensity zone slightly below the horizontal axis and four inches to the right of the headlight vertical line, then tighten the screws. Finally, when using the high beams, place the region of high illumination four inches below the line of the horizontal respectively bearing in mind that low beams are safer. Auxiliary driving lights can be tilted up and down by means of this top screw.


