×
- Hello
- Login or Register
- Quick Links
- Live Chat
- Track Order
- Parts Availability
- RMA
- Help Center
- Contact Us
- Shop for
- Nissan Parts
- Nissan Accessories
My Garage
My Account
Cart
Genuine Nissan 300ZX Hood Cable
Hood Release Cable- Select Vehicle by Model
- Select Vehicle by VIN
Select Vehicle by Model
orMake
Model
Year
Select Vehicle by VIN
For the most accurate results, select vehicle by your VIN (Vehicle Identification Number).
8 Hood Cables found


Nissan 300ZX Hood Cable
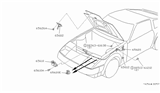
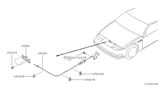
With the help of a Nissan 300ZX Hood Cable, drivers can quickly and easily unlatch the engine cover for inspections or repairs. Running between the interior release lever and the twin latch assembly up front, it turns a simple pull into motion that frees the locking catch. In the cockpit, when the driver pulls on the handle, the steel core of the Hood Cable transmits tension through it, flipping the latch to allow the hood to lift. The Nissan 300ZX can develop a cracked outer sheath with time due to heat, vibration, and moisture, which allows water to seep inside, causing the strands to rust or stretch until the hood stays stubbornly shut. The car is actually designed with a two-stage system, one primary Hood Cable linking the lever to a mid-point junction, then shorter branch cables that reach each side latch. It is a layout that balances pull force and keeps both catches working together. More recent models were equipped with a split system, whereas earlier models had a continuous line. Knowing which style sits in your Nissan 300ZX will assist you in ordering a replacement. Having the Hood Cable checked for fraying or sticky movement can save you time and get your Hood Cable to open if it ever gets locked shut at the worst possible moment.
If you need any OEM Nissan 300ZX Hood Cable, feel free to choose them out of our huge selection of genuine Nissan 300ZX Hood Cable. All our parts are offered at unbeatable prices and are supported by the manufacturer's warranty. In addition, we offer quick shipping to have your parts delivered to your door step in a matter of days.
Nissan 300ZX Hood Cable Parts Questions & Experts Answers
- Q: What is involved in the hood latch assembly and How to remove and replace the Hood Cable on a Nissan 300ZX?A:The Hood Latch assembly consists of the pull handle, control cable, and housing. To remove the cable, raise the hood and mark the location of the hood latch in relation to the front crossmember. Remove the bolts securing the latch to the crossmember, lift the latch out of the recess, and while holding the release lever back with your thumb, work the cable end from the latch. Pull the cable housing from the latch and, working towards the fender, remove the cable from the plastic retaining clips. Pry the plastic cable cover from the fender panel and remove the lower dash trim panel to access the hood latch release handle and securing bolts. Under the dash, remove the cable assembly by taking out the two retaining bolts. Before pulling the cable through the fender and dash, attach a strong piece of line to the end of the cable and tape the connection to prevent snags. From the driver's compartment, pull the cable through the dash and disconnect it from the guide line. Connect the guide line to the new cable and tape the connection, then gently pull the guide line to feed the new cable through the dash and fender. Once the cable is fully pulled through the fender, install it into its retaining clips and replace the plastic cover in the fender panel. Finally, insert the cable end into the hood latch by pushing back on the actuating lever and inserting the cable end into its retaining recess on the latch, then install the latch and align it with the mark made during removal.


