×
- Hello
- Login or Register
- Quick Links
- Live Chat
- Track Order
- Parts Availability
- RMA
- Help Center
- Contact Us
- Shop for
- Nissan Parts
- Nissan Accessories
My Garage
My Account
Cart
Genuine Nissan Armada Wheel Hub
Wheel Axle Hub- Select Vehicle by Model
- Select Vehicle by VIN
Select Vehicle by Model
orMake
Model
Year
Select Vehicle by VIN
For the most accurate results, select vehicle by your VIN (Vehicle Identification Number).
18 Wheel Hubs found


Nissan Armada Hub Assembly-Road Wheel, Front R
Part Number: 40202-7S000$264.73 MSRP: $391.98You Save: $127.25 (33%)Ships in 1-3 Business Days


Nissan Armada Hub Assembly
Part Number: 40202-7S100$370.02 MSRP: $564.75You Save: $194.73 (35%)Ships in 1-2 Business Days


Nissan Armada Road Wheel Hub
Part Number: 40202-ZR40B$277.06 MSRP: $422.87You Save: $145.81 (35%)Ships in 1-3 Business Days


Nissan Armada Rear Hub Assembly
Part Number: 43202-7S000$283.35 MSRP: $432.46You Save: $149.11 (35%)Ships in 1-2 Business Days

Nissan Armada Road Wheel Hub
Part Number: 40202-9FG0A$265.92 MSRP: $405.87You Save: $139.95 (35%)Ships in 1-2 Business Days


Nissan Armada Road Wheel Hub Assembly Front
Part Number: 40202-1LA2A$315.32 MSRP: $481.25You Save: $165.93 (35%)Ships in 1-3 Business Days


Nissan Armada Road Wheel Hub
Part Number: 40202-ZR00B$245.32 MSRP: $363.25You Save: $117.93 (33%)Ships in 1-3 Business Days


Nissan Armada Hub Assembly-Rear Axle
Part Number: 43202-ZZ90A$275.16 MSRP: $419.97You Save: $144.81 (35%)Ships in 1-2 Business Days


Nissan Armada Hub Assembly Rear
Part Number: 43202-1LA0A$289.86 MSRP: $442.40You Save: $152.54 (35%)Ships in 1-3 Business Days
Nissan Armada HUB ASSY-ROAD WHEEL,FRONT
Part Number: 40202-1LA3A$315.32 MSRP: $481.25You Save: $165.93 (35%)Ships in 1-3 Business Days
Nissan Armada HUB ASSY-REAR AXLE
Part Number: 43202-1LA0B$289.86 MSRP: $442.40You Save: $152.54 (35%)Ships in 1-2 Business DaysNissan Armada Road Wheel Hub
Part Number: 40202-9FF0A$251.82 MSRP: $372.87You Save: $121.05 (33%)Ships in 1-3 Business Days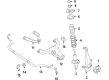
Nissan Armada HUB ASSY-ROAD WHEEL,FRONT
Part Number: 40202-1LA3B$350.95 MSRP: $535.63You Save: $184.68 (35%)Ships in 1-3 Business Days
Nissan Armada Road Wheel Hub
Part Number: 40202-ZR40A$277.06 MSRP: $422.87You Save: $145.81 (35%)Ships in 1-3 Business DaysNissan Armada Road Wheel Hub
Part Number: 40202-ZR00A$245.32 MSRP: $363.25You Save: $117.93 (33%)Ships in 1-3 Business Days
Nissan Armada HUB ASSY-ROAD WHEEL,FRONT
Part Number: 40202-7JA0A$287.49 MSRP: $438.78You Save: $151.29 (35%)Ships in 1-2 Business Days
Nissan Armada HUB ASSY-REAR AXLE
Part Number: 40202-7JA1A$300.99 MSRP: $459.38You Save: $158.39 (35%)Ships in 1-2 Business Days
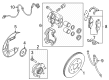
Nissan Armada Wheel Hub
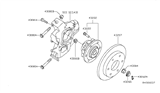
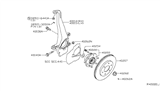
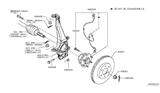
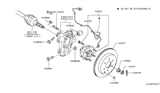
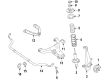
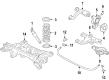
The Nissan Armada Wheel Hub is responsible for securing the wheels to the vehicle while allowing the wheel to rotate freely. This part lets the wheels rotate but not come off the car, ensuring safe steering control. The Wheel Hub is installed between the drive axle and the brake disc or brake drum. This component is fitted with stout bearings that minimize friction. Additionally, the Wheel Hub supports the weight of the vehicle and ensures the wheel does not become misaligned. An upper link bolts to a suspension bracket at one end and fastens to the wheel with studs at the other, creating a sturdy link. This link also carries other sensors, brake rotors, and calipers. There are three hub and bearing configurations documented. The first is an integral unit that combines the hub, bearings, and often an ABS sensor into a single non-serviceable assembly. The second is a design that can be pressed apart after removal of the steering knuckle. The third is a non-driven axle style with opposed, replaceable tapered roller bearings. Ensuring proper torque on the Wheel Hub bolts maintains reliability. Every Nissan Armada Wheel Hub is made from tough material to maintain performance and safety throughout daily Nissan Armada operation.
If you need any OEM Nissan Armada Wheel Hub, feel free to choose them out of our huge selection of genuine Nissan Armada Wheel Hub. All our parts are offered at unbeatable prices and are supported by the manufacturer's warranty. In addition, we offer quick shipping to have your parts delivered to your door step in a matter of days.
Nissan Armada Wheel Hub Parts Questions & Experts Answers
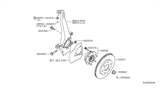
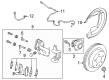
- Q: How to remove and replace the Wheel Hub and bearing assembly on the Nissan Armada?A:The hub and bearing package comes fully sealed and you must replace the whole unit whenever it's worn out or damaged. This method works on all new hubs at the front of the car, and for Armada models it works on the rear hub. For 4WD models and Armadas, to take out both the front and rear hub assemblies, you must remove the locking pin of the hub and gently turn the nut. First lay the car on jackstands after lifting it with a jack. Remove lug nuts from one wheel at a time and hand-tighten the nut on the transmission output shaft. After lifting or hoisting the car, disconnect the wheel speed sensor and pull off the brake disc from the hub. From the back of the knuckle, you can undo the hub retaining bolts with right tools attached to the driveaxle, saving you the effort of taking off the entire driveaxle. After that, take off the hub and wheel-cover plate from the inner frame of the wheel fork. Also detach the hub assembly from the drive axle splines if needed. To add a hub and bearing assembly, first clean the surfaces on three parts: knuckle, bearing flange, and knuckle bore. Slip the assembly into the knuckle's open end from the front or back, depending on whether you're working on a 4WD or full-size Armada (using multi-purpose grease as needed for the splines). Position the disc shield in place and put on new bolts, making sure they're very well fastened. After that, put in the sensor that checks wheel speed, brake rotor, bracket to hold up the caliper, and caliper. For 4WD cars, put the driveaxle/hub nut on last and tighten it, then add a new cotter pin. Afterward, put the wheel back on, let the vehicle down, and screw in all lug nuts.

Related Nissan Armada Parts
 Nissan Armada Lug Nuts
 Nissan Armada Wheel Stud
 Nissan Armada Wheel Bearing
 Nissan Armada Spindle
 Nissan Armada Wheel Seal
Browse by Year
2025 Wheel Hub 2024 Wheel Hub 2023 Wheel Hub 2022 Wheel Hub 2021 Wheel Hub 2020 Wheel Hub 2019 Wheel Hub 2018 Wheel Hub 2017 Wheel Hub 2015 Wheel Hub 2014 Wheel Hub 2013 Wheel Hub 2012 Wheel Hub 2011 Wheel Hub 2010 Wheel Hub 2009 Wheel Hub 2008 Wheel Hub 2007 Wheel Hub 2006 Wheel Hub 2005 Wheel Hub 2004 Wheel Hub