×
- Hello
- Login or Register
- Quick Links
- Live Chat
- Track Order
- Parts Availability
- RMA
- Help Center
- Contact Us
- Shop for
- Nissan Parts
- Nissan Accessories
My Garage
My Account
Cart
Genuine Nissan Frontier Differential Seal
- Select Vehicle by Model
- Select Vehicle by VIN
Select Vehicle by Model
orMake
Model
Year
Select Vehicle by VIN
For the most accurate results, select vehicle by your VIN (Vehicle Identification Number).
16 Differential Seals found


Nissan Frontier Seal-Oil,Rear Axle Shaft
Part Number: 43252-0W000$14.29 MSRP: $20.70You Save: $6.41 (31%)Ships in 1 Business Day


Nissan Frontier Drive Pinion Oil Seal
Part Number: 38189-P0117$21.25 MSRP: $30.02You Save: $8.77 (30%)Ships in 1-2 Business Days


Nissan Frontier Oil Seal
Part Number: 38342-N3100$15.89 MSRP: $21.90You Save: $6.01 (28%)Ships in 1-3 Business Days


Nissan Frontier Oil Seal
Part Number: 38189-AR00A$19.60 MSRP: $27.02You Save: $7.42 (28%)Ships in 1 Business Day


Nissan Frontier Drive Pinion Oil Seal
Part Number: 38189-8S100$26.85 MSRP: $37.02You Save: $10.17 (28%)Ships in 1-2 Business Days


Nissan Frontier Oil Seal
Part Number: 38189-C7012$24.80 MSRP: $34.18You Save: $9.38 (28%)Ships in 1-3 Business Days

Nissan Frontier Oil Seal
Part Number: 38189-C7023$18.14 MSRP: $25.00You Save: $6.86 (28%)Ships in 1-3 Business Days

Nissan Frontier Drive Pinion Oil Seal
Part Number: 38189-EB10A$26.85 MSRP: $37.02You Save: $10.17 (28%)Ships in 1-3 Business Days


Nissan Frontier Drive Pinion Oil Seal
Part Number: 38189-C7011$24.80 MSRP: $34.18You Save: $9.38 (28%)Ships in 1-2 Business Days


Nissan Frontier Oil Seal
Part Number: 38189-21G16$12.36 MSRP: $17.03You Save: $4.67 (28%)Ships in 1-3 Business Days


Nissan Frontier Drive Pinion Oil Seal
Part Number: 38189-C7010$24.80 MSRP: $34.18You Save: $9.38 (28%)Ships in 1-3 Business Days


Nissan Frontier Oil Seal
Part Number: 38189-P0116$21.25 MSRP: $30.02You Save: $8.77 (30%)Ships in 1 Business Day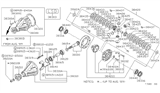
Nissan Frontier Oil Seal
Part Number: 38189-C7021$18.14 MSRP: $25.00You Save: $6.86 (28%)Ships in 1-3 Business Days
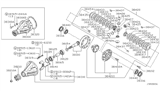
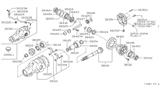
Nissan Frontier Differential Seal
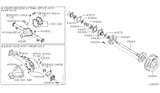
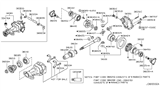
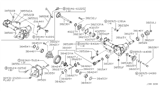
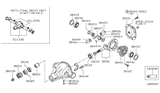
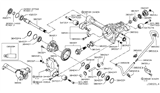
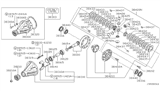
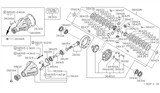
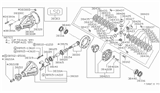
The Nissan Frontier Differential Seal prevents leaks by preventing dirt from entering and keeping gear oil inside the axle housing to allow for smooth power splitting in the truck's differential. The Differential Seal is a seal that is located at the pinion and axle shafts and is designed to hold the 75W-90 lubricant that creates a film to protect the differential gears in the turning corners from heat and friction. Many Frontier generations come with either open or limited slip differentials, and in either case the Nissan Differential Seal prevents fluid loss that would cause noisy or binding operation. The open unit splits torque equally. The limited slip uses clutches and springs to send extra power to the wheel that has grip. Both need a healthy Differential Seal so the internals can bathe in oil. Earlier models had a simple nitrile rubber build. Later trucks came with improved synthetic rubber mixes that cope with higher temperatures and resist swelling. The Differential Seal press fit installation method and shape were not changed much. Regularly inspecting your equipment for sweat marks and replacing it when necessary saves money on replacements and ensures your Nissan Frontier drivetrain can be maneuvered with confidence.
If you need any OEM Nissan Frontier Differential Seal, feel free to choose them out of our huge selection of genuine Nissan Frontier Differential Seal. All our parts are offered at unbeatable prices and are supported by the manufacturer's warranty. In addition, we offer quick shipping to have your parts delivered to your door step in a matter of days.
Nissan Frontier Differential Seal Parts Questions & Experts Answers
- Q: How to replace the differential seal and perform related tasks on a Nissan Frontier's differential assembly?A:Put the jackstands on your vehicle, lift it up, then safely support and block the other wheels to stop the car from moving before you remove its front or rear wheels. At the front or back of the car, undo the lug nuts for the wheels, use jackstands to lift safely, block the other wheels first. Separate the driveshaft from its connection at the companion flange, then find a safe spot to tie it down. Twist the pinion a few turns by hand. Then measure how much torque the inch-pound torque wrench requires to turn the pinion. Record the reading for future use. Note how the pinion flange connects to the shaft, and count the thread parts showing on the shaft. Clamp down a flange holding tool or chain wrench to stop the companion flange from moving when you take out the self-locking pinion nut. Take out the nut with the pinion and let the flange slide down, using a two-jaw puller when needed but never strike or pry. Melt the old seal from its joint and throw it away. Coat the lips of the new seal with wheel bearing grease and push the greasy seal into place, pressing evenly with a seal install tool or large socket to ensure it fits directly and goes fully into the housing. Push the pinion flange into position by hand with marks on it lined up, tighten the pinion nut carefully to move the flange into place without using a hammer. Put a bead of RTV sealant around the exposed splines in the center of the flange, to keep oil inside. Then install and tighten the pinion nut until it shows the number of threads from before. Take small torques in stages to rotate the pinion, then increase pressure on the nut until your measurements fall in line with earlier results without dragging on the new oil seal. Keep tightening until the rotational torque goes up 5 in-lbs past the earlier mark, ensuring the preload falls within specification. When the maximum nut rotation doesn't reach the desired preload, take the differential apart and put in a fresh, built-in spacer. Put everything back where it was, applying the specified amount of force to every connecting screw to match factory settings. For 4WD models, you'll need two tools: one to firmly hold the companion flange still while you use another tool to loosen and take out the self-locking pinion nut. After removing the nut and flange, further assist with a two-jaw puller if the flange won't come out easily. Take the old seal out, lubricate both edges of the new seal, press wheel bearing grease inside the seal, and push it smoothly into place. Put the pinion flange in place, tightening the pinion nut when needed. Add sealant to both splines and bolt on the pinion nut while making sure you meet the proper torque. Reconnect the driveshaft to the pinion flange.

Related Nissan Frontier Parts
 Nissan Frontier Coolant Temperature Sensor
 Nissan Frontier Axle Shaft
 Nissan Frontier Differential
 Nissan Frontier CV Joint Companion Flange
 Nissan Frontier Differential Bearing
Browse by Year
2024 Differential Seal 2023 Differential Seal 2022 Differential Seal 2021 Differential Seal 2020 Differential Seal 2019 Differential Seal 2018 Differential Seal 2017 Differential Seal 2016 Differential Seal 2015 Differential Seal 2014 Differential Seal 2013 Differential Seal 2012 Differential Seal 2011 Differential Seal 2010 Differential Seal 2009 Differential Seal 2008 Differential Seal 2007 Differential Seal 2006 Differential Seal 2005 Differential Seal 2004 Differential Seal 2003 Differential Seal 2002 Differential Seal 2001 Differential Seal 2000 Differential Seal 1999 Differential Seal 1998 Differential Seal