×
- Hello
- Login or Register
- Quick Links
- Live Chat
- Track Order
- Parts Availability
- RMA
- Help Center
- Contact Us
- Shop for
- Nissan Parts
- Nissan Accessories
My Garage
My Account
Cart
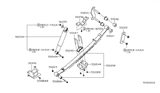
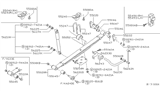
Genuine Nissan Frontier Leaf Spring
Leaf Helper Spring- Select Vehicle by Model
- Select Vehicle by VIN
Select Vehicle by Model
orMake
Model
Year
Select Vehicle by VIN
For the most accurate results, select vehicle by your VIN (Vehicle Identification Number).
28 Leaf Springs found


Nissan Frontier Rear Spring Assembly Leaf
Part Number: 55020-EB00A$479.71 MSRP: $677.55You Save: $197.84 (30%)Ships in 1-2 Business Days


Nissan Frontier Rear Spring Assembly Leaf
Part Number: 55020-EB15A$504.41 MSRP: $712.46You Save: $208.05 (30%)Ships in 1-3 Business Days
Nissan Frontier Rear Spring Assembly Leaf
Part Number: 55020-EB05A$481.94 MSRP: $680.70You Save: $198.76 (30%)Ships in 1-3 Business Days


Nissan Frontier Rear Spring Assembly Leaf
Part Number: 55020-8B411$259.84 MSRP: $367.00Limited AvailabilityYou Save: $107.16 (30%)Nissan Frontier Rear Spring Assembly Leaf
Part Number: 55020-EB10A$458.19 MSRP: $647.17You Save: $188.98 (30%)Ships in 1-3 Business DaysNissan Frontier Rear Spring Assembly Leaf
Part Number: 55020-8Z400$249.00 MSRP: $351.70You Save: $102.70 (30%)Ships in 1-3 Business DaysNissan Frontier Spring Assy-Leaf,Rear
Part Number: 55020-4S100$509.32 MSRP: $719.38You Save: $210.06 (30%)Ships in 1-3 Business DaysNissan Frontier Spring Assy-Leaf,Rear
Part Number: 55020-EB000$479.71 MSRP: $677.55You Save: $197.84 (30%)Ships in 1-3 Business DaysNissan Frontier Rear Spring Assembly Leaf
Part Number: 55020-8B502$303.53 MSRP: $467.69Limited AvailabilityYou Save: $164.16 (36%)Nissan Frontier Rear Spring Assembly Leaf
Part Number: 55020-9Z806$224.14 MSRP: $345.36Limited AvailabilityYou Save: $121.22 (36%)Nissan Frontier Rear Spring Assembly Leaf
Part Number: 55020-8B401$252.94 MSRP: $389.75Limited AvailabilityYou Save: $136.81 (36%)Nissan Frontier Spring Assy-Leaf,Rear
Part Number: 55020-EB010$458.19 MSRP: $647.17You Save: $188.98 (30%)Nissan Frontier Spring Assy-Leaf,Rear
Part Number: 55020-EB015$504.41 MSRP: $712.46You Save: $208.05 (30%)Ships in 1-3 Business DaysNissan Frontier Spring Assy-Leaf,Rear
Part Number: 55020-EB005$481.94 MSRP: $680.70You Save: $198.76 (30%)Ships in 1-3 Business Days

Nissan Frontier SPRING ASSY-LEAF,REAR
Part Number: 55020-9BU5D$352.53 MSRP: $497.92You Save: $145.39 (30%)Nissan Frontier SPRING ASSY-LEAF,REAR
Part Number: 55020-9BU3D$373.53 MSRP: $527.58You Save: $154.05 (30%)Nissan Frontier SPRING ASSY-LEAF,REAR
Part Number: 55020-9BU2D$390.66 MSRP: $551.79You Save: $161.13 (30%)Nissan Frontier SPRING ASSY-LEAF,REAR
Part Number: 55020-9BU4D$374.76 MSRP: $529.32You Save: $154.56 (30%)
| Page 1 of 2 |Next >
1-20 of 28 Results
Nissan Frontier Leaf Spring
The Nissan Frontier Leaf Spring helps to support the rear suspension. This helps to carry cargo and smoothen bumps on the road. The arc-shaped steel component is made up of multiple overlapping layers that support vertical load and also houses the axle below the chassis of the Nissan Frontier. A master leaf with rolled eyes acts as a central attachment point for every layer, while layers flex under load so that road shocks are absorbed efficiently and energy dissipation takes place throughout the stack. Damping from the friction between leaves is limited, which reduces rebound after a bump. Basically, the Leaf Spring serves a dual function, providing weight support and controlling axle location. The Leaf Spring assembly is connected directly to the frame or is linked by means of a shackle, which is a hinged link that permits additional movement when the suspension is compressed under heavy hauling or towing. The axle is solidly fixed to the frame with the Leaf Spring, which maintains alignment but is more rigid in its inter-leaf friction, causing a greater amount of vibration to be transmitted than a coil setup. This Leaf Spring design remains suited to Nissan Frontier trucks on Frontier pickups produced by Nissan that prioritize payload capacity.
If you need any OEM Nissan Frontier Leaf Spring, feel free to choose them out of our huge selection of genuine Nissan Frontier Leaf Spring. All our parts are offered at unbeatable prices and are supported by the manufacturer's warranty. In addition, we offer quick shipping to have your parts delivered to your door step in a matter of days.
Nissan Frontier Leaf Spring Parts Questions & Experts Answers
- Q: How to replace the Leaf Spring on Nissan Frontier?A:Loosen the rear wheel lug nuts, raise the rear of the vehicle and support it securely on jackstands placed underneath the frame rails. Block the front wheels to keep the vehicle from rolling off the stands. Remove the rear wheels. Support the axle with a floor jack placed under the axle tube and raise it slightly to take the weight of the axle. Remove the Shock Absorber lower mounting bolt. Remove the four U-bolt nuts and washers, the spring plate and the two Li-bolts. At the front end of the spring, remove the nut from the spring pin. On 1998 through 2000 2WD Frontier models also remove the bolt securing the pin to the frame bracket. Remove the pin. At the rear end of the spring, remove the spring shackle nuts. Remove the shackle plate and shackle. Remove the spring assembly. If the bushings at the ends of the spring are worn or deteriorated, an automotive machine shop or dealer service department can press the old ones out and press new ones in. The upper shackle bushings can be replaced without the use of special tools. Place the spring in position and install the front mounting pin and nut, but don't tighten the nut yet. If you're working on a1998 through 2000 2WD Frontier, install the pin-to-frame bolt, tightening it to the torque. Raise the rear of the spring into position and install the shackle, shackle plate and nuts. Don't tighten the nuts yet. Raise or lower the axle on the jack until it mates properly with the spring. Install the spring plate and U-bolts, then install the nuts and washers. Tighten the U-bolt nuts, in a criss-cross pattern, to the torque. Connect the lower end of the shock absorber to the spring plate. Install the washer and nut, tightening the nut to the torque. Install the wheel, lower the vehicle to the ground and bounce it a few times, then tighten the front mounting pin nut and the shackle nuts to the torque values. Tighten the lug nuts to the torque.

Related Nissan Frontier Parts


Browse by Year
2025 Leaf Spring 2024 Leaf Spring 2023 Leaf Spring 2022 Leaf Spring 2021 Leaf Spring 2020 Leaf Spring 2019 Leaf Spring 2018 Leaf Spring 2017 Leaf Spring 2016 Leaf Spring 2015 Leaf Spring 2014 Leaf Spring 2013 Leaf Spring 2012 Leaf Spring 2011 Leaf Spring 2010 Leaf Spring 2009 Leaf Spring 2008 Leaf Spring 2007 Leaf Spring 2006 Leaf Spring 2005 Leaf Spring 2004 Leaf Spring 2003 Leaf Spring 2002 Leaf Spring 2001 Leaf Spring 2000 Leaf Spring 1999 Leaf Spring 1998 Leaf Spring