×
- Hello
- Login or Register
- Quick Links
- Live Chat
- Track Order
- Parts Availability
- RMA
- Help Center
- Contact Us
- Shop for
- Nissan Parts
- Nissan Accessories
My Garage
My Account
Cart
Genuine Nissan Frontier Piston
Engine Pistons- Select Vehicle by Model
- Select Vehicle by VIN
Select Vehicle by Model
orMake
Model
Year
Select Vehicle by VIN
For the most accurate results, select vehicle by your VIN (Vehicle Identification Number).
82 Pistons found


Nissan Frontier Piston,W/Pin
Part Number: 12010-EA200$94.26 MSRP: $133.13You Save: $38.87 (30%)Ships in 1-3 Business Days
Nissan Frontier Piston W/Pin
Part Number: 12010-9BP0C$52.66 MSRP: $72.60You Save: $19.94 (28%)Ships in 1-3 Business Days

Nissan Frontier Piston W/Pin
Part Number: 12010-EA20B$94.26 MSRP: $133.13You Save: $38.87 (30%)Ships in 1 Business Day
Nissan Frontier Piston W/Pin
Part Number: 12010-EA21B$94.26 MSRP: $133.13You Save: $38.87 (30%)Ships in 1-3 Business DaysNissan Frontier Piston W/Pin
Part Number: 12010-9BP2C$43.45 MSRP: $59.90You Save: $16.45 (28%)Ships in 1-3 Business DaysNissan Frontier Piston W/Pin
Part Number: 12010-9BP0D$58.33 MSRP: $80.42You Save: $22.09 (28%)Ships in 1-3 Business DaysNissan Frontier Piston W/Pin
Part Number: A2010-EA01C$80.43 MSRP: $113.60You Save: $33.17 (30%)Ships in 1-3 Business DaysNissan Frontier Piston W/Pin
Part Number: A2010-EA02C$81.23 MSRP: $114.73You Save: $33.50 (30%)Ships in 1-3 Business DaysNissan Frontier Piston W/Pin
Part Number: A2010-EA09C$82.23 MSRP: $116.15You Save: $33.92 (30%)Ships in 1-3 Business DaysNissan Frontier Piston W/Pin
Part Number: 12010-EA22B$94.26 MSRP: $133.13You Save: $38.87 (30%)Ships in 1-3 Business DaysNissan Frontier Piston W/Pin
Part Number: 12010-9BP1C$46.06 MSRP: $63.50You Save: $17.44 (28%)Ships in 1-3 Business DaysNissan Frontier Piston,W/Pin
Part Number: 12010-EA201$94.26 MSRP: $133.13You Save: $38.87 (30%)Ships in 1-3 Business DaysNissan Frontier Piston W/PIN (O/S)
Part Number: 12010-EA071$51.99 MSRP: $71.67You Save: $19.68 (28%)Ships in 1-3 Business DaysNissan Frontier Piston,W/Pin
Part Number: 12010-EA202$94.26 MSRP: $133.13You Save: $38.87 (30%)Ships in 1-3 Business Days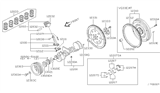
Nissan Frontier Piston W/Pin
Part Number: A2010-1Z111$51.99 MSRP: $71.67Limited AvailabilityYou Save: $19.68 (28%)Nissan Frontier Piston W/Pin
Part Number: A2010-8Z310$64.29 MSRP: $90.80You Save: $26.51 (30%)Ships in 1-3 Business DaysNissan Frontier Piston W/Pin
Part Number: A2010-1Z110$64.29 MSRP: $90.80You Save: $26.51 (30%)Ships in 1-3 Business DaysNissan Frontier Piston W/Pin
Part Number: A2010-EA01A$80.43 MSRP: $113.60You Save: $33.17 (30%)Ships in 1-3 Business DaysNissan Frontier Piston W/Pin
Part Number: A2010-EA02A$81.23 MSRP: $114.73You Save: $33.50 (30%)Ships in 1-3 Business DaysNissan Frontier Piston W/Pin
Part Number: A2010-EA09A$82.23 MSRP: $116.15You Save: $33.92 (30%)Ships in 1-3 Business Days
| Page 1 of 5 |Next >
1-20 of 82 Results
Nissan Frontier Piston
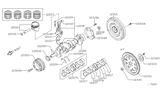
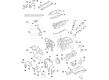
The Nissan Frontier Piston takes the combustion heat and turns it into motion of the crankshaft that ultimately drives the truck. This component is made of aluminum and provided with gas-tight sealing rings. The sliding of the component within the cylinder transmits the power formed by the expansion of gases to the crank directly, leading to the smooth transmission of torque. The early Frontier engines applied the trunk Piston type, which supports side forces. The oil rings were below the gudgeon pin. This was a layout applied well for petrol and diesel. Following the increase in power demands, the later Nissan trucks utilized slipper Piston versions that were lighter than before in an attempt to reduce reciprocating mass to enhance balance and fuel efficiency, particularly at high rpm. Turbocharged Frontier editions have also made use of cooling cavities fed by engine oil, which help the Piston take higher pressures and temperatures without durability compromise. Trim configurations focused on performance sometimes featured forged racing Piston construction. This combined lightweight with extra strength for extended operation at high speeds. Over the years, Nissan has made minor changes to the engines to make them efficient to convert combustion energy reliably so that every Nissan driver enjoys responsive acceleration and a long service life.
If you need any OEM Nissan Frontier Piston, feel free to choose them out of our huge selection of genuine Nissan Frontier Piston. All our parts are offered at unbeatable prices and are supported by the manufacturer's warranty. In addition, we offer quick shipping to have your parts delivered to your door step in a matter of days.
Nissan Frontier Piston Parts Questions & Experts Answers
- Q: How to remove the piston/connect rod assemblies on Nissan Frontier?A:Prior to removing the piston/connecting rod assemblies, remove the Cylinder Heads, the oil pan, the windage tray (3.5L engine only) and the oil pump pick-up. Use your fingernail to feel if a ridge has formed at the upper limit of ring travel. If carbon deposits or cylinder wear have produced ridges, they must be completely removed with a special tool. After the cylinder ridges have been removed, turn the engine upside-down so the crankshaft is facing up. Before the connecting rods are removed, check the side clearance (endplay) with feeler gauges. Slide them between the first connecting rod and the crankshaft throw until the play is removed. Check the connecting rods and caps for identification marks. Loosen each of the connecting rod cap nuts 1/2-turn at a time until they can be removed by hand. Remove the number one connecting rod cap and bearing insert. Slip a short length of plastic or rubber hose over each connecting rod cap bolt to protect the crankshaft journal and cylinder wall as the piston is removed. Remove the bearing insert and push the connecting rod/piston assembly out through the top of the engine. Repeat the procedure for the remaining cylinders. After removal, reassemble the connecting rod caps and bearing inserts in their respective connecting rods and install the cap nuts finger tight. Don't separate the pistons from the connecting rods.

Related Nissan Frontier Parts
 Nissan Frontier Crankshaft Pulley
 Nissan Frontier Crankshaft
 Nissan Frontier Crankshaft Gear
 Nissan Frontier Crankshaft Thrust Washer Set
 Nissan Frontier Alternator Bracket
 Nissan Frontier Belt Tensioner Bolt
Browse by Year
2024 Piston 2023 Piston 2022 Piston 2021 Piston 2020 Piston 2019 Piston 2018 Piston 2017 Piston 2016 Piston 2015 Piston 2014 Piston 2013 Piston 2012 Piston 2011 Piston 2010 Piston 2009 Piston 2008 Piston 2007 Piston 2006 Piston 2005 Piston 2004 Piston 2003 Piston 2002 Piston 2001 Piston 2000 Piston 1999 Piston 1998 Piston