×
- Hello
- Login or Register
- Quick Links
- Live Chat
- Track Order
- Parts Availability
- RMA
- Help Center
- Contact Us
- Shop for
- Nissan Parts
- Nissan Accessories
My Garage
My Account
Cart
Genuine Nissan Juke Bumper
Bumper Fascia- Select Vehicle by Model
- Select Vehicle by VIN
Select Vehicle by Model
orMake
Model
Year
Select Vehicle by VIN
For the most accurate results, select vehicle by your VIN (Vehicle Identification Number).
23 Bumpers found


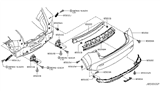
Nissan Juke Rear Bumper Fascia, Lower
Part Number: 850B2-3YM0A$118.13 MSRP: $182.02You Save: $63.89 (36%)Ships in 1-3 Business Days

Nissan Juke Front Bumper Fascia Kit
Part Number: FBM22-1KM5H$344.57 MSRP: $530.93You Save: $186.36 (36%)Ships in 1 Business Day


Nissan Juke Rear Bumper Fascia, Lower
Part Number: 850B2-3YW0A$199.75 MSRP: $307.78You Save: $108.03 (36%)Ships in 1-3 Business Days


Nissan Juke Front Bumper Lower Fascia
Part Number: 62026-1KA0A$196.68 MSRP: $303.05You Save: $106.37 (36%)Ships in 1-3 Business Days

Nissan Juke Rear Bumper Fascia
Part Number: HEM22-1KA4H$198.66 MSRP: $306.11You Save: $107.45 (36%)Ships in 1-2 Business DaysNissan Juke Rear Bumper FASCIA
Part Number: 85022-3YV4H$397.00 MSRP: $611.71You Save: $214.71 (36%)Ships in 1-3 Business DaysNissan Juke Front Bumper FASCIA
Part Number: 62022-3YV4H$359.94 MSRP: $554.60You Save: $194.66 (36%)Ships in 1-3 Business DaysNissan Juke Front Bumper Fascia, Lower
Part Number: 62026-3YW0B$516.17 MSRP: $795.33You Save: $279.16 (36%)Ships in 1-3 Business DaysNissan Juke Bumper Cover
Part Number: 62022-3YM4H$323.60 MSRP: $498.62You Save: $175.02 (36%)Ships in 1-3 Business DaysNissan Juke Front Bumper Fascia, Left
Part Number: 62026-3YM0A$213.60 MSRP: $329.13You Save: $115.53 (36%)Ships in 1-3 Business DaysNissan Juke Rear Bumper FASCIA
Part Number: 85022-3YM0H$341.22 MSRP: $525.76You Save: $184.54 (36%)Ships in 1-3 Business DaysNissan Juke Rear Bumper Fascia, Lower
Part Number: 850B2-1KA0A$110.12 MSRP: $169.67You Save: $59.55 (36%)Ships in 1-3 Business Days
Nissan Juke Front Bumper FASCIA
Part Number: 62022-4FT0H$376.14 MSRP: $579.56You Save: $203.42 (36%)Ships in 1-3 Business DaysNissan Juke Front Bumper Fascia, Lower
Part Number: 62026-3YW0A$632.81 MSRP: $975.05You Save: $342.24 (36%)Ships in 1-3 Business DaysNissan Juke Rear Bumper Face
Part Number: 85022-1KA4H$198.66 MSRP: $306.11You Save: $107.45 (36%)Ships in 1-2 Business DaysNissan Juke Front Bumper Fascia, Lower
Part Number: 62026-4FT0A$569.89 MSRP: $878.11You Save: $308.22 (36%)Ships in 1-3 Business DaysNissan Juke Rear Bumper Cover
Part Number: 85022-3YW0C$301.16 MSRP: $661.36You Save: $360.20 (55%)Ships in 1-2 Business DaysNissan Juke Bumper Cover
Part Number: 85022-3YW0A$301.16 MSRP: $585.14You Save: $283.98 (49%)Ships in 1-2 Business DaysNissan Juke Rear Bumper Cover
Part Number: 85022-4AU0B$379.76 MSRP: $585.15You Save: $205.39 (36%)Ships in 1-3 Business DaysNissan Juke Front Bumper Face
Part Number: 62022-1KM5H$344.57 MSRP: $530.93You Save: $186.36 (36%)Ships in 1 Business Day
| Page 1 of 2 |Next >
1-20 of 23 Results
Nissan Juke Bumper
Nissan Juke Bumper is in the front line of defense. When a slight collision occurs, the Bumper absorbs energy and spreads it out to protect the lights and sheet metal. Chiefly importantly, it protects the occupants. The Bumper on early Juke models echoed the automobile's past. A pair of simple chromed metal bars sat on brackets. However, design progress rapidly tucked the Bumper in closer to the body for sleeker looks. Unfortunately, this rapidly reduced real protection until 1970s 5-mph rules pushed it out again. Current Nissan offerings allow a sculpted plastic outer shell to hide a reinforced impact beam and foam or honeycomb energy absorber. This helps the outer shell take the impact while the cabin stays safe. Those buyers who are contemplating a replacement Bumper have noticed three materials. The Juke's lightweight aluminum design is not only nimble but also resists rust. Strong carbon steel will appeal to drivers who want strength, though added weight and propensity to corrode both come with it. The price of premium stainless steel offers similar toughness but better resistance to rust. All Bumpers, regardless of style, are essential for legality and protection in the Nissan lineup.
If you need any OEM Nissan Juke Bumper, feel free to choose them out of our huge selection of genuine Nissan Juke Bumper. All our parts are offered at unbeatable prices and are supported by the manufacturer's warranty. In addition, we offer quick shipping to have your parts delivered to your door step in a matter of days.
Nissan Juke Bumper Parts Questions & Experts Answers
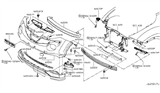
- Q: How to remove the front bumper from a Nissan Juke?A:To begin the removal process, firmly apply the handbrake, jack up the front of the vehicle, and support it securely on axle stands. For easier access inside the wheel arch, remove the front roadwheels. Next, prise out the centre pin and remove the four expanding plastic rivets from the top of the bumper and grille panel. Working under the front of the vehicle on each side, undo the screws and remove the two air guides. Continue under the front by prising out the centre pin and removing the three expanding plastic rivets located on the lower edge of the bumper. Remove the expanding rivet and carefully pull away the wheel arch trim on each side to release the retaining clips from the ends of the bumper, ensuring not to damage them as the bumper is removed. Undo the retaining bolt on each side that secures the bumper to the front wing, then reach up behind the bumper to disconnect the foglight wiring connectors. If applicable, disconnect the parking sensor wiring connector and headlight washer pipes. Have an assistant support one end of the bumper while unclipping the outer ends from the front wing panels, ensuring to note the locating slots. Finally, check that nothing is still connected to the bumper, and with the help of an assistant, draw the bumper forwards and remove it from the vehicle, taking care not to damage the wheel arch trims if it is not completely removed. For refitting, follow the reverse order of the removal steps.

Related Nissan Juke Parts
 Nissan Juke Emblem
 Nissan Juke Headlight
 Nissan Juke Wheel Cover
 Nissan Juke Spoiler
 Nissan Juke Sunroof
 Nissan Juke A/C Condenser Fan
 Nissan Juke License Plate
 Nissan Juke A/C Accumulator
 Nissan Juke HVAC Pressure Switch