×
- Hello
- Login or Register
- Quick Links
- Live Chat
- Track Order
- Parts Availability
- RMA
- Help Center
- Contact Us
- Shop for
- Nissan Parts
- Nissan Accessories
My Garage
My Account
Cart
Genuine Nissan Maxima Brake Master Cylinder
- Select Vehicle by Model
- Select Vehicle by VIN
Select Vehicle by Model
orMake
Model
Year
Select Vehicle by VIN
For the most accurate results, select vehicle by your VIN (Vehicle Identification Number).
21 Brake Master Cylinders found


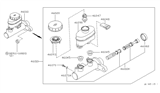
Nissan Maxima Brake Master Cylinder Assembly
Part Number: 46010-3TA0A$164.75 MSRP: $243.95You Save: $79.20 (33%)Ships in 1-3 Business Days


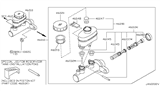
Nissan Maxima Cylinder Brake Master
Part Number: 46010-40U05$231.87 MSRP: $319.38You Save: $87.51 (28%)Ships in 1-2 Business Days


Nissan Maxima Brake Master Cylinder Assembly
Part Number: 46010-3L120$170.82 MSRP: $235.28You Save: $64.46 (28%)Ships in 1-2 Business Days


Nissan Maxima Brake Master Cylinder Assembly
Part Number: 46010-3L121$170.82 MSRP: $235.28You Save: $64.46 (28%)Ships in 1-2 Business Days
Nissan Maxima Brake Master Cylinder
Part Number: 46010-3TA1B$164.75 MSRP: $243.95You Save: $79.20 (33%)Ships in 1-3 Business Days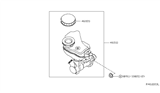
Nissan Maxima Cylinder Brake Master
Part Number: 46010-3TA0B$164.75 MSRP: $243.95You Save: $79.20 (33%)Ships in 1-3 Business DaysNissan Maxima Cylinder Brake Master
Part Number: 46010-40U10$226.12 MSRP: $319.38You Save: $93.26 (30%)


| Page 1 of 2 |Next >
1-20 of 21 Results
Nissan Maxima Brake Master Cylinder
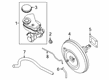
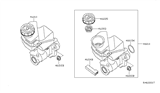
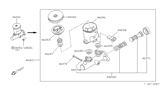
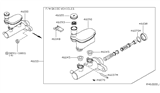
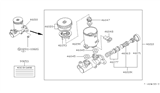
Brake Master Cylinder is one of the important subsystems of Nissan Maxima brake system that is recognized for its durability and output in different models of Nissan Maxima vehicles. This important assembly translates pressure from the driver's foot to hydraulic power thus enabling the brakes to work as they should. The master cylinder of the brake has two piston circuits that, offer a backup in case one circuit fails to respond adequately. Nissan Maxima brakes employ cast iron and aluminum Brake Master Cylinder, the two Brake Master Cylinder use different reservoir designations to reflect distinct servicing requirements. Both the integral and external reservoir options improve the fluid management while the external are prone to harm. Hence, the Brake Master Cylinder is of tremendous importance in that it provides hydraulic inputs for the brakes, and thus provides more effective braking and ber spending control for safety. Also the Brake Master Cylinder is applications with various generations of the car model Maxima so that the drivers are guaranteed the functionality of reproducing the part in many years. Indeed, specific features of the Brake Master Cylinder like its low weight, enhanced engineering made it to stand out to compete and be top-notch automotive solution for high performance bridging braking and accelerating systems. Lastly, the Brake Master Cylinder has established Nissan's concern in producing quality and new products that make the Maxima to stand out and be at the top position among the full-size sedans available in the market.
If you need any OEM Nissan Maxima Brake Master Cylinder, feel free to choose them out of our huge selection of genuine Nissan Maxima Brake Master Cylinder. All our parts are offered at unbeatable prices and are supported by the manufacturer's warranty. In addition, we offer quick shipping to have your parts delivered to your door step in a matter of days.
Nissan Maxima Brake Master Cylinder Parts Questions & Experts Answers
- Q: How to remove and install a Brake Master Cylinder on a Nissan Maxima?A:To remove the Brake Master Cylinder, first disconnect the cable from the negative battery terminal and unplug the electrical connector for the fluid level warning switch. Use a syringe to extract as much fluid as possible from the reservoir, placing rags under the fittings and preparing caps or plastic bags to cover the ends of the lines once disconnected, taking care to avoid spilling brake fluid, which can damage paint. Loosen the fittings at the ends of the Brake Lines where they enter the Brake Master Cylinder using a flare-nut wrench to prevent rounding off the flats. Pull the brake lines away from the Brake Master Cylinder and plug the ends to prevent contamination. Remove the nuts attaching the Brake Master Cylinder to the power booster and carefully pull the Brake Master Cylinder off the studs, discarding the old gasket between the Brake Master Cylinder and the power Brake Booster. For installation, place the Brake Master Cylinder over the studs on the power brake booster and tighten the nuts only finger-tight, ensuring a new gasket is used. Thread the brake line fittings into the Brake Master Cylinder, adjusting the position slightly for easier threading while avoiding stripping the threads. Securely tighten the mounting nuts and brake line fittings to the specified torque. Fill the Brake Master Cylinder reservoir with fluid, then bleed the lines at the Brake Master Cylinder by having an assistant depress the Brake Pedal and hold it down while loosening the fitting to allow air and fluid to escape. Tighten the fitting and allow the assistant to return the pedal to its rest position, repeating this process on both fittings until the fluid is free of air bubbles, followed by bleeding the remainder of the brake system. Finally, check the operation of the brake system carefully before driving the vehicle.

Related Nissan Maxima Parts
 Nissan Maxima Brake Booster
 Nissan Maxima Brake Fluid Pump
 Nissan Maxima Brake Proportioning Valve
 Nissan Maxima Brake Fluid Level Sensor
 Nissan Maxima Master Cylinder Repair Kit
Browse by Year
2023 Brake Master Cylinder 2022 Brake Master Cylinder 2021 Brake Master Cylinder 2020 Brake Master Cylinder 2019 Brake Master Cylinder 2018 Brake Master Cylinder 2017 Brake Master Cylinder 2016 Brake Master Cylinder 2014 Brake Master Cylinder 2013 Brake Master Cylinder 2012 Brake Master Cylinder 2011 Brake Master Cylinder 2010 Brake Master Cylinder 2009 Brake Master Cylinder 2008 Brake Master Cylinder 2007 Brake Master Cylinder 2006 Brake Master Cylinder 2005 Brake Master Cylinder 2004 Brake Master Cylinder 2003 Brake Master Cylinder 2002 Brake Master Cylinder 2001 Brake Master Cylinder 2000 Brake Master Cylinder 1999 Brake Master Cylinder 1998 Brake Master Cylinder 1997 Brake Master Cylinder 1996 Brake Master Cylinder 1995 Brake Master Cylinder 1994 Brake Master Cylinder 1993 Brake Master Cylinder 1992 Brake Master Cylinder 1991 Brake Master Cylinder 1990 Brake Master Cylinder 1989 Brake Master Cylinder 1988 Brake Master Cylinder 1987 Brake Master Cylinder 1986 Brake Master Cylinder 1985 Brake Master Cylinder