×
- Hello
- Login or Register
- Quick Links
- Live Chat
- Track Order
- Parts Availability
- RMA
- Help Center
- Contact Us
- Shop for
- Nissan Parts
- Nissan Accessories
My Garage
My Account
Cart
Genuine Nissan Maxima Lash Adjuster
Lash Adjuster Lifter- Select Vehicle by Model
- Select Vehicle by VIN
Select Vehicle by Model
orMake
Model
Year
Select Vehicle by VIN
For the most accurate results, select vehicle by your VIN (Vehicle Identification Number).
139 Lash Adjusters found


Nissan Maxima Lifter-Valve
Part Number: 13231-V5014$212.03 MSRP: $299.48You Save: $87.45 (30%)Ships in 1-3 Business Days
Nissan Maxima Lifter-Valve
Part Number: 13231-2Y810$54.07 MSRP: $74.53You Save: $20.46 (28%)Ships in 1-3 Business Days
Nissan Maxima Lifter-Valve
Part Number: 13231-2Y871$55.11 MSRP: $75.97You Save: $20.86 (28%)Ships in 1-2 Business Days

Nissan Maxima Lifter-Valve
Part Number: 13231-7S018$55.11 MSRP: $75.97You Save: $20.86 (28%)Ships in 1-3 Business Days
Nissan Maxima Lifter-Valve
Part Number: 13231-JA10A$30.84 MSRP: $42.51You Save: $11.67 (28%)Ships in 1-3 Business DaysNissan Maxima Lifter-Valve
Part Number: 13231-2Y818$55.11 MSRP: $75.97You Save: $20.86 (28%)Ships in 1-3 Business DaysNissan Maxima Lifter-Valve
Part Number: 13231-2Y873$55.95 MSRP: $77.13You Save: $21.18 (28%)Ships in 1-3 Business Days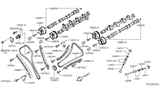
Nissan Maxima Lifter-Valve
Part Number: 13231-9HP0B$45.42 MSRP: $62.62You Save: $17.20 (28%)Ships in 1-3 Business DaysNissan Maxima Lifter-Valve
Part Number: 13231-AR010$33.36 MSRP: $45.98You Save: $12.62 (28%)Ships in 1-3 Business DaysNissan Maxima Lifter-Valve
Part Number: 13231-2Y812$58.93 MSRP: $81.23You Save: $22.30 (28%)Ships in 1-3 Business Days
Nissan Maxima Lifter-Valve
Part Number: 13231-7S020$54.10 MSRP: $74.58You Save: $20.48 (28%)Ships in 1-3 Business DaysNissan Maxima Lifter-Valve
Part Number: 13231-4W001$54.10 MSRP: $74.58You Save: $20.48 (28%)Ships in 1-3 Business DaysNissan Maxima Lifter-Valve
Part Number: 13231-9HP2C$29.95 MSRP: $41.28You Save: $11.33 (28%)Ships in 1-3 Business DaysNissan Maxima Lifter-Valve
Part Number: 13231-2Y802$52.39 MSRP: $72.22You Save: $19.83 (28%)Ships in 1-3 Business DaysNissan Maxima Lifter-Valve
Part Number: 13231-7S021$54.90 MSRP: $75.68You Save: $20.78 (28%)Ships in 1-3 Business DaysNissan Maxima Lifter-Valve
Part Number: 13231-7S016$55.95 MSRP: $77.13You Save: $21.18 (28%)Ships in 1-3 Business DaysNissan Maxima Lifter-Valve
Part Number: 13231-9HP1E$45.28 MSRP: $62.42You Save: $17.14 (28%)Ships in 1-3 Business DaysNissan Maxima Lifter-Valve
Part Number: 13231-9HP1A$45.10 MSRP: $62.17You Save: $17.07 (28%)Ships in 1-3 Business Days

| Page 1 of 7 |Next >
1-20 of 139 Results
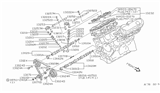
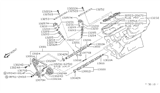
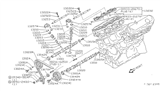
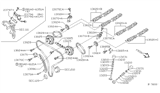
Nissan Maxima Lash Adjuster
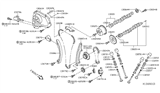
Nissan Maxima Lash Adjuster maintains precise valve movement by automatically adjusting the small gap between all cam lobes and the valve train, resulting in quieter, longer-lasting engine performance. The Lash Adjuster acts as a hydraulic tappet, as witnessed in older literature. Using pressurized oil, it swells an internal plunger that takes up clearance as the components heat, ensuring the driver never has to worry about manual shim adjustments. Early versions in older Maxima models employed basic solid lifters that required regular feeler-gauge adjustments, but once the superior reliability of an oil-fed design was demonstrated, the design changed to hydraulic Lash Adjuster units. More recent generations in modern Nissan versions now have a roller tip. This allows the cam to slide in and out with less friction while the core hydraulic chamber takes up the slack. The difference between these styles mainly comes down to maintenance and efficiency because a solid piece has a fixed gap, a hydraulic Lash Adjuster is self-compensating, and a roller hydraulic also trims energy loss. In any year, Nissan Maxima Lash Adjusters help reduce engine wear, smooth engine idle, and extend engine life. Additionally, the Lash Adjuster plays a crucial role in optimizing performance.
If you need any OEM Nissan Maxima Lash Adjuster, feel free to choose them out of our huge selection of genuine Nissan Maxima Lash Adjuster. All our parts are offered at unbeatable prices and are supported by the manufacturer's warranty. In addition, we offer quick shipping to have your parts delivered to your door step in a matter of days.
Nissan Maxima Lash Adjuster Parts Questions & Experts Answers
- Q: Should the camshaft and lash adjuster be thoroughly inspected before installation on the Nissan Maxima with DOHC engine?A:The camshafts and Lash Adjusters should always be thoroughly inspected before installation, and camshaft endplay should be checked prior to removal. Begin by detaching the cable from the negative terminal of the battery, then remove the valve covers. Next, remove the Timing Chains and camshaft sprockets; for 2004 and later models, unbolt the camshaft position sensor from the rear end of each cylinder bank if necessary, ensuring the working end of the sensor does not touch metal after removal. Mark the camshaft bearing caps from 1 to 4, indicating intake or exhaust with an "I" or "E," and mark arrows to show the front of the engine. Loosen the camshaft bearing caps in two or three steps, following the reverse order of the tightening sequence, while keeping the caps in order for reinstallation. Remove the bearing caps and camshafts, noting the camshaft markings for correct installation. Remove the Lash Adjusters and shims from the cylinder head, keeping the proper shim with each Lash Adjuster and maintaining their order for reinstallation. Inspect the camshaft and Lash Adjusters before proceeding with installation by placing the Lash Adjusters and shims back into their original locations. Apply moly-based engine assembly lubricant to the camshaft lobes and journals, then install the camshafts in their original positions with the dowel pins facing up and inline with the cylinder bank. Apply a bead of RTV sealant to the sealing surfaces of the No. 1 bearing cap(s), then install the bearing caps and bolts, tightening them hand tight before tightening the bearing cap bolts in several steps to the specified torque. Install the camshaft sprockets and timing chain, holding the camshafts with a suitable wrench while tightening the sprocket bolts to the specified torque. The remainder of the installation follows the reverse order of removal, and if any part of the valve train was replaced, check and adjust the valve clearance.

Related Nissan Maxima Parts

Browse by Year
2023 Lash Adjuster 2022 Lash Adjuster 2021 Lash Adjuster 2020 Lash Adjuster 2019 Lash Adjuster 2018 Lash Adjuster 2017 Lash Adjuster 2016 Lash Adjuster 2014 Lash Adjuster 2013 Lash Adjuster 2012 Lash Adjuster 2011 Lash Adjuster 2010 Lash Adjuster 2009 Lash Adjuster 2008 Lash Adjuster 2007 Lash Adjuster 2006 Lash Adjuster 2005 Lash Adjuster 2004 Lash Adjuster 2003 Lash Adjuster 2002 Lash Adjuster 2001 Lash Adjuster 2000 Lash Adjuster 1999 Lash Adjuster 1998 Lash Adjuster 1997 Lash Adjuster 1996 Lash Adjuster 1995 Lash Adjuster 1994 Lash Adjuster 1993 Lash Adjuster 1992 Lash Adjuster 1991 Lash Adjuster 1990 Lash Adjuster 1989 Lash Adjuster 1988 Lash Adjuster 1987 Lash Adjuster 1986 Lash Adjuster 1985 Lash Adjuster