×
- Hello
- Login or Register
- Quick Links
- Live Chat
- Track Order
- Parts Availability
- RMA
- Help Center
- Contact Us
- Shop for
- Nissan Parts
- Nissan Accessories
My Garage
My Account
Cart
Genuine Nissan Maxima Trunk Lock Cylinder
Back Door Cylinder- Select Vehicle by Model
- Select Vehicle by VIN
Select Vehicle by Model
orMake
Model
Year
Select Vehicle by VIN
For the most accurate results, select vehicle by your VIN (Vehicle Identification Number).
12 Trunk Lock Cylinders found


Nissan Maxima Trunk Lid Lock Cylinder Set
Part Number: H4660-62J02$45.93 MSRP: $69.07You Save: $23.14 (34%)Ships in 1-3 Business Days
Nissan Maxima Trunk Lid Lock Cylinder Set
Part Number: 90600-15F87$64.35 MSRP: $99.15Limited AvailabilityYou Save: $34.80 (36%)Nissan Maxima Trunk Lid Lock Cylinder Set
Part Number: 90600-15F27$64.35 MSRP: $99.15Limited AvailabilityYou Save: $34.80 (36%)Nissan Maxima Cylinder Set-Trunk Lock
Part Number: 90600-15F26$64.35 MSRP: $99.15Limited AvailabilityYou Save: $34.80 (36%)
Nissan Maxima Trunk Lid Lock Cylinder Set
Part Number: H4660-2Y900$116.76 MSRP: $179.91You Save: $63.15 (36%)Ships in 1-3 Business DaysNissan Maxima Trunk Lid Lock Cylinder Set
Part Number: 84660-50J26$45.93 MSRP: $69.07You Save: $23.14 (34%)Ships in 1-3 Business Days

Nissan Maxima Trunk Lock Cylinder
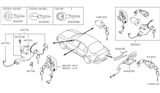
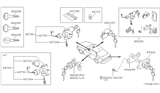
The rear compartment is secured by the Nissan Maxima Trunk Lock Cylinder, which also protects the contents from being stolen. This Trunk Lock Cylinder connects the external key slot to a latch inside the trunk lid, so you can simply turn it to lock the lid after loading tools, a spare tire, or weekend stuff. The Trunk Lock Cylinder prevents the cab from being loaded with cargo. That keeps it separate from the interior while also making it much harder to steal. This is great to have since the roomy space often tempts opportunists. Over the years, Nissan Maxima has relied on a simple, straightforward keyed Trunk Lock Cylinder rather than various complex styles and mechanisms. In other words, the company didn't complicate matters and made the working rather easy to utilize. Besides, every version comes with a metal barrel that rotates to move the latch rod, so it feels familiar and the operation is the same whether the car is early or late model. Consequently, every owner can derive a similar confidence when locking up their Nissan. Every Maxima driver must develop the habit of checking the Trunk Lock Cylinder of their car before walking away from it because forgetting to engage it will leave the equipment exposed.
If you need any OEM Nissan Maxima Trunk Lock Cylinder, feel free to choose them out of our huge selection of genuine Nissan Maxima Trunk Lock Cylinder. All our parts are offered at unbeatable prices and are supported by the manufacturer's warranty. In addition, we offer quick shipping to have your parts delivered to your door step in a matter of days.
Nissan Maxima Trunk Lock Cylinder Parts Questions & Experts Answers
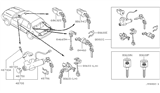
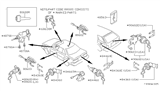
- Q: How to replace the rear trunk latch and trunk lock cylinder on Nissan Maxima?A:To lay your hands on the trunk lid latch; pull open the trunk, use a trim tool to lift the two black tabs which hold the lower part of the trunk lid inner panel popping out the upper part of the latch assembly and slid off the black trim piece covering the latch. It is also convenient to scribe a line around the latch assembly for a reference point to help in the installation. Turnoff the electrical connector then remove the link of the rod that links the catch and the lock cylinder. To do that you have to remove the two retaining bolts and then pull the latch thus disconnecting the linkage rod and then disconnect the electrical connector, remove the two mounting bolts. For the trunk lock cylinder, there is the trim panel within the trunk area, which requires the removal using the trim tool to raise the plastic buttons. Head up toward the trunk through the trunk lid access hole right at the right taillight; to pull out the lock cylinder rod from its peg and the lock's base plate. Remove the linkage rod or the electrical connector if there is any, and also, remove the mounting plate by using your hands, needle-nose pliers, or a screwdriver, depending on its design. Twist the lock in an anti-clock wise direction and pull it up from the trunk, while the putter is the reverse of the remover.

Related Nissan Maxima Parts
 Nissan Maxima Body Control Module
 Nissan Maxima Door Jamb Switch
 Nissan Maxima Car Key
 Nissan Maxima Door Hinge
 Nissan Maxima Antenna
 Nissan Maxima Door Latch Cable
Browse by Year
2003 Trunk Lock Cylinder 2002 Trunk Lock Cylinder 2001 Trunk Lock Cylinder 2000 Trunk Lock Cylinder 1999 Trunk Lock Cylinder 1998 Trunk Lock Cylinder 1997 Trunk Lock Cylinder 1996 Trunk Lock Cylinder 1995 Trunk Lock Cylinder 1994 Trunk Lock Cylinder 1993 Trunk Lock Cylinder 1992 Trunk Lock Cylinder 1991 Trunk Lock Cylinder 1990 Trunk Lock Cylinder 1989 Trunk Lock Cylinder 1988 Trunk Lock Cylinder 1987 Trunk Lock Cylinder 1986 Trunk Lock Cylinder 1985 Trunk Lock Cylinder